 |
||
 |
"World Leader in GPS Tracking Software" |
|
| GEOTelematic® Solutions | ||
 |
Frequently Asked Questions
Here is a list of commonly asked questions regarding the configuration of the GTS Enterprise (GTSE).
This list is continually growing, so check back periodically for updated questions and answers.
(Note: These solutions are intended for the GTS Enterprise and may not work as expected if applied to the open-source OpenGTS® version)
(Click here for the OpenGTS® FAQ page).
(Click here for the "Glossary of Terms" page).
A) Installation:
- What OS platforms are supported by GTSE?
- What is the basic overall architecture of GTSE?
- How do I install GTSE?
- Can I install GTSE on a virtual or shared server?
- What are the system hardware requirements to run GTSE?
- What version of the Java compiler/runtime can I use?
- How do I tell how much memory and disk space my Linux system has?
- How do I upgrade GTSE to the latest version?
- How do I check my GTSE installation to see if it was installed properly?
- How do I load the sample data into GTSE?
- How do I rebuild/redeploy the 'track.war' file?
- How do I install multiple versions of the 'track.war' file?
- How do I create the "sysadmin" Account?
- How do I reset the "sysadmin" password?
- What is the relationships between Accounts, Users, Devices, and DeviceGroups?
- How do I enable available optional table columns?
- How do I view messages sent by the CelltracGTS™/Pro application?
- There are several "
.conf" runtime configuration files, which one do I modify? - How do I assign default values to table columns when a new record is created?
- How do I enable the web-service feature?
- How do I export a table into a CSV file?
- How do I import Devices or Users into their corresponding table?
B) Configuration: Look-and-Feel
- How do I change the displayed language translation (ie. locale)?
- How do I change the look-and-feel of the web-interface?
- How do I change the displayed data/time formats?
- How do I change the displayed page title?
- How do I set the first page viewed after logging in (other than the main menu)?
- How do I specify the account/user in the URL to bypass the login page for a specific user?
- How do I enable the Speed Limit field on the Geozone Admin page?
- How do I increase the maximum number of vertices/points on the Geozone Admin page?
- How do I enable the Account Manager feature on the SysAdmin "System Accounts" page?
- How do I limit the number of devices that an Account can add?
- How do I prevent all accounts from adding any devices?
- How do I enable the "Events Per Second" value on the "System Info" page?
- How do I increase the number of selectable authorized device groups on the User Admin page?
- How do I enable the Driver Admin page?
- How do I enable the Trailer/Package/RFID Admin pages?
- How do I enable the 'sysadmin' Find Assigned Unique-IDs page?
- How do I include a URL/Link as a selectable option on the main menu page?
- How do I configure the mobile-friendly login link for mobile phones?
C) Configuration: Map
- How do I change the map provider?
- How do I configure the maps to use my Google Maps API for Work license?
- How do I change the default displayed map location and zoom when no pushpins are displayed?
- How do I change the speed settings for the pushpin colors displayed on the Device map?
- How do I change the maximum number of pushpins displayed on the map?
- How do I add my own custom pushpins?
- How do the Device/Fleet maps choose which pushpin icon to display for a specific event?
- How do I debug exactly how the GTS is choosing pushpins to display on the maps?
- How do I add additional items to the displayed pushpin information balloon?
- How do I change the Device Map 'Replay' button configuration?
- How do I change the map and report Calandars to show Monday as the first day of the week?
- How do I enable the address lookup on the Track and Geozone Map?
- How do I enable the battery level icon on the Device Map page?
- How do I enable the map auto-update feature?
- How do I remove the "route-line" between pushpins?
- How do I display Geozones on the Device Map page?
- How do I associate a pushpin with the displayed Geozones?
- How do I set the map configuration to fill the width of the browser frame?
- What other map configuration options are available?
- How do I download and serve my own local copy of "OpenLayers.js"?
- How do I support "https" when using OpenLayers?
- How do I enable a Group/Fleet map showing the last known occurrance of a specific status code?
- How do I install the MapQuest AppKey to use for "Nominatim" reverse-geocoding?
D) Configuration: Reports
- How do I remove certain reports from the report menu?
- How do I add/remove columns on the various reports?
- How do I configure "Idle Elapsed" time on the "Driving/Stopped Time" report?
- How do I enable the "Temperature Monitor" report?
- My device has Igniton On/Off events, why is it not showing on the "Ignition Detail Report"?
- How is fuel-economy and fuel-used calculated on the "Trip Report"?
- How do I enable exporting reports to an Excel Spreadsheet file (.xls)?
- How do I enable clicking on a report line to see a map of that location?
- How do I enable the periodic ReportJob feature?
- How do I enable the State-Line Border-Crossing (I.F.T.A) reports?
E) Configuration: Geocoding / Reverse-Geocoding
- How do I enable reverse-geocoding (ie. turning a latitude/longitude into an address)?
- How do I configure reverse-geocoding to use my Google Maps API for Work license?
- I've enabled reverse-geocoding, but why are my addresses still blank?
- My report addresses are fine, but why are the addresses in my email notifications blank?
- How do I enable geocoding (ie. turning an address into a latitude/longitude)?
- I've enabled geocoding, but clicking on the "Find Address" does not change the map?
- How do I enable the OpenCellID cell-tower lookup support?
- How do I enable using a Geozone description for the Reverse-Geocode address?
- How do I perform a bulk upload of Geozones from an external source?
- How do I set up the configuration to use an HTTP proxy?
F) Configuration: SMS/Email notification
- How do I configure outbound SMTP (EMail) service?
- How do I send outbound SMS messages from the GTS Enterprise?
- How do I enable Geozone arrive/depart email notification?
G) Tomcat:
- How do I stop/start Tomcat?
- How do I assign a host name to my login URL?
- How do I change the Tomcat listen port?
- How do I remove the ":8080" port and "/track/Track" requirements from the Login URL?
- How do I change the default session timeout value for Tomcat?
- How do I configure SSL (ie. "https") in Tomcat?
- I've copied my changed "track.war" file to Tomcat, but I don't see my changes?
- How do I configure Tomcat to run as a background service on Windows?
- How do I increase the amount of memory allocated to the Tomcat process?
- How do I start Tomcat with "
java.awt.headless=true"?
H) MySQL:
- How do I increase the number of allowed MySQL connections?
- How do I reset the MySQL 'root' password?
- How do I repair a MySQL reported error indicating an "Incorrect key file"?
- How do I backup my MySQL database?
- How do I copy the MySQL "gts" database to another computer?
- How do I run MySQL on a separate server?
- How do I enable MySQL "Connection Pooling" in GTSE?
- How do I convert a MySQL table to use the "InnoDB" engine?
- How do I fix the MySQL error "The total number of locks exceeds the lock table size"?
I) Events:
- Why does my event table contain events dated in the future, and how do I delete them?
- My device is sending events with invalid past-dated timestamps, how do I ignore them?
- My device is sending events with excessive speeds, how do I clear the excessive speed value?
- How do I count the number of old events in the EventData table?
- How do I trim/delete old events from the EventData table?
- What time format does the EventData "timestamp" field use?
J) Device Communication Server (DCS) modules:
- What is the best GPS tracking/telematic hardware?
- How many devices can GTSE track?
- What is a Device Communication Server, and why do I need one?
- How is GPS tracking/telematic data sent from the device to the server?
- How do I calculate the amount of data used by my tracking device?
- How do I set the "Server ID" field on the Device/Vehicle Admin page?
- How do I move a tracking device from one account to another?
- Why does my GPS-based odometer calculation not match my vehicles actual odometer?
- How do I create my own device communication server (DCS)?
- How do I stop/start a single device communication server (DCS) module to begin receving data?
- How do I stop/start all installed device communication server (DCS) modules?
- How do I monitor what device communication server (DCS) modules are currently running?
- How can I monitor the progress of a device communication server (DCS) process?
- How can I change the directory to which device communication server (DCS) log files are written?
- How can I change the directory to which device communication server (DCS) PID files are written?
- How can I send commands to my remote tracking device using SMS?
- When I click on the "Send" command, why does it say that my device may not support commands?
- I click the command "Send" and it says it was queued, but why does the device never respond?
- My tracking device should be transmitting, why don't I see events in the EventData table?
- My tracking device used to be transmitting, why am I no longer seeing events?
- My device is sending OBD/CANBUS data, why don't I see the data in the EventData table?
- My device is sending Temperature data, why don't I see the data in the EventData table?
- Why is my device reporting inaccurate locations, and movement while stopped?
- How accurate are the GPS receivers in tracking devices?
- Why do the TCP sessions in my DCS module always time-out?
- Will the "tk10x" DCS support my specific TK102/TK103 device?
- Why am I getting a "Read timeout" when using the "tk10x" DCS with a TK102 device?
- How do I use a Boost Mobile Motorola GPS phone with GTSE?
- How do I use Sanav devices with GTSE?
- How do I use the "Aspicore GSM Tracker" Nokia phone tracking software with GTSE?
- What are the various methods used for sending commands to the remote device?
- How do I configure a device communication server (DCS) to run as a background service on Windows?
- My device provides battery-voltage, why am I not seeing a battery-level value?
- Why is my device not receiving UDP packet acknowledgements sent by the server?
- How do I allocate more memory to a DCS module?
- I am seeing "UniqueID not found" in the DCS log files, what does this mean?
K) Event Notification Rules Engine (ENRE):
- Where can I find information on the ENRE rule selector syntax and functions?
- How do I enable the Rule and GeoCorridor Admin pages?
- How do I enable the ENRE Periodic Maintenance Notification?
- How do I assign a specific ENRE rule to a group of vehicles?
- How do I send rule email notifications to multiple recipients?
- How do I send a rule notification as an SMS text message?
- How can I separately select which list of Account/Device/Rule notification email recipients to combine?
- How do I enable the "Alert Monitor" and "Vehicle Alerts" page?
- How do I enable the "Fuel Register" feature?
- Why are no emails being sent for my rule notification?
- How do I set the "Work Hours" for checking within rule triggers?
- How do I enable the "Predefined Actions" feature on the Rule Admin page?
- How do I enable "Reminder Messages" in the Device Admin and Rule Admin?
- How do I keep the same rule from triggering for the same condition multiple times?
L) Troubleshooting:
- When attempting to build the project, why do I get a "Permission Denied" error?
- How do I fix the compile error "... package javax.mail does not exist"?
- How do I fix the login error "Error reading Account"?
- How do I fix the web-page error "'private.xml' contains syntax/parsing errors"?
- How do I fix the web-page Status 404 error "The requested resource (/track/Track) is not available"?
- How do I fix the web-page Status 404 error "The requested resource (/track/track) is not available"?
- After logging-in, selecting any menu option logs me out again.
- How do I fix the command-line error "Can't locate .../common.pl in @INC ..."?
- When running a command, how do I fix the error "ERROR: 'build/lib/tools.jar' not found!"?
- When running a command, how do I fix the error "Exception in 'main' java.lang.NoClassDefFoundError"?
- I'm seeing errors indicating "Too many open files", how do I increase the allowed number of open files?
- Why am I seeing errors indicating "java.net.UnknownHostException: HOST.example.com"?
- Why am I seeing the message "This report has reached it's record display limit ..." on some reports?
- How do I fix XML "[Fatal Error] ..." syntax errors?
- How do I fix Tomcat "java.lang.OutOfMemoryError: PermGen space" errors?
- How do I fix Java runtime "java.lang.OutOfMemoryError: unable to create new native thread" errors?
- How do I fix log file "Field does not exist" and "Colum 'X' not found" warnings?
- How do I enter command-line options on Windows?
A.1) What OS platforms are supported by GTSE? [_]
The GTS Enterprise can be installed, and run, on the following platforms:
- Linux (CentOS, RedHat Enterprise, Debian, Ubuntu, Gentoo, Fedora, etc)
- Mac OSX
- FreeBSD
- OpenBSD
- Windows
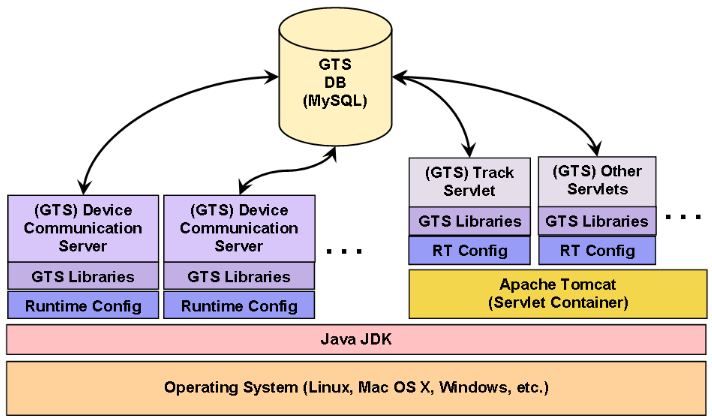
A.2) What is the basic overall architecture of GTSE? [_]
A.3) How do I install GTSE? [_]
The GTS Enterprise has the same installation requirements as OpenGTS® and can be
installed in the same manner as described by the OpenGTS® installation documentation. However,
the GTS Enterprise is provided with pre-compiled binaries, so the "build" step can be
skipped.
The document "OpenGTS_Config.pdf"
contains step by step information for installing OpenGTS® and the GTS Enterprise.
top
top
A.4) Can I install GTSE on a virtual or shared server? [_]
This depends on the features and support provided by the virtual or shared hosting service
provider. You will need to be able to install the software tools required for the
GTS Enterprise (Java,
Ant,
Tomcat,
MySQL, etc).
You should also have 'ssh'
access to the server to be able to remotely administer the GTS database and tables, restart
Tomcat when necessary, and monitor log files. Each virtual/shared hosting service provider
is different, so you will need to check with the specific provider to see if they support
the features you require. These are some of the questions you should ask:
top
- Is Linux available on the server? (what distribution? CentOS, Ubuntu, etc?)
- Does the server have at least 4Gb of available RAM? (8Gb+ preferred for larger systems)
- Does the server have at least 100Gb of available disk space? (300Gb+ preferred for larger systems)
- Is 'ssh' access allowed/provided to the server?
- Is 'root' access allowed/provided while on the server?
- Can other software packages be loaded as required (such as Java, Tomcat, Ant, etc.)?
top
A.5) What are the system hardware requirements to run GTSE? [_]
The following is the minimum recommended system configuration for running the
GTS Enterprise in a production environment:
top
- 2.8Ghz 4+ core CPU
- 8Gb+ RAM (add 4Gb+ for each DCS module you plan to run)
- 500Gb+ RAID-1+ hard disk array
- Gigabit Ethernet adapter (fixed IP address)
- 1.8Ghz CPU
- 2Gb RAM (1 DCS module only - UDP based)
- 80Gb hard disk
- Ethernet adapter (fixed IP address)
- CentOS 7+ (recommended)
- Ubuntu
/var/"
directory is sized large enough to handle the MySQL database ("/var/lib/mysql/"),
where the GTSE tables are stored (see also "disk space" size question/answer below).
top
A.6) What version of the Java compiler/runtime can I use? [_]
The GTS Enterprise now requires that at least Java-7 or Java-8 be used to compile and run the
various device communication server (DCS) and Tomcat. (the previously supported Java-6 runtime had
some significant runtime bugs, and was no longer publicly supported in Jan-2016).
top
top
A.7) How do I tell how much memory and disk space my Linux system has? [_]
On Linux, the following command will display the amount of memory available on your system:
On Linux, the following command will display the amount of disk space available on your system:
MySQL typically places its database files in the "
top
   $  free -m    (the "-m" indicates to display the memory units in megabytes)
                total       used       free     shared    buffers     cached
   Mem:          8061       6494       1566          0        573       4293
   Swap:         1213        100       1113
The above "total" column indicates the amount of total RAM ("8061" megabytes)
and the amount of swap memory ("1213" megabytes).
See the Linux 'man' page for the "free" command for more information.
On Linux, the following command will display the amount of disk space available on your system:
   $  df -m      (the "-m" indicates to display the memory units in megabytes)
   Filesystem           1M-blocks      Used Available Use% Mounted on
   /dev/sda6                79729     10518     65162  14% /
   tmpfs                     4031         1      4031   1% /dev/shm
   /dev/sda5                  248        27       209  12% /boot
   /dev/sda7                25592       173     24120   1% /tmp
   /dev/sda9               351075     98292    234950  30% /var
The output of the "df -m" command can vary greatly from system to system.
The "Available" column indicates the amount of available disk-space in megabytes,
and the "Mounted on" column indicates the disk mount partition.
See the Linux 'man' page for the "df" command for more information.
MySQL typically places its database files in the "
/var/lib/mysql/" directory, so you
will want to make sure that the partition containing the "/var/" directory is sized
large enough to handle the increasing table sizes as new devices are added, and new events are
recevied. The GTS installation is typically located in the "/usr/local/ directory,
so the partition containing this directory should also be large enough to handle the GTS installation
files and upgrades.
top
A.8) How do I upgrade GTSE to the latest version? [_]
Review the "
The general procedure for updating the GTS Enterprise to the latest version on a Linux system is outlined below, however, each system configuration is slightly different, so use the following information as a guideline only (there are many variables that can effect an upgrade, so adjust the following steps accordingly). The following assumes that the GTS installation will be placed into the parent directory "
top
CHANGELOG.txt" and "README.txt" files for any notes that may be important for the new version.The general procedure for updating the GTS Enterprise to the latest version on a Linux system is outlined below, however, each system configuration is slightly different, so use the following information as a guideline only (there are many variables that can effect an upgrade, so adjust the following steps accordingly). The following assumes that the GTS installation will be placed into the parent directory "
/usr/local/". For example purposes, the installed GTS version below will be
GTS_2.5.3-B15, and the user owning the GTS installation will be "opengts":
- Stop all running old device communication servers.
The "
psjava" command will display any currently running old DCS modules (Linux only):$ cd $GTS_HOME (this GTS_HOME is assumed to still to the old GTS installation) $ bin/psjava PID Parent L User Java class/jar ------ ------ - -------- ---------------------------------------------- 1273( 1) 1 opengts /usr/local/GTS_2.5.3-B15/build/lib/sanav.jar 19011( 1) 1 opengts org.apache.catalina.startup.BootstrapThe old DCS modules can be stopped using the "bin/runserver.pl -s DCSNAME -kill" command (for example), or you can use the standard Linux "kill -9 PID" command. (The "...Bootstrap" process is the running Tomcat, and can be left running for now) - Login to a command-shell as the "
root" user and unzip the latest GTS Enterprise version along side the previous version. The directory where the GTS installation is typically placed is "/usr/local/", and the "root" user will likely need to perform the unzip operation (Linux only).# cd /usr/local # unzip /tmp/GTS_2.5.3-B15.zip
On Windows it is recommended that the GTS Enterprise be installed in the following directory:> cd \GTS\ > unzip \DOWNLOAD_DIR\GTS_2.5.3-B15.zip
- As of GTS version
2.3.7-B15, an installation help script is provided to assist in performing the steps required for installation/upgrade. The "bin/installGtsUpgrade.sh" can perform the following steps (Linux only):- Setting the 'execute' bit on the various GTS script files
- Set the owner of the GTS installation directory
- Create the "
/usr/local/gts" symbolic link (if not already present) - Create the "
/usr/local/gts_vars.env" environment setup file (if not already present) - Update the GTS db tables
- Run CheckInstall (optional)
bin/installGtsUpgrade.sh" has the following available command-line options:-dir GTSDirectory: The GTS version installation directory.-user GTSUser: The user which should own the GTS installation.-link: Optional parameter to create the "/usr/local/gts" symbolic link. (Note: if the symbolic link already exists, then a message will be displayed and the command will stop)-db: Optional parameter to update the GTS db table columns-ci: Optional parameter to run CheckInstall at the end of the update. (Note: this option make take some time if there are over 1 million records in the tables, such as the EventData table. Please plan accordingly.)
-db" option - may take several minutes - possible hours - to complete):# rm -f /usr/local/gts (remove the old 'gts' symbolic link) # cd /usr/local/GTS_2.5.3-B15 # bin/installGtsUpgrade.sh -user opengts -dir /usr/local/GTS_2.5.3-B15 -link -db -ci
The CheckInstall output may indicate that the "track.war" file and various running DCS modules are not up to date. These can be taken care of in the steps below. - Log in to a command-shell as the "
opengts" user, and execute the following line to set theGTS_HOMEand other environment variables. To setGTS_HOMEproperly, the symbolic link "/usr/local/gts" must exist and be pointing to the latest installed version of the GTS. The command below is valid for Linux installations only (Note: there is a space after the "." and before the first "/") :$ . /usr/local/gts_vars.env
(this command can also be added to the "opengts" user ".bashrc" file to automatically perform this step each time "opengts" logs-in)
On Windows theGTS_HOMEenvironment variable will either need to be set manually, or it can be set automatically in your system settings. - Run the following "
bin/dbAdmin.pl" command (Linux only) to make sure the database tables are up to date with the latest available table columns:$ cd $GTS_HOME $ bin/dbAdmin.pl -tables=cak
On Windows, the command would be as follows:> cd %GTS_HOME% > bin\dbConfig.bat -tables:cak
- Restart Tomcat (as user "
opengts") and deploy the new "track.war" file (Linux only):$ $CATALINA_HOME/bin/shutdown.sh (wait at least 30 seconds here for Tomcat to stop) $ $CATALINA_HOME/bin/startup.sh (wait at least 15 seconds here for Tomcat to restart) $ cd $GTS_HOME $ ant track.deployOn Windows, stop and restart Tomcat as described on the Apache Tomcat website. - Restart any new device communication servers (as user "
opengts"). If your "bin/serverList" file is configured properly with your custom DCS modules, then the following commands will restart them (Linux only):$ cd $GTS_HOME $ bin/startServers.sh -start $ bin/psjava PID Parent L User Java class/jar ------ ------ - -------- ---------------------------------------------- 5678( 1) 1 opengts /usr/local/GTS_2.5.3-B15/build/lib/sanav.jar 19011( 1) 1 opengts org.apache.catalina.startup.Bootstrap
top
A.9) How do I check my GTSE installation to see if it was installed properly? [_]
The procedure for checking the GTS Enterprise installation is the same as described for OpenGTS®
in Section 3.2 of the "OpenGTS_Config.pdf" documentation.
The Linux command for checking the OpenGTS® installation is as follows:
top
cd $GTS_HOME
bin/checkInstall.sh
On Windows, this command would be run as follows:
cd %GTS_HOME%
bin\checkInstall.bat
This command will check several different aspects of the GTS Enterprise installation and display a summary
report of its findings. Any errors or warnings should be corrected, or at least understood, before
running the system in a production environment.
top
A.10) How do I load the sample data into GTSE? [_]
Additional documentation for installing sample 'demo' data into the database can be
found in the "
top
README.txt" file in the GTS Enterprise
"sampleData/" directory at "sampleData/README.txt".
top
A.11) How do I rebuild/redeploy the 'track.war' file? [_]
The "
[Note: It is HIGHLY RECOMMENDED that Tomcat be restarted after deploying a new "
top
track.war" file is the module deployed to Tomcat which includes all
of the runtime configuration files and code to display all of the web-interface pages.
If any of the runtime configuration files have been changed (ie. any of the ".conf",
".xml", or ".css" configuration files, etc), then the
"track.war" file should be rebuilt and redeployed. If only the configuration
files have changed (ie. no code changes have been made) then the following command will
rebuild the "track.war" file:
cd $GTS_HOME
ant track
The following command will redeploy the "track.war" file to the Tomcat
"webapps" directory:
cd $GTS_HOME
ant track.deploy
Or, you can copy the "track.war" directly to the Tomcat "webapps"
directory:
cd $GTS_HOME
cp build/track.war $CATALINA_HOME/webapps/.
At this point Tomcat should recognize that a new "track.war" has been
installed, and within a few seconds should make the new "track.war" file available to
the web-interface. After the redeployment, should you see any issues with Tomcat, examine
the "$CATALINA_HOME/logs/catalina.out" to determine what the issue may be.
If an out-of-memory error condition is indicated, the FAQ section at this
link will describe how to correct this error.
[Note: It is HIGHLY RECOMMENDED that Tomcat be restarted after deploying a new "
track.war" file in a production environment. This will allow Tomcat to
recover all resources used from the previous instance of "track.war", and
start fresh with the new instance.]
top
A.12) How do I install multiple versions of the 'track.war' file? [_]
The typical URL for accessing the login page is as follows:
http://login.example.com:8080/track/Track
(where "login.example.com" is your server domain name)
The name "track" listed above derives it's name from the name for
the war file, in this case "track.war".
This means that you can install multiple/different copies of the "track.war" file, as long as the name of
the war file is changed during the copy.
For example, if you copy the "track.war" file to Tomcat as follows:
cp $GTS_HOME/build/track.war $CATALINA_HOME/webapps/track1.war
You can then access this installed version with the following URL (wait a few seconds for
Tomcat to auto-deploy the new file):
http://login.example.com:8080/track1/Track
The above scenario can also be used to testing a new Track servlet before moving it into the production
area. For instance, the "/track1/Track" URL can be
used for testing, then when all is tested and works as expected, the the "track1.war"
file can be copied to "track.war" to enable the
"/track/Track" URL.
cd $CATALINA_HOME/webapps/
cp track1.war track.war
top
A.13) How do I create the "sysadmin" Account? [_]
The "sysadmin" Account is used to create other Accounts, and to view system-wide information.
The following commands will create the "sysadmin" Account:
[Note: Since the "sysadmin" Account should be limited to only performing System Administrative type functions, Devices typically should not ne added to the "sysadmin" Account.]
top
cd $GTS_HOME
bin/admin.sh Account -account=sysadmin -pass=PASSWORD -create
Where PASSWORD is your chosen password for the "sysadmin" Account.
Additional information can be found in the "OpenGTS_Config.pdf" documentation.
[Note: Since the "sysadmin" Account should be limited to only performing System Administrative type functions, Devices typically should not ne added to the "sysadmin" Account.]
top
A.14) How do I reset the "sysadmin" password? [_]
If the "sysadmin" password has been lost or forgotten, it can be changed on with the following ommand:
top
cd $GTS_HOME
bin/admin.sh Account -account=sysadmin -setPass=PASSWORD
Where PASSWORD is your chosen password for the "sysadmin" Account.
top
A.15) What is the relationships between Accounts, Users, Devices, and DeviceGroups? [_]
In the GTS system, an "Account" is a top-level unit of ownership, which can be assigned
Users, Devices, and DeviceGroups. The following briefly describes the differences between
Accounts, User, Devices, and DeviceGroups
An "Account" has the following attributes:
[Note: Since the "sysadmin" Account should be limited to only performing System Administrative type functions, Devices typically should not ne added to the "sysadmin" Account. As with other Accounts, any Devices which may be added to the "sysadmin" account cannot be viewed from other created Accounts.]
top
An "Account" has the following attributes:
- Must have a unique ID relative to all other Accounts managed in the GTS system
- Has the default User "admin" which has full authorization to view/edit/create items in the Account.
- May own a specific set of assigned "Devices".
- May create/own other "Users", and grant these Users specific access rights.
- Is created within a specific "Account".
- Must have an ID which is unique within the "Account" to which it belongs.
- Has authorization granted to it by the "admin" user to have certain access-rights within the login, such as specific reports, pages, etc.
- Can be assigned access to a specific DeviceGroup, restricting its access to only devices included in the assigned DeviceGroup.
- Typically represents a GPS tracked vehicle, or other remote telematic device.
- Belongs to a single Account.
- Can only be viewed within the Account to which it belongs.
- Can be assigned to one or more DeviceGroups.
- Typically represents a group of GPS tracked vehicle.
- Can contain zero or more "Devices".
- Belongs to a single Account.
- Can only be viewed within the Account to which it belongs.
[Note: Since the "sysadmin" Account should be limited to only performing System Administrative type functions, Devices typically should not ne added to the "sysadmin" Account. As with other Accounts, any Devices which may be added to the "sysadmin" account cannot be viewed from other created Accounts.]
top
A.16) How do I enable available optional table columns? [_]
Various tables within GTS provide for additional table columns which can be used for special
application requirements. These table columns can be enabled by setting specific property values
within one of the available "
Also Rebuild/Redeploy the "
top
.conf" files (ie. "config.conf", etc).
Here is a summary of the common types of available additional table columns:
- Account table additional columns:
startupInit.Account.AddressFieldInfostartupInit.Account.AccountManagerInfo
- Device table additional columns:
startupInit.Device.NotificationFieldInfostartupInit.Device.LinkFieldInfostartupInit.Device.BorderCrossingFieldInfostartupInit.Device.GeoCorridorFieldInfostartupInit.Device.MaintOdometerFieldInfo
- User table additional columns:
startupInit.User.AddressFieldInfo
- EventData table additional columns:
startupInit.EventData.AddressFieldInfostartupInit.EventData.GPSFieldInfostartupInit.EventData.CustomFieldInfostartupInit.EventData.CANBUSFieldInfostartupInit.EventData.ThermoFieldInfostartupInit.EventData.AnalogFieldInfostartupInit.EventData.ServingCellTowerDatastartupInit.EventData.NeighborCellTowerData
OpenGTS® Installation/Configuration Manual
After making any changes to the runtime configuration to define additional table columns, the
database tables themselves need to be updated to add the new columns to the existing tables.
The following Linux commands will update the tables with the newly added fields:
cd $GTS_HOME
bin/dbAdmin.pl -tables=ca
On Windows, the commands would be as follows:
cd %GTS_HOME%
bin\dbConfig.bat -tables:ca
(Note: this command make take some time to complete if there are over 1 million records in the tables,
such as the EventData table. Please plan accordingly.)
Also Rebuild/Redeploy the "
track.war" file, and
restart any running DCS modules, so that these modules will also
pick up the new table column changes.
top
A.17) How do I view messages sent by the CelltracGTS™/Pro application? [_]
The CelltracGTS™/Pro
Android phone tracking application supports including a message with impromptu
events sent to the server. To view messages sent by CelltracGTS™/Pro, perform the following steps:
- Make sure you are using the latest "
gprmc" DCS module from GTS version 2.5.4 or later (required to support messages). You can download the "gprmc" DCS module source from here (right-click and select "Save Link As...") and use this source module to replace the existing "Data.java" source module located at "src/org/opengts/war/gprmc/Data.java" (then rebuild/redeploy the "gprmc.war" file as necessary). - Messages received by the "
gprmc" DCS module are stored the EventData table column "driverMessage" which is part of the optional columns defined by the "startupInit.EventData.CustomFieldInfo" property. (Note: Most versions of the GTS Enterprise already have these optional columns enabled by default in the "custom_gts.conf" file, so this step may not be necessary). See the FAQ entry above for information on enabling the "CustomFieldInfo" optional EventData columns. - If you are using the GTS Enterprise
the "Driver Message Detail" report may already be enabled, however if it is not then
uncomment the property "
Domain.Reports.DriverMessageDetail=true" (or add if not already present) in the "config.conf" file. Then rebuild/redeploy "track.war". (Note: If using the open-source OpenGTS version, the "reports.xml" file will need to be modified and the report column "driverMessage" will need to be added to the "EventDetail" report).
A.18) There are several "
.conf" runtime configuration files, which one do I modify?
[_]
The various "
Note: The "
(Rebuild/Redeploy the "
top
.conf" files are used to establish certain runtime configuration
properties when running the various device communication server (DCS) modules, command-line tools,
or servlets running within Tomcat.
In most cases the property definitions in the ".conf" files will also override
property settings which may appear in the "private.xml" or "private/private_common.xml",
or also property settings in the DCS runtime configuration files in the "dcservers/" directory.
The ".conf" files are loaded in a specific order, with
subsequent loaded properties overriding previously loaded properties. The following list describes each
of the ".conf" files, in the order in which they are loaded:
default.conf- This is the initial config file loaded by command-line processes. (This config file should generally not be modified in most applications).webapp.conf- This is the initial config file loaded by Tomcat modules, such as "track.war", "events.war", etc. (this file is not loaded for command-line processes). (This config file should generally not be modified in most applications).common.conf- This config file establishes some very basic default configuration, then loads the various other runtime configuration files. (This config file should generally not be modified in most applications).system.conf- This config file sets a few client specific "SystemAccount." properties, such as the client id and name. For most applications, only the "ServiceAccount.Nameproperty should be modified in this file.custom.conf- This config file provides the default runtime configuration values for most applications. (This config file should generally not be modified in most applications)custom_gts.conf- This config file is typically provided by GeoTelematic® Solutions, Inc., with any specific configuration required by the client.config_old.conf- This is an optional config file that can be used when upgrading from a previous version of the GTSE, and is typically a copy of the "config.conf" from the previous version.config.conf- This file is the main customizable runtime configuration file for most customized system installations. Any required runtime configuration changes should be placed into this file. Runtime configuration properties placed into this file will override any configuration properties placed into any of the above ".conf" files.
config.conf" file. When upgrading
to a new GTS version, this modified "config.conf" file can then be copied to
"config_old.conf" in the new installed version of the GTS.
Note: The "
ant" build process makes copies of these runtime configuration files in the GTS installation
"build/" directory for purposes of packaging and creating the "track.war"
and other servlet files that are deployed to Tomcat. These runtime configuration files that are
copied as a result of the "ant" build process should not be modified as they will
later be overwritten by subsequent "ant" builds.
(Rebuild/Redeploy the "
track.war" file, and restart any running DCS modules, after making any changes to the runtime configuration files.)
top
A.19) How do I assign default values to table columns when a new record is created? [_]
When a new records is created, the method "
Alternatively, in most cases you can set/add a property configuration line into your "
(Rebuild/Redeploy the "
top
TABLE.setCreationDefaultValues()"
gets called in the selected "TABLE" whenever a new record is created,
in order to set the default values for certain fields in the new record. If you
wish to modify the code to set your own default values, you can do so in this method in the specific
table source module you wish to change. The table source modules can be found in the directory
"src/org/opengts/db/tables/".
Alternatively, in most cases you can set/add a property configuration line into your "
config.conf"
file with the following format:
TABLENAME.default.COLUMNNAME=COLUMNVALUE
Where "TABLENAME" is the name of the table (ie. "Account", "Device", etc),
"COLUMNNAME" is the name of the column in the table, and
"COLUMNVALUE" is the desired default value.
For instance to set the default Speed-Units, Distance-Units, and Volume-Units to metric, you would
set/add the following properties to your "config.conf" file:
Account.default.speedUnits=1
Account.default.distanceUnits=1
Account.default.volumeUnits=1
However, it is important to note that some fields, such as primary keys, cannot be set to default values in this manner.
(Rebuild/Redeploy the "
track.war" file, and restart any running DCS modules, after making any changes to the runtime configuration files.)
top
A.20) How do I enable the web-service feature? [_]
The GTSE supports a 'web-service' interface that allows other programs and tools to query and retrieve
data from the GTS system using an XML-based interface. The web-service feature is disabled by default. To enable
this feature, uncomment and set the following property in your "
(Rebuild/Redeploy the "
top
config.conf" file:
track.enableService=true
Then rebuild/redploy the "track.war" file. For more information on the request XML syntax and
a list of the available types of features supported in the web-service interface, please see the
Web Services Guide
(Rebuild/Redeploy the "
track.war" file, and restart any running DCS modules, after making any changes to the runtime configuration files.)
top
A.21) How do I export a table into a CSV file? [_]
The GTSE supports exporting tables to a CSV (comma-separated-value) file.
The first row of the CSV file will contain a list of all column names that are in the table, and
subsequent rows in the CSV file will contain the comma-separated data elements which match the position of
the column names indicated in the first row.
The following example will show how to export/dump the contents of the Device table to a CSV file:
top
The following example will show how to export/dump the contents of the Device table to a CSV file:
cd $GTS_HOME
bin/dbAdmin.pl -dir=. -dump=Device.csv
The "-dir=" option provides the name of the directory into which the exported "Device.csv"
file will be placed, and the "-dump=" option provides the name of the table to export/dump,
followed by the file type/extension to create. The above example exports the Device table to the file
"Device.csv" in the $GTS_HOME directory.
top
A.22) How do I import Devices or Users into their corresponding table? [_]
The GTSE supports importing rows into a table from a CSV (comma-separated-value) file that is formatted the same as
provided by the export/dump command.
The first row of the CSV file must contain a comma-separated list of columns that are to be loaded into the table.
The subsequent rows in the CSV file must contain the comma-separated data elements which match the position of
the column indicated in the first row to which the element will be assigned.
Not all columns in the table must be included, however, the table primary keys must be included, and must be
specified as the first few columns in each row.
The following example will show how to import/load a file "
Important Note:
Care must be taken when loading data rows into a table, as consistancy checks may not be performed on the loaded data. For example, you must ensure that the specified Account already exists when loading a Device entry.
top
The following example will show how to import/load a file "
Device.csv" into the Device table:
cd $GTS_HOME
bin/dbAdmin.pl -dir=. -load=Device.csv
The "-dir=" option provides the name of the directory where it can find the "Device.csv"
file, and the "-load=" option provides the name of the table to import/load,
followed by the file type/extension.
The above example imports the Device table entries in the file "Device.csv" into the Device table.
Important Note:
Care must be taken when loading data rows into a table, as consistancy checks may not be performed on the loaded data. For example, you must ensure that the specified Account already exists when loading a Device entry.
top
B.1) How do I change the displayed language translation (ie. locale)? [_]
This is best configured in the "
You can also add a pull-down language selection menu to the login page by setting the following property to
(Rebuild/Redeploy the "
top
config.conf" file by setting the following property
to one of the 2-letter language/country codes:
Domain.locale=de
The above example sets the displayed language to German.You can also add a pull-down language selection menu to the login page by setting the following property to
true:
Domain.Properties.accountLogin.showLocaleSelection=true
The language codes are specified in the "SupportedLocales" tag in the
"private.xml" file.
(Rebuild/Redeploy the "
track.war" file, and restart any running DCS modules, after making any changes to the runtime configuration files.)
top
B.2) How do I change the look-and-feel of the web-interface? [_]
There are a couple ways to change the look-and-feel in the GTSE.
The easiest way is to use the "Look and Feel Admin" from the "sysadmin" login to change the page titles,
banners, and colors.
The "
Using the "Look-and-Feel Admin" page:
private.xml" and "private/private_common.xml" files, as well as the various
CSS and JSP files could also be modified to create more comprehensive look-and-feel changes.Using the "Look-and-Feel Admin" page:
- When logging in as the "sysadmin", the new "System Admin" tab has a "Look-and-Feel Admin" option. When this option is selected, you are presented with a list of created look-and-feel host names, and an option for creating a new look-and-feel host name entry. The "Host ID" field must specify the host/domain name of the URL that you will be using to view the login page. For instance, in the URL "http://track.example.com:8080/track/Track", the host id/name would be "track.example.com". For this example, enter "track.example.com" in the "Host ID" field and click "New", then click "Edit" to edit this entry. The displayed page allows you to change the JSP template used to display the web-pages, specify the page title, specify an image URL to display as the page banner, as well as a few other options. After setting the desired options, and clicking "Change", hit reload on your test page to see the effect of the changes you've made. See the section "Look-and-Feel Administration" in the Basic GTS Enterprise Tutorial/Users Guide for additional information.
- The colors and fonts can be changed by modifying the various 'CSS' files located in
the directory "
war/track/css/". The various available 'JSP' files used to display the web-interface are located in the directory "war/track/jsp/", and and have the name format "loginSession*.jsp". Which one of these "loginSession" files is used to display the web-interface is controlled in "private/private_common.xml" by the "JSPEntries" tag specification, and the "WebPages" tag attribute "jsp". The "private.xml" and "private/private_common.xml" files have many configurable options that can also be modified to change the look-and-feel. Here is a partial list of look-and-feel features that can be configured within the "private.xml" and "private/private_common.xml" files:- Which login fields are available to the users.
- The type of main menu that will be presented (ie. icons/buttons, text, etc).
- Setting the map to grow to the size of the client browser window frame.
- Where the map controls are placed (ie. right or left).
- Which map control options are displayed within the map control area.
- The default displayed map latitude/longitude/zoom when no pushpins are available.
- Setting various configurable options on the available displayed web pages.
- Which web-pages are displayed/disabled to the user.
- etc.
private.xml" and "private/private_common.xml" files for more information.
(Rebuild/Redeploy the "track.war" file after making any changes to the runtime configuration files.)
B.3) How do I change the displayed data/time formats? [_]
This is best configured in the "
top
config.conf" file by setting the following properties:
Domain.DateFormat=yyyy/MM/dd
Domain.TimeFormat=HH:mm:ss
The following case-sensitive codes must be used to represent the date/time components:
yyyy- the 4-digit year (ie. "2012")yy- the 2-digit year (ie. "12")MM- the 2-digit month (ie. "07")dd- the 2-digit day of month (ie. "10")HH- the 2-digit hour of day, 24 hour clock (ie. "17")hh- the 2-digit hour of day, 12-hour clock (ie. "05")mm- the 2-digit minute (ie. "37")ss- the 2-digit second (ie. "54")aa- the AM or PM indicator (ie. "PM")
track.war" file, and restart any running DCS modules, after making any changes to the runtime configuration files.)
top
B.4) How do I change the displayed page title? [_]
This is best configured in the "
(Rebuild/Redeploy the "
top
config.conf" file by uncommenting/setting the following property:
Domain.PageTitle=Example Tracking Systems
Set the above "Example Tracking Systems" title to the value you wish to see as the page title.
Other properties in this configuration file can also be changed in a similar manner to change
other displayed attributes (such as the displayed Copyright, etc).
(Rebuild/Redeploy the "
track.war" file, and restart any running DCS modules, after making any changes to the runtime configuration files.)
top
B.5) How do I set the first page viewed after logging in (other than the main menu)? [_]
After logging in, the default first page viewed is the main menu. To set this to a different page
(such as the vehicle or fleet maps), create a user (such as the default user "admin"), then edit the
user to set the "First Login Page" pull-down menu to the desired default page to first display after
the user logs in.
top
top
B.6) How do I specify the account/user in the URL to bypass the login page for a specific user? [_]
The login URL can specify the desired account/user/password so that the account/users menu page
will automatically display when the URL is entered. For instance, assuming your domain name is
"
top
track.example.com" you can specify the account, user, and password, on the URL line
as follows:
http://track.example.com:8080/track/Track?account=ACCOUNT&user=USER&password=PASSWORD
It is important to note that when using this method the password is exposed in the URL string.
For public accounts which are to be accessed in this manner, you may wish to
set a blank password for the account/user by setting the password value to literal "*blank*" string
(ie. an asterisk [*], followed by the word "blank", followed by another asterisk [*]).
In this case the "&password=PASSWORD" specification can be omitted as follows:
http://track.example.com:8080/track/Track?account=ACCOUNT&user=USER
To use the default user, the "&user=USER" specification can also be omitted.
top
B.7) How do I enable the Speed Limit field on the Geozone Admin page? [_]
The "Speed Limit" field on the Geozone Map can be configured in the "
(Rebuild/Redeploy the "
top
config.conf" file by
setting the following properties:
# -- enable Geozone priority (and speed limit) fields
startupInit.Geozone.PriorityFieldInfo=true
# -- show speed limit field on Geozone Admin page
Domain.Properties.zoneInfo.showSpeedLimit=true
This first property configures the Geozone table to include the "speedLimitKPH" field.
After changing this property the Geozone table will need to be updated to make sure that it
not contains the "speedLimitKPH" (it is doesn't already have the field available).
The following Linux commands will update the tables with the newly added fields:
cd $GTS_HOME
bin/dbAdmin.pl -tables=ca
On Windows, the commands would be as follows:
cd %GTS_HOME%
bin\dbConfig.bat -tables:ca
The second property above indicates to the "Geozone Admin" page that the "Speed Limit" field
should be displayed in the control area. Note that the Geozone "speedLimitKPH" field might
only be used by the Event Notification Rules Engine when
testing for excess speed limit within a Geozone (the RuleFactoryLite does not currently
look at the Geozone speed limit field when attempting to determine excess speed).
(Rebuild/Redeploy the "
track.war" file, and restart any running DCS modules, after making any changes to the runtime configuration files.)
top
B.8) How do I increase the maximum number of vertices/points on the Geozone Admin page? [_]
The number of available vertices/points on the Geozone Map can be configured in the "
(Rebuild/Redeploy the "
top
config.conf" file by
setting the following properties:
# -- set maximum Geozone vertices supported by the Geozone table code
Geozone.maximumVertices=30
# -- set maximum Geozone vertices that can be displayed in the Geozone Admin page
Domain.Properties.zoneInfo.maximumDisplayedVertices=30
The above example will set the maximum number of Geozone vertices to 30.
The maximum number of Geozone vertices that can be supported is about 3200 (limited by the MySQL 'TEXT' datatype size for the Geozone 'vertices' column).
(Rebuild/Redeploy the "
track.war" file, and restart any running DCS modules, after making any changes to the runtime configuration files.)
top
B.9) How do I enable the Account Manager feature on the SysAdmin "System Accounts" page? [_]
The "Account Manager" feature allows specifically selected accounts to create other accounts
that have attributes similar to their own.
(Note that this feature is still experimental and may changed in a future release).
This feature can be enabled by setting/uncommenting the following property in the "
When editing accounts on the "sysadmin" user "System Accounts" page, the new "Is Account Manager" and "Account Manager ID" fields will be displayed. To set a specific account as an "Account Manager" set the "Is Account Manager" to "Yes", and enter an Account Manager ID. The Account Manager ID should be unique, and should not be changed once this account manager is allowed to create other accounts.
(Rebuild/Redeploy the "
top
(Note that this feature is still experimental and may changed in a future release).
This feature can be enabled by setting/uncommenting the following property in the "
config.conf" file:
startupInit.Account.AccountManagerInfo=true
Then run the following Linux commands to update the Account table:
cd $GTS_HOME
bin/dbAdmin.pl -tables=ca
On Windows, the commands would be as follows:
cd %GTS_HOME%
bin\dbConfig.bat -tables:ca
This command will add the Account Manager support fields to the Account tables.When editing accounts on the "sysadmin" user "System Accounts" page, the new "Is Account Manager" and "Account Manager ID" fields will be displayed. To set a specific account as an "Account Manager" set the "Is Account Manager" to "Yes", and enter an Account Manager ID. The Account Manager ID should be unique, and should not be changed once this account manager is allowed to create other accounts.
(Rebuild/Redeploy the "
track.war" file, and restart any running DCS modules, after making any changes to the runtime configuration files.)
top
B.10) How do I limit the number of devices that an account can add? [_]
To limit the number of devices that an Account can create, first set/uncomment the following property
in your "
(Rebuild/Redeploy the "
top
config.conf" file, and rebuild/redeploy "track.war:
Domain.Properties.deviceInfo.allowNewDevice=true
Then login as "sysadmin" and display the specific Account on the "System Accounts" page.
On this page you can specify the maximum number of devices that than account will be able
to create by entering a value in the "Maximum Devices" field. A '0' in this field allows
the account holder to create an unlimited number of devices. Note that this setting is
overridden if the "sysadmin" user logs in to an Account using the "Login" button on the
"System Accounts" page, allowing the System Admin to explicitly create additional devices.
(Rebuild/Redeploy the "
track.war" file, and restart any running DCS modules, after making any changes to the runtime configuration files.)
top
B.11) How do I prevent all accounts from adding any devices? [_]
You can disable the ability to add device, for all accounts, by setting/uncommenting the following property
in your "
(Rebuild/Redeploy the "
top
config.conf" file, and rebuilding/redeploying "track.war:
Domain.Properties.deviceInfo.allowNewDevice=false
Then only the "sysadmin" user will be able to create new Devices within a specific Account by
logging to the selected account using the "Login" button on the "System Accounts" page.
(Rebuild/Redeploy the "
track.war" file, and restart any running DCS modules, after making any changes to the runtime configuration files.)
top
B.12) How do I enable the "Events Per Second" value on the "System Info" page? [_]
The "Events Per Second" value on the "System Info" page attempts to query the total number of events
received in the last 24 hours, then divide this value by 86400 to come up with the average number
of events received per second (which may be a fractional value).
This feature can be enabled in the "
Please note that if the EventData table is quite large (ie. over a million records), under certain conditions (particularly when using MySQL on Windows, or when using MySQL InnoDB) the query can take quite some time to complete, giving the appearance that the web-interface has temporarily locked-up. In these cases, it would be highly recommended to keep this feature disabled.
(Rebuild/Redeploy the "
top
config.conf" file by uncommenting/setting the
following property:
Domain.Properties.sysAdminInfo.showEventsPerSecond=true
The "Number of Events" value can also be displayed by uncommenting/setting the following property:
Domain.Properties.sysAdminInfo.showEventCount=true
Important Note:Please note that if the EventData table is quite large (ie. over a million records), under certain conditions (particularly when using MySQL on Windows, or when using MySQL InnoDB) the query can take quite some time to complete, giving the appearance that the web-interface has temporarily locked-up. In these cases, it would be highly recommended to keep this feature disabled.
(Rebuild/Redeploy the "
track.war" file after making any changes to the runtime configuration files.)
top
B.13) How do I increase the number of selectable authorized device groups on the User Admin page? [_]
A User can be restricted to a specific Device/Vehicle group on the "User Admin" page using the "Authorized Group"
pull-down selection (Note that the name "Group" in this context can be customized on the "Account Admin"
page to fit your specific requirement. For instance, the name "Group" could be renamed to "Fleet").
In the default configuration, only a single group can be assigned to a User, however this can be changed
to allow up to 10 groups to be assigned to a User by setting the following property in the
"
(Rebuild/Redeploy the "
top
config.conf" file:
Domain.Properties.userInfo.authorizedGroupCount=MAX_GROUPS
Where "MAX_GROUPS" is a value between 1 and 10 (inclusive) representing the
number of group pulldown selections that should be available on the User Admin page.
(Rebuild/Redeploy the "
track.war" file after making any changes to the runtime configuration files.)
top
B.14) How do I enable the Driver Admin page? [_]
The Driver Admin page can be enabled by uncommenting/setting the following property in the
"
top
config.conf" file:
Domain.WebPages.DriverInfo=true
(Rebuild/Redeploy the "track.war" file after making any changes to the runtime configuration files.)
top
B.15) How do I enable the Trailer/Package/RFID Admin pages? [_]
The Trailer, Package, and RFID admin pages are typically only used for special cases when the tracking
device supports sending rfid tag in-view/out-of-view state. To enable these additional admin pages,
the following properties should be uncommented/set (or added if they are not already present) in the
"
top
config.conf" file:
Domain.WebPages.EntityAdmin_Trailer=true
Domain.WebPages.EntityAdmin_Package=true
Domain.WebPages.EntityAdmin_RFID_0=true
(Rebuild/Redeploy the "track.war" file after making any changes to the runtime configuration files.)
top
B.16) How do I enable the 'sysadmin' Find Assigned Unique-IDs page? [_]
The "Find Assigned Unique-IDs" page allows the System Administrator user ("sysadmin") to look up
specific mobile-ids (ie. IMEI#, ESN#, etc) to find out to which account/device they are currently assigned.
The "Find Unique-IDs" page is available from the "System Admin" menu table when logged into the "sysadmin" account.
To enable the "Find Assigned Unique-IDs" page, the following property must be uncommented/set
(or added if it is not already present) in the "
top
config.conf" file:
Domain.WebPages.SysAdminDevices=true
(Rebuild/Redeploy the "track.war" file after making any changes to the runtime configuration files.)
top
B.17) How do I include a URL/Link as a selectable option on the main menu page? [_]
The "
(Rebuild/Redeploy the "
top
private/private_common.xml" file provides the configuration for the displayed selectable
page menu options, and can be configured as well to include general links to external URLs.
The following "<Link..." tag can be included within a "<MenuGroup>" tag
section to display a selectable link within the chosen MenuGroup:
<Link url="http://www.example.com?a=${accountID}&u=${userID}" target="_blank">
<NavigationDescription>Example link</NavigationDescription>
<MenuDescription>Account/User example</MenuDescription>
<MenuHelp>Example Account/User link</MenuHelp>
</Link>
Note that the above URL includes the optional replacement variables "${accountID}" and
"${userID}", which will be replaced with the corresponding logged-in Account/User IDs.
(Rebuild/Redeploy the "
track.war" file after making any changes to the runtime configuration files.)
top
B.18) How do I configure the mobile-friendly login link for mobile phones? [_] (Since 2.6.3-B30+)
As of GTSE version 2.6.3-B30+, a mobile-friendly login page is now supported
(click here to see a demo).
The following steps will describe how this can be set up on your GTSE server:
top
- Using your DNS service provider, create a subdomain that you will use for your mobile-friendly login.
For this example, we will use "
mobile.example.com". This subdomain must point to the same IP address where your main GTS login is installed. You can use the command "nslookup mobile.example.com" to confirm that the IP address is correct. - Edit the "
config.conf" runtime configuration file and uncomment/set the "MobileDomain.Host" property (if present) to match your subdomain assigned in step #1 above:MobileDomain.Host=mobile.example.com
If the "MobileDomain.Host" property is not present in your "config.conf" file, edit the "private.xml" file and change "mobile.example.com" in the following line to match your subdomain assigned in step #1 above:<Property key="Domain.host">mobile.example.com</Property>
- Rebuild/Redeploy the "
track.war" file. - On your phone, use the following URL to view the mobile-friendly login page:
http://mobile.example.com:8080/track/Track
top
C.1) How do I change the map provider? [_]
The available map providers are configured in the file "
The following MapProvider configurations are currently supported, however please view the specific configuration in the file "
(Rebuild/Redeploy the "
top
private_common.xml", and they
can be referenced and enabled in the "config.conf" file by setting the following properties:
Domain.MapProvider.active=openLayers
Domain.MapProvider.key=
Specify the name of the active MapProvider (the above example configures the use of OpenLayers/OpenStreetMap),
and any authorization key that the specified MapProvider may require.The following MapProvider configurations are currently supported, however please view the specific configuration in the file "
private.xml"
for any additional requirements, such as access codes/keys, etc:
googleMaps- Google maps (may require access key and client code)openLayers- OpenLayers map tile engine displaying OpenStreetMap mapleaflet_osm- Leaflet map tile engine displaying OpenStreetMap map [v2.6.3-B60]leaflet_esri- Leaflet map tile engine displaying ESRI map (requires registration) [v2.6.3-B60]leaflet_mapbox- Leaflet map tile engine displaying MapBox map (requires access key) [v2.6.3-B60]
(Rebuild/Redeploy the "
track.war" file, and restart any running DCS modules, after making any changes to the runtime configuration files.)
top
C.2) How do I configure the maps to use my Google Maps API for Work license? [_]
When using Google Maps for commercial purposes, Google may require purchasing their
Google Maps API for Work license.
To configure the GTS to use your
Google Maps API for Work
license, uncomment/set the following properties in the
"
Click here to see how to configure Google reverse-geocoding using your Google Maps API for Work license.
(Rebuild/Redeploy the "
top
config.conf" file:
Domain.MapProvider.active=googleMaps
Domain.MapProvider.key=gme-GOOGLE_ID
Where "gme-GOOGLE_ID" is your assigned Google customer ID.
Click here to see how to configure Google reverse-geocoding using your Google Maps API for Work license.
(Rebuild/Redeploy the "
track.war" file, and restart any running DCS modules, after making any changes to the runtime configuration files.)
top
C.3) How do I change the default displayed map location and zoom when no pushpins are displayed? [_]
This is best configured in the "
(Rebuild/Redeploy the "
top
config.conf" file by setting the following properties:
Domain.MapProvider.default.zoom=4
Domain.MapProvider.default.lat=39.0000
Domain.MapProvider.default.lon=-96.5000
The default latitude/longitude and zoom centers over the US.
(Rebuild/Redeploy the "
track.war" file, and restart any running DCS modules, after making any changes to the runtime configuration files.)
top
C.4) How do I change the speed settings for the pushpin colors displayed on the Device map? [_]
The actual pushpin icon selection is determined in the JavaScript function "
top
evHeadingMarkerURL"
found in the JavaScript module located at "war/track/js/maps/jsmap.js". You can change the
chosen pushpin, based on the current speed, by modifying this function. To set the matching "Legend"
displayed on the Device map, you will need to modify the "Legend" tag section of the currently
active MapProvider.
top
C.5) How do I change the maximum number of pushpins displayed on the map? [_]
In most cases there is no actual limit on the number of pushpins that may be displayed on a map, however
there may be a "practical" limit on the number of pushpins that a user may be able to comprehend or assimilate.
The 'default' maximum number of pushpins that can be displayed on a map is set to 1000, however this
limit can be set lower, or higher, in the "
(Rebuild/Redeploy the "
top
config.conf" file with the following property:
Domain.MapProvider.map.maxPushpins.device=500
Domain.MapProvider.map.maxPushpins.fleet=500
Domain.MapProvider.map.maxPushpins.report=500
The above example properties will set the maximum number of displayed pushpins to 500 for the Device, Fleet,
and report maps.
If the selected date/time range happens to include more pushpins than the specified maximum, then the oldest
pushpins will be dropped first, leaving only the most recent pushpins displayed within the selected date/time range.
(Rebuild/Redeploy the "
track.war" file, and restart any running DCS modules, after making any changes to the runtime configuration files.)
top
C.6) How do I add my own custom pushpins? [_]
Custom pushpins can be added in the "
The "
The "
The "
the "
The following is a list of specially defined pushpin keys (as specified with the "
top
private.xml" file within a new "Pushpins" tag section.
For instance, assume you have a Car.png and Bus.png icon image available at the following URLs:
http://image.example.com/images/Car.png
http://image.example.com/images/Bus.png
Assuming that each image is 48 by 48 pixels in size,
you could add a new "Pushpins" tag section to the "private.xml" file as follows:
<!-- Custom Pushpins -->
<Pushpins baseURL="http://image.example.com/images/">
<Pushpin key="custom_car" icon="Car.png" iconSize="48,48" iconOffset="48,24"/>
<Pushpin key="custom_bus" icon="Bus.png" iconSize="48,48" iconOffset="48,24"/>
</Pushpins>
The "baseURL" represents the URL where the image files may be found.The "
key" attribute must specify a unique id representing the pushpin name.The "
icon" attribute is the name of the image file relative to the "baseURL".The "
iconSize" attributes represents the "Width,Height" of the image, andthe "
iconOffset" attributes represents the image "hotspot" that
will be centered over the corresponding map location.
The following is a list of specially defined pushpin keys (as specified with the "
key=" attribute)
that are used to indicate various types of events:
black- A general "BLACK" pushpin.brown- A general "BROWN" pushpin.red- A general "RED" pushpin.orange- A general "ORANGE" pushpin.yellow- A general "YELLOW" pushpin.green- A general "GREEN" pushpin.blue- A general "BLUE" pushpin.purple- A general "PURPLE" pushpin.gray- A general "GRAY" pushpin.white- A general "WHITE" pushpin.heading- This is the general pushpin displayed for most events generated by a GPS tracking device. This key will cause a red pushpin to display when the vehicle is stopped, yellow with directional arrows when moving slow, and green with directional arrows when moving faster.last- This pushpin is displayed as the last pushpin in the series of pushpins displayed for a vehicle/device on the Vehicle/Device Map page.fleet- This pushpin is displayed as the default representative pushpin for a Vehicle/Device on the Fleet Map page. The Vehicle/Device pushpin displayed on the Fleet Map page can be overidden by the specific pushpin selected for a specific Vehicle/Device on the Vehicle Admin page.
track.war" file, and restart any running DCS modules, after making any changes to the runtime configuration files.)
top
C.7) How do the Device/Fleet maps choose which pushpin icon to display for a specific event? [_]
The Device and Fleet maps go through a series of checks to determine which pushpin icon to display for a
specific event. The following describes how the pushpin icons are chosen for each event
(Note: The "
Device/Vehicle Map:
trackMap.XXXXXX" properties described below can be set in the
"private/private_common.xml" file, or they can be specified in the "config.conf" file
as "Domain.Properties.trackMap.XXXXXX=VALUE"):
Device/Vehicle Map:
- If the pushpin name "
all" has been defined, then choose the "all" pushpin icon. - If the current event status code has a selected pushpin name, then choose the selected status code pushpin icon.
- If the current event is the last in the displayed sequence, and property
"
trackMap.lastDevicePushpin.device" is "true", and a preferred pushpin icon has been selected for the specific device, then choose the device selected pushpin icon. - If the current event is the last in the displayed sequence, and the pushpin name
"
last" has been defined, then choose the "last" pushpin icon. - If the current status code represents a stop event, and the pushpin name "
stop" has been defined, then choose the "stop" pushpin icon. - If the current event speed is greater than zero, and the pushpin name "
moving" has been defined, then choose the "moving" pushpin icon. - If the pushpin name "
heading" has been defined, then choose the "heading" pushpin icon. - Finally, if the above fails to choose an icon, then choose the "
black" pushpin icon.
- If property "
trackMap.showFleetMapDevicePushpin" is defined as "false" then use the "Device/Vehicle Map" pushpin icon selection process described above. - If property "
trackMap.lastDevicePushpin.fleet" is "true", and a preferred pushpin icon has been selected for the specific device, then choose the device selected pushpin icon. [v2.5.3-B25+: If the selected device pushpin name is "statusCode", then the Status Code Admin will be queried for the displayed pushpin name, if defined]. - If the pushpin name "
fleet" has been defined, then choose the "fleet" pushpin icon. - If the pushpin name "
all" has been defined, then choose the "all" pushpin icon. - If the current event status code has a selected pushpin name, then choose the selected status code pushpin icon.
- If the current status code represents a stop event, and the pushpin name "
stop" has been defined, then choose the "stop" pushpin icon. - If the current event speed is greater than zero, and the pushpin name "
moving" has been defined, then choose the "moving" pushpin icon. - If the pushpin name "
heading" has been defined, then choose the "heading" pushpin icon. - Finally, if the above fails to choose an icon, then choose the "
black" pushpin icon.
C.8) How do I debug exactly how the GTS is choosing pushpins to display on the maps? [_]
There are many configuration options that can control how a pushpin is displayed on a map.
If you have added new pushpins, or have modified the configuration in order to change the
way pushpins are selected for the map, it is sometime useful to debug exactly what code path
is being used to select a pushpin for a map location.
In the "
(Note: as of version "
When enabled, the pushpin selection process will display log messages in the "
(You will likely want to turn off pushpin selection debugging when deploying to a production environment.)
top
In the "
webapp.conf" file, the following property can be set/uncommented to turn on
pushpin selection debugging:
DebugPushpins=true
Rebuild/Redeploy the "track.war" file to activate the pushpin
selection debugging.(Note: as of version "
v2.4.1-B02", you can also add the paramter "&DebugPushpins=true"
to the URL to temporarily turn on pushpin selection debugging for a specific login session).When enabled, the pushpin selection process will display log messages in the "
logs/TrackWar.log" file similar to the following:
[INFO_] Pushpin Selection - default: #19 "heading"
[INFO_] Pushpin Selection - Device (demo2): #19 "heading"
[INFO_] Pushpin Selection - 'fleet': #14 "fleet"
[INFO_] Pushpin Selection - 'all': #14 "all"
etc.
This will display the section of the code that chose a specific pushpin, the index of the
pushpin chosen, and the name of the pushpin (as of v2.4.1-B02).
The method "getPushpinIconIndex(...)" in the source module "EventData.java"
is where the pushpins are chosen based on the various criteria.
(You will likely want to turn off pushpin selection debugging when deploying to a production environment.)
top
C.9) How do I add additional items to the displayed pushpin information balloon? [_]
By default the pushpin "Information Balloon" displays the status code, latitude, longitude, speed, heading, and address.
Depending on the map type, the following information can also be displayed by setting the appropriate property
values in the "
top
config.conf" file:- Device/Vehicle Map:
OptionalEventFields.DeviceMap=EXTRA_FIELD_LIST
WhereEXTRA_FIELD_LISTis a comma-separate list containing one or more of the following:fuelLevel- displays the fuel level percent.fuelVolume- displays the fuel level volume.speedLimit- displays the Speed-Limit (if available).odometer- displays the Vehicle Odometer.batteryLevel- displays the Battery-Level percent.batteryVolts- displays the Battery-Volts.vBatteryVolts- displays the Vehicle Battery-Volts.inputMask- displays the Digital Input mssk.outputMask- displays the Digital output mssk.faultCodes- displays the OBD Fault Codes. (v2.4.2+)geozoneID- displays the current GeozoneID.driverID- displays the DriverID.driverDesc- displays the Driver name/description.driverBadge- displays the Driver Badge#. (v2.4.2+)driverLicense- displays the Driver License. (v2.4.2+)driverPhone- displays the Driver Phone#. (v2.6.3+)simPhone- displays the Device SIM Phone#. (v2.6.3+)temp0- displays the Event Temperature #0.temp1- displays the Event Temperature #1.deviceLink- displays the Device "linkURL" (requires Device "LinkFieldInfo" fields). (v2.4.3+)- In addition, you can add any one of the currently configured EventData table fields.
- Group/Fleet Map:
OptionalEventFields.GroupMap=EXTRA_FIELD_LIST
WhereEXTRA_FIELD_LISTis a comma-separate list containing one or more of the following:lastFuelLevel- displays the last Fuel Level percent.lastFuelVolume- displays the last Fuel Level volume.faultCodes- displays the accumulated OBD Fault Codes. (Since v2.4.2+)driverID- displays the last Driver ID.driverBadge- displyas the last Driver Badge#. (Since v2.4.2+)driverLicense- displays the last Driver License. (Since v2.4.2+)driverPhone- displays the last Driver Phone#. (v2.6.3+)deviceLink- displays the Device "linkURL" (requires Device "LinkFieldInfo" fields). (v2.4.3+)- In addition, you can add any one of the currently configured Device table fields.
track.war" file, and restart any running DCS modules, after making any changes to the runtime configuration files.)
top
C.10) How do I change the Device Map 'Replay' button configuration? [_]
The Device/Vehicle map "Replay" button allows replaying the pushpins for a route, in chronological order.
The following properties in the "
(Rebuild/Redeploy the "
top
config.conf" file control the pushpin "Replay" feature
for the active map provider:
Domain.MapProvider.replay.enable=true
Domain.MapProvider.replay.interval=1700
Domain.MapProvider.replay.singlePushpin=false
The "replay.enable" property control whether the "Replay" feature is enabled or not.
The "replay.interval" controls the 'delay' between displayed pushpins, in milliseconds.
The "replay.singlePushpin" control whether only the last pushpin is to be displayed
on the map during the replay, or if all pushpins, up to the last, will also be displayed.
(Rebuild/Redeploy the "
track.war" file, and restart any running DCS modules, after making any changes to the runtime configuration files.)
top
C.11) How do I change the map and report Calandars to show Monday as the first day of the week? [_]
This is best configured in the "
(Rebuild/Redeploy the "
top
config.conf" file by setting the following properties:
Domain.Properties.calendar.firstDayOfWeek=1
Set this value to '1' to set for Monday as the first day of the week, or '0' to set Sunday
as the first day of the week.
(Rebuild/Redeploy the "
track.war" file, and restart any running DCS modules, after making any changes to the runtime configuration files.)
top
C.12) How do I enable the address lookup on the Geozone Map? [_]
To enable the address lookup fields on the Track Map and Geozone Map, the "
Next, the following property must also be set in the "
(Rebuild/Redeploy the "
top
GeocodeProvider" must first
be configured in the "config.conf" file with the following properties:
Domain.GeocodeProvider.active=YourGeocodeProviderName
Domain.GeocodeProvider.key=
Specify the name of the active GeocodeProvider you will be using
(see the "private/private_common.xml" file for available GeocodeProvider options),
and any authorization key that the specified GeocodeProvider may require.
Make sure you comply with the terms-of-use for the geocode-provider which you are using.Next, the following property must also be set in the "
config.conf" file to enable
the "Center on address" field to display on the Geozone map page:
Domain.Properties.zoneInfo.enableGeocode=true
And to enable the "Find Address" field on the Track Map page, set the following property
as well:
Domain.Properties.trackMap.enableGeocode=true
(Note: this feature may not work with all Geocode-Providers, so your results may vary,
depending on the reverse-geocode provider that you are currently using)
(Rebuild/Redeploy the "
track.war" file, and restart any running DCS modules, after making any changes to the runtime configuration files.)
top
C.13) How do I enable the battery level icon on the Device Map page? [_]
The "percent" battery-level indicator icon can be enabled on the Device/Vehicle map by uncommenting
the following property in the "
(Rebuild/Redeploy the "
top
config.conf" file (or adding the property if it
does not already exist), and setting the value to "percent":
Domain.Properties.trackMap.showBatteryLevel=percent
A small battery with a percent (%) indication will then be displayed on the Device/Vehicle Map.
The battery-level "percent" value is obtained from the "batteryLevel" field in the latest
EventData record, and stored in the corresponding Device record "lastBatteryLevel" field.
Note that if the tracking device does not provide a battery-level value, or it cannot be accurately
calculated, then this battery percent indicator may always indicate a 0% value.
(For information on battery-voltage vs. battery-level, click here)
(Rebuild/Redeploy the "
track.war" file, and restart any running DCS modules, after making any changes to the runtime configuration files.)
top
C.14) How do I enable the map auto-update feature? [_]
The "auto-update" features allows the map to automatically refresh the displayed pushpins
when the user clicks the "Auto" button.
This feature can be enabled with the following property settings in your "
The following property controls how the map pan/zooms when the map is updated:
To automatically engage the auto-map-update when the map page is initially displayed, set the following property in the "
top
config.conf"
file:
Domain.MapProvider.auto.enable=true
Domain.MapProvider.auto.interval=60
Domain.MapProvider.auto.count=10
The "Domain.MapProvider.auto.enable" property enables the auto-update feature. A new
"Auto" button will be displayed on the map page allowing the user to click "Auto" to start the
map auto-update.
The update interval is specified with the "Domain.MapProvider.auto.interval" property
and "Domain.MapProvider.auto.count" specifies how many times the map should be refreshed
before the auto-update is stopped.The following property controls how the map pan/zooms when the map is updated:
Domain.Properties.trackMap.autoUpdateRecenter={zoom|last|no}
"zoom" pan/zooms the map so that all updated pushpins are displayed.
"last" pan/zooms the map to last vehicle location/pushpin.
"last" Does not pan/zoom the map between map updates.
To automatically engage the auto-map-update when the map page is initially displayed, set the following property in the "
private/private_common.xml" file, in the section for the
map page that you wish to have the auto-map-update automatically engaged
(ie. "TrackMapDevice" or "TrackMapFleet"):
<Property key="autoUpdate.onload">true</Property>
As of GTS version 2.3.9-B22, you can alternatively set the following property in your
"config.conf", or "custom_gts.conf" file to automatically engage the
auto-map-update feature for either the "TrackMapDevice" or "TrackMapFleet"
map pages:
Domain.WebPages.TrackMapDevice.autoUpdate.onload=true
Domain.WebPages.TrackMapFleet.autoUpdate.onload=true
(Rebuild/Redeploy the "track.war" file, and restart any running DCS modules, after making any changes to the runtime configuration files.)
top
C.15) How do I remove the "route-line" between pushpins? [_]
The route-line drawn between pushpins on the Device/Vehicle map can be removed by setting the
following property in your "
top
config.conf" file:
Domain.MapProvider.map.routeLine=false
Domain.MapProvider.map.showPushpins=true
The following property settings will display the route-line, but will only draw the last pushpin:
Domain.MapProvider.map.routeLine=true
Domain.MapProvider.map.showPushpins=false
(Rebuild/Redeploy the "track.war" file, and restart any running DCS modules, after making any changes to the runtime configuration files.)
top
C.16) How do I display Geozones on the Device Map page? [_]
If a device has an event pushpin which places it inside a pre-defined geozone, the geozone
can be displayed on the Device/Vehicle Map page by uncommenting/setting the following property
value in the "
The above property setting will display only geozones that are indicated by the "
To display Geozones that are "nearby", but do not have a pushpin located within the specific geozone, uncommented/set the following property in the "
(Rebuild/Redeploy the "
top
config.conf" file:
Domain.MapProvider.map.includeGeozones=true
(this property normally defaults to "true")The above property setting will display only geozones that are indicated by the "
geozoneID"
field of the event.
If a Geozone was created after the event was generated, the Geozone may not be displayed since the event
"geozoneID" field may not contain a reference to the Geozone. To display all geozones that any
given pushpin may be within, then also uncomment/set the following property in the "config.conf" file:
Domain.Properties.trackMap.showAllContainedGeozones=true
This will indicate to the map that it should look for and display all Geozones that surround any
displayed pushpin.To display Geozones that are "nearby", but do not have a pushpin located within the specific geozone, uncommented/set the following property in the "
config.conf" file:
Domain.Properties.trackMap.showNearbyGeozones=true
This will display any Geozone within 1000 meters of an event pushpin displayed on the map.
You can also replace the value "true" with the preferred radius, in meters (up to 5000 meters).
(Rebuild/Redeploy the "
track.war" file, and restart any running DCS modules, after making any changes to the runtime configuration files.)
top
C.17) How do I associate a pushpin with the displayed Geozones? [_] (Since v2.5.9-B15)
A pushpin can be associated with a Geozone on the Geozone Admin page.
The associated pushpin will be displayed with the Geozone on the Device/Vehicle Map page.
When the Geozone pushpin is clicked on the map it will display the Geozone's description in the displayed
information balloon.
To enable the "Pushpin" selection on the Geozone Admin page, uncomment/set the following property value in
the "
(Rebuild/Redeploy the "
top
config.conf" file:
Domain.Properties.zoneInfo.showPushpins=true
Or add/set the following property in the "private/private_common.xml" file, in the <Properties> tag section:
<Property key="zoneInfo.showPushpins">true</Property>
The "Pushpin" selection will then appear on the Geozone Admin page.(Rebuild/Redeploy the "
track.war" file, and restart any running DCS modules, after making any changes to the runtime configuration files.)
top
C.18) How do I set the map configuration to fill the width of the browser frame? [_]
The map can be configured to size itself to the full width of the browser frame window by setting the
following property in your "
(Rebuild/Redeploy the "
top
config.conf" file:
Domain.MapProvider.map.fillFrame=true
This property setting in "config.conf" enables the "map.fillFrame" property
setting for the active MapProvider in the "private/private_common.xml" file.
(Rebuild/Redeploy the "
track.war" file, and restart any running DCS modules, after making any changes to the runtime configuration files.)
top
C.19) What other map configuration options are available? [_]
The following is a partial list of other map configuration options that can also be set in the "
(Rebuild/Redeploy the "
top
config.conf" file:
Domain.Properties.trackMap.fleetDeviceEventCount=##
This property specifies the number of pushpins that are to be displayed for each vehicle/device on the group/fleet map page (where "##" specifies the number of pushpins to display per vehicle).Domain.Properties.trackMap.mapControlLocation={right|left}
This property specifies which side of the map the control (ie. date/time range, etc) are displayed.Domain.Properties.trackMap.showLocationDetails={true|false}
This property specifies whether the "Location Details" list is available for display on the map page.Domain.Properties.trackMap.detailAscending={true|false}
This property specifies whether the "Location Details" list displays the events in ascending order ("true") or descending order ("false").Domain.Properties.trackMap.sortableLocationDetails={true|false}
This property specifies whether the columns on the "Location Details" list are sortable. If set to "true", clicking on a column header will sort that column in ascending order, a second click will then sort the column in descending order.
private/private_common.xml" file.
(Rebuild/Redeploy the "
track.war" file, and restart any running DCS modules, after making any changes to the runtime configuration files.)
top
C.20) How do I download and serve my own local copy of "OpenLayers.js"? [_]
The "
(Rebuild/Redeploy the "
top
OpenLayers.js" JavaScript is used to display map tiles in the client browser when using the
OpenLayers/OpenStreetMaps MapProvider.
In some cases it may be more advantageous to download your own copy of the "OpenLayers.js" JavaScript
and serve it yourself from your own server. The following steps describe how to configure the GTS to use your own
copy of the "OpenLayers.js" JavaScript, rather than use the version pulled directly from the
OpenLayers.org server:
- Download (and unzip if necessary) a copy of the latest "
OpenLayers.js" from "http://www.openlayers.org/download/" and place it at the following location inside the GTS installation folder:
war/track/js/openlayers/OpenLayers.js
(create the "war/track/js/openlayers" directory if it does not already exist) - Modify the "
private/private_common.xml" file and change the "openlayers.js" property configuration in the "openLayers" MapProvider section. Change this line:
<Property key="openlayers.js">http://openlayers.org/api/OpenLayers.js</Property>
To this:
<Property key="openlayers.js">./js/openlayers/OpenLayers.js</Property>
- Rebuild/Redeploy the "
track.war" file to test this configuration.
OpenLayers.js" JavaScript, you may wish to periodically
check for updates from OpenLayers.org and download/install the latest version.
(Rebuild/Redeploy the "
track.war" file, and restart any running DCS modules, after making any changes to the runtime configuration files.)
top
C.21) How do I support "https" when using OpenLayers? [_]
The method for supporting "
top
https" may depend on the version of the GTS you have installed.
The easiest way is to check the "private/private_common.xml" file.
If you have a line that matches the following ...<Property key="openlayers.js">http://openlayers.org/api/OpenLayers.js</Property>Then changing the "
http" to "https" should fix this issue:<Property key="openlayers.js">https://openlayers.org/api/OpenLayers.js</Property>If your "
private/private_common.xml" file has a line matching the following:<Property key="useSSL">auto</Property>Then it should convert to using https automatically if the displaying page is also using https, however you can force it to use https by changing the "
auto" to "true":<Property key="useSSL">true</Property>(Rebuild/Redeploy the "
track.war" file, and restart any running DCS modules, after making any changes to the runtime configuration files.)
top
C.22) How do I enable a Group/Fleet map showing the last known occurrance of a specific status code? [_]
Additional mapping menu options can be configured to display the last known occurrance of a specific status code
for each device/vehicle in the fleet/group.
There should be 2 examples of this kind of map in the "
top
private/private_common.xml" file; "TrackMapPanic" and "TrackMapFleetIgnition".
The "TrackMapPanic" map will display the last known occurance of the "Waymark_0" status code, and
the "TrackMapFleetIgnition" map will display the last known occurance of either the "Ignition On" or "Ignition Off" status codes.
Either of these status code map types can be customized and configured in the "private/private_common.xml file.
To enable the display of one or both of these status code maps, uncomment/set the following properties in
the "config.conf" file:
Domain.WebPages.TrackMapPanic=true
Domain.WebPages.TrackMapFleetIgnition=true
(Rebuild/Redeploy the "track.war" file, and restart any running DCS modules, after making any changes to the runtime configuration files.)
top
C.23) How do I install the MapQuest AppKey to use for "Nominatim" reverse-geocoding? [_]
To use the "
After adding the above app-key to the "
Please note that the free version of the MapQuest reverse-geocoding API does not have some limits on the number of reverse-geocoding requests allowed per month.
top
nominatim" ReverseGeocodProvider, MapQuest requires that an AppKey now be included in the
reverse-geocoding request. A free app-key can be obtained from Mapquest at
"https://developer.mapquest.com/".
The "nominatim" reverse-geocoding can be configured to include your registered app-key by editing the
"private/private_common.xml" file and changing the following line ...
<Property key="reverseURL">http://open.mapquestapi.com/nominatim/v1/reverse?</Property>To this ...
<Property key="reverseURL"><![CDATA[
http://open.mapquestapi.com/nominatim/v1/reverse?key=YOUR_APP_KEY&
]]></Property>
Where "YOUR_APP_KEY" is replaced with the registered app-key obtained from MapQuest.
[don't forget to include the ampersand (&) at the end of your app-key]
After adding the above app-key to the "
nominatim" configuration, stop and restart all of the running DCS files.
Please note that the free version of the MapQuest reverse-geocoding API does not have some limits on the number of reverse-geocoding requests allowed per month.
top
D.1) How do I remove certain reports from the report menu? [_]
Reports are defined in the "
(Rebuild/Redeploy the "
top
reports.xml" file, and they are selected as available
report options in the "private/private_common.xml" file. For instance, the
"EventDetail" report is made available for user selection in the "Reports"
tag section of the "/private/private_common.xml" file as follows:
<Reports rtPropPrefix="Domain.Reports.">
<!-- device.detail -->
<Report rtKey="EventDetail" name="EventDetail">
<AclName>acl.report.eventDetail</AclName>
</Report>
...
The best place to remove specific reports from the user selection is in the "config.conf" file
by including a property that combines the above "rtPropPrefix" and "rtKey"
attributes as follows:
Domain.Reports.EventDetail=false
With the above property defined, the "EventDetail" report would no longer be available for selection
on the Report menu in the web-interface. While you may not wish to specifically disable the "EventDetail"
report, this same property specification can be used to disable any of the reports listed in the
"Reports" tag section in the "private/private_common.xml" file, such as
Domain.Reports.GeozoneDriving=false
Domain.Reports.EventDetailAll=false
Domain.Reports.DigitalInputDetailReport_Group=false
etc.
If the property specification does not already exist in the "config.conf" file, then
it can be added to this file to disable the desire report.
(Rebuild/Redeploy the "
track.war" file, and restart any running DCS modules, after making any changes to the runtime configuration files.)
top
D.2) How do I add/remove columns on the various reports? [_]
Reports are defined in the "
The OpenGTS_Config.pdf" installation/configuration document also contains a chapter on "Creating/Modifying Reports" that may contain helpful information as well.
(Rebuild/Redeploy the "
top
reports.xml" file. Within this file each report has
a set of "Column" tags that specify the columns that are to be displayed on the report.
For instance, the "EventDetail" report contains the following "Column"
definition section:
<Columns>
<Column name="index" />
<Column name="deviceId" />
<Column name="deviceDesc" />
<Column name="timestamp" />
...
The available column names that can be specified are listed in the "ReportLayout" tag
section for the corresponding report. See the comments included in the "reports.xml" file
for additional information.
The OpenGTS_Config.pdf" installation/configuration document also contains a chapter on "Creating/Modifying Reports" that may contain helpful information as well.
(Rebuild/Redeploy the "
track.war" file, and restart any running DCS modules, after making any changes to the runtime configuration files.)
top
D.3) How do I configure "Idle Elapsed" time on the "Driving/Stopped Time" report? [_]
The "Driving/Stopped Time Summary" report calculates idle time as the accumulated
elapsed time when ignition is on, but the vehicle is not moving. In order for this
report to calculate the idle time properly, it needs to know how to determine the
ignition state of the device. This ignation state indicator can be set on the
"Vehicle Admin" page by selecting the "Ignition Input" value which corresponds to
the method used by the device to indicate the ignition state. "ign" means that the
device sends an explicit "Ignition On" and "Ignition Off" status code event. The
values "0" through "7" are selected when the device uses the corresponding digital
input to indicate the ignition state.
On the "Vehicle Admin" page, select the appropriate "Ignition Input" value which corresponds to the way your device indicates ignition state, save the changes, then re-display the "Driving/Stopped Time" report.
top
On the "Vehicle Admin" page, select the appropriate "Ignition Input" value which corresponds to the way your device indicates ignition state, save the changes, then re-display the "Driving/Stopped Time" report.
top
D.4) How do I enable the "Temperature Monitor" report? [_]
The "Temperature Monitor" report displays the temperatures contained in the EventData
"
top
thermoAverage#" fields. To enable the "Temperature Monitor" report
will require that the EventData "thermoAverage#" fields be enabled,
as well as configuring the "Temperature Monitor" report to display on the Vehicle Detail report menu.
To enable the EventData "thermoAverage#" fields, the "ThermoFieldInfo"
optional fields must be configured as described here and here.
To configure the "Temperature Monitor" report to be a selectable option on the Vehicle Detail
report menu, the following property should be uncommented/set in the "config.conf" file:
Domain.Reports.EventThermo=true
(Rebuild/Redeploy the "track.war" file, and restart any running DCS modules, after making any changes to the runtime configuration files.)
top
D.5) My device has Igniton On/Off events. Why is it not showing on the "Ignition Detail Report"? [_]
The "Ignition Detail Report" is designed to show the ignition on and off times for the selected device.
However, the Device/Vehicle record must be configured to let the reporting system know how the device
reports ignition state. Some devices use one of the digital inputs to report ignition state, while
other will report a specific status code. The method used by the device to report ignition state must
be configured on the Device/Vehicle Admin page using the "Ignition Input" pull-down selection. If the
device sends a digital input state change to the server to indicate ignition state, then select the number
of the digital input from the pull down selection ('0' is the first digital input). If the device
reports an explicit "Ignition On" (status code
top
0xF401) and "Ignition Off" (status code
0xF403) status codes, then select the "ign" item from the "Ignition Input" pull-down
selection. Note that if "n/a" (ie. not applicable), or an incorrect ignition state value is selected
on the pull-down selection, then the device may not display any information on the "Ignition Detail Report".
top
D.6) How is fuel-economy and fuel-used calculated on the "Trip Report"? [_]
If the trip fuel-economy and trip fuel-used columns are enabled on the "Trip Report", the values for these
report columns is calulated using one of the following algorithms, depending on the type of data available from
the Device/Vehicle table and the received event:
top
- Total Fuel Consumed: If the total fuel-used if available from the event, then the reported
trip fuel is the delta fuel-used between the end event and the start event. The fuel-economy is then
the distance travelled divided by the delta fuel-used. This is the most accurate fuel-ecomony and
fuel-used calculation.
(Note that if the property "
ReportDefinition.TripReport.estimateFuelTotal" is true, then a total fuel-used will be estimated for each event based on the device/vehicle fuel-economy and the delta distance travelled. In this case the "Fuel Remaining" and "Device/Vehicle Fuel Economy" algorithms below may not be used). - Fuel Remaining: If the event provides a fuel-level, and the Device/Vehicle record provides a fuel-capacity, the delta fuel-used is estimated from the difference in the fuel-level multiplied by the fuel-capacity. The fuel-economy is then the distance travelled divided by this estimated delta fuel-used. This method of calculating fuel-economy and total fuel-used is very inaccurate because it depends on the event fuel-level which is not consistent while the vehicle is in motion.
- Device/Vehicle Fuel Economy: If the Device/Vehicle record specifies an estimated fuel-economy, then the delta fuel consumed is the distance travelled divided by the specified fuel-economy. The fuel-economy is the value provided by the Device/Vehicle. For a specific trip detail or totoal, if there is no delta distance travelled, then zero/blank is displayed for the fuel-economy.
fuelEconomyType" is also displayed on the report, it will display which
method was used to calculate the fuel-economy and fuel-used.
top
D.7) How do I enable exporting reports to an Excel Spreadsheet file (.xls)? [_]
Reporting to an Excel spreadsheet (ie. '
(Note: This package creates the Excel '
top
.xls' file) can be enabled using the Apache POI project ("Java API for Microsoft Documents").
Download the latest Apache POI project zip file from the Apache website at the following URL:
http://poi.apache.org/
After downloading and unzipping the Apache POI project files, copy the jar file
(such as 'poi-bin-3.15-20160924.zip')
to your $JAVA_HOME/jre/lib/ext/ directory
(or $JAVA_HOME/lib/ext/ directory, depending on your Java installation).
Make sure that the jar files added to this directory can be read by other users (ie. are 'world-readable').
After installing the jar file, restart Tomcat so that it will pick up the new supported features.
The option "XLS" will then be available in the report "Format" pulldown menu on the report selection page.
Depending on your installation platform, Excel file generation may also require that display rendering is
also disabled within Tomcat by setting the
"java.awt.headless=true"
property.
(Note: This package creates the Excel '
.xls' file in memory. Attempting to create
an '.xls' output file from a large number of report records can cause out-of-memory
issues in Tomcat, so additional Tomcat memory allocation may be neccessary).
top
D.8) How do I enable clicking on a report line to see a map of that location? [_]
To make the report line index ("#") become a link that can be clicked to display a map with the selected point,
uncomment/set the following property in the "
(Rebuild/Redeploy the "
top
config.conf" file:
ReportDefinition.columnIndexMapLink=true
Then Rebuild/Redeploy the "track.war" file.
The index column (the first column indicated by "#") on various reports will then change to a clickable link that
will bring up a map displaying the selected point.
(Rebuild/Redeploy the "
track.war" file, and restart any running DCS modules, after making any changes to the runtime configuration files.)
top
D.9) How do I enable the periodic ReportJob feature? [_]
The ReportJob feature allows selecting certain reports from the Fleet/Group Detail report menu
to have them automatically generated and emailed on a daily or weekly basis.
By default, this feature is disabled, however it can be enabled by setting a few configuration
options. To enable the "ReportJob Admin" page, uncomment/set the following property in the
"
On the "System Acocunts" page ("sysadmin" login), you may also need to enable "Allow Web Service" for the specific accounts you wish to have use this feature. (in GTSE v2.5.8-B37+ you may also set property "
When the Cron task handler detects a periodic report that should be generated and emailed, it will send a request through the web-service feature to track servlet to create the report and send it to the specified recipients.
(Rebuild/Redeploy the "
top
config.conf" file:
Domain.WebPages.ReportJobAdmin=true
The periodic report generation and emails are handled by the "cron" process,
which examines a "crontab" XML file in the "crontab/" directory
for the periodically executed tasks.
If the Event Notification Rules Engine (ENRE) is installed, then this file is typically
"crontab/crontab.xml", otherwise the file "crontab/cronRuleFactoryLite.xml.xml"
is typically used to define cron tasks.
These crontab files already contain defined tasks for Daily, Weekly, and
Monday-through-Friday reports, however these will need to be enabled with the following
property configuration settings in the "config.conf" file:
track.enableService=true
GTSRequest.url=http://localhost:8080/track/Service
Crontab.ReportCron_daily5am.active=true
Crontab.ReportCron_weekly.active=true
Crontab.ReportCron_monfri.active=true
After setting the ReportJob configuration properties in the "config.conf" file,
Rebuild/Redeploy the "track.war" file,
and restart the "cron" task handler with the appropriate crontab XML
task definition file.
On the "System Acocunts" page ("sysadmin" login), you may also need to enable "Allow Web Service" for the specific accounts you wish to have use this feature. (in GTSE v2.5.8-B37+ you may also set property "
Account.alwaysAllowWebServices=true" in the "config.conf" file).
When the Cron task handler detects a periodic report that should be generated and emailed, it will send a request through the web-service feature to track servlet to create the report and send it to the specified recipients.
(Rebuild/Redeploy the "
track.war" file, and restart any running DCS modules, after making any changes to the runtime configuration files.)
top
D.10) How do I enable the State-Line Border-Crossing (I.F.T.A) reports? [_]
The State-Line Border-Crossing (SLBC) module can keep track of state border crossings within the US, and
provide reports based on the number of miles driven in each state.
The State-Line Border-Crossing reports require that the State-Line Border-Crossing (SLBC) module is installed
on the system.
If the "I.F.T.A Detail" report group menu option is not available on the main menu, then it is likely that
the State-Line Border-Crossing (SLBC) module has not been installed.
Please contact GeoTelematic Solutions, Inc. for information on obtaining the State-Line Border-Crossing (SLBC) module.
top
top
E.1) How do I enable reverse-geocoding (ie. turning a latitude/longitude into an address)? [_]
This is best configured in the "
Reverse-Geocoding only occurs on events which arrive after this configuration has been completed (Reverse geocoding will not be retroactively applied to events which have already been placed into the EventData table). Monitor the device communication server log files for reverse-geocoding attempts, to verify that it is working properly.
The following command will test the configured active reverse-geocode provider:
The following is a partial list of predefined reverse-geocode providers available in the GTS Enterprise that can be configured with the "
See the "
(Rebuild/Redeploy the "
top
config.conf" file by setting the following properties:
Domain.ReverseGeocodeProvider.active=geonames
Domain.ReverseGeocodeProvider.key=
Specify the name of the active ReverseGeocodeProvider (the above example configures the
use of Geonames), and any authorization key that the specified ReverseGeocodeProvider may require.
Make sure you comply with the terms-of-use for the reverse-geocode-provider which you are using.
Run the CheckInstall script and check the output to see that your specified reverse-geocode
option has been activated:
cd $GTS_HOME
bin/checkInstall.sh
Next, set the "geocodeMode" in the various Account records where you wish to have
enabled. Account records must be set to "3" for "full" reverse-geocoding (this allows
you to control which Accounts may have reverse-geocoding service, since some reverse-geocoders
are a premium/fee service).
Reverse-Geocoding only occurs on events which arrive after this configuration has been completed (Reverse geocoding will not be retroactively applied to events which have already been placed into the EventData table). Monitor the device communication server log files for reverse-geocoding attempts, to verify that it is working properly.
The following command will test the configured active reverse-geocode provider:
cd $GTS_HOME
bin/rgTest.sh -pl=default -gp=39.1234/-142.1234
Where "-pl=" specifies the "default" private-label configuration (or specify
another configured provate-label domain), and "-gp=" specifies
the latitude/longitude (GeoPoint) that you wish to test with the active reverse-geocoding provider.
You can also examine the device communication server (DCS) log files for the reverse-geocoding
requests, and any errors that may be returned by the reverse-geocoding provider.
The following is a partial list of predefined reverse-geocode providers available in the GTS Enterprise that can be configured with the "
Domain.ReverseGeocodeProvider.active" property:
geonames- Geonames web-based reverse-geocoding.geonames_premium- Geonames premium web-based reverse-geocoding.geonames_tiger- Geonames/TigerDB locally installed reverse-geocoding.nominatim- OpenStreetMap/Mapquest web-based reverse-geocoding.gisgraphy- GISGraphy locally installed reverse-geocoding.gisgraphy4- GISGraphy (version 4) locally installed reverse-geocoding.googleV3- Google V3 premium web-based reverse-geocoding (see link below).opencage- OpenCage reverse-geocoding.nacgeo- NacGeo reverse-geocoding.nokiahere- Nokia/HERE reverse-geocoding.
See the "
ReverseGeocodeProvider" tag in the "private.xml" or
"private/private_common.xml" file for more configurable options for each of these
reverse-geocode providers.
(Rebuild/Redeploy the "
track.war" file, and restart any running DCS modules, after making any changes to the runtime configuration files.)
top
E.2) How do I configure reverse-geocoding to use my Google Maps API for Work license? [_]
When using Google reverse-geocoding for commercial purposes, Google may require purchasing their
Google Maps API for Work
license.
To configure the GTS to use your
Google Maps API for Work
license for reverse-geocoding, uncomment/set the following properties in the
"
To enable querying the speed limit at the reverse-geocoded location and including it with the address, the following additional properties should also be set (Since v2.6.0-B83+):
Click here to see how to configure Google Maps using your Google Maps API for Work license.
(Rebuild/Redeploy the "
top
config.conf" file:
Domain.ReverseGeocodeProvider.active=googleV3
Domain.ReverseGeocodeProvider.key=gme-GOOGLE_ID
Domain.ReverseGeocodeProvider.signatureKey=SIGNATURE_KEY
Where "gme-GOOGLE_ID" is your assigned Google customer ID, and
"SIGNATURE_KEY" is your assigned Google signature key (keep this key secret).
To enable querying the speed limit at the reverse-geocoded location and including it with the address, the following additional properties should also be set (Since v2.6.0-B83+):
Domain.ReverseGeocodeProvider.roadsApiKey=GOOGLE_ROAD_API_KEY
Domain.ReverseGeocodeProvider.includeSpeedLimit=moving
Where "GOOGLE_ROAD_API_KEY" is your Google Road API key obtained by logging into your
Google Maps For Work account and registering for the Roads API key.
Note that obtaining the speed limit for a location requires a separate query to the Google reverse-geocoding
service. So each reverse-geocoded location that includes a speed limit requires 2 queries to Google; one for
the address, and another for the speed-limit. Each query typically takes about 100 to 250
milliseconds to complete, so adding speed-limits will increase the totol amount of time it takes to obtain a
full reverse-geocoded address with speed limit.
Click here to see how to configure Google Maps using your Google Maps API for Work license.
(Rebuild/Redeploy the "
track.war" file, and restart any running DCS modules, after making any changes to the runtime configuration files.)
top
E.3) I've enabled reverse-geocoding, but why are my addresses still blank? [_]
This can occur for one of several possible reasons:
top
- The enabled reverse-geocoder does not support addresses in the area where the vehicle is traveling (a different reverse-geocode provider will likely need to be chosen).
- The enabled reverse-geocoder may support the general geographic area, but does not have an address for the specific latitude/longitude.
- The enabled reverse-geocoder may not be properly configured. (Checking the log files for reverse-geocoding
errors/warnings, or using the "
rgTest.sh" command, will often reveal configuration issues). - The enabled reverse-geocoder is currently off-line, or has refused to reverse-geocode a location.
- A reverse-geocoder was enabled after the events have been placed into the database (the reverse-geocode provider only reverse-geocodes events arriving after it has been enabled).
rgTest.sh" command (see above) and the
log files from the running device communication server (DCS) should diagnose the reverse-geocoding issue.
top
E.4) My report addresses are fine, but why are the addresses in my email notifications blank? [_]
Reverse geocode providers that publish their service over the web are considered "slow" reverse-geocoding
operations because they are dependent on Internet network latencies and often cannot return their address
information quickly enough (Internet-based reverse-geocode providers typically take a few seconds to return
their result).
If the reverse-geocode provider is considered a slow Internet-based service, then when an event arrives in a device communication server (DCS) it spawns a thread which is allowed to take its time to query the reverse-geocode an address, allowing the main thread to continue quickly. The main thread then continues and if any notifications need to be sent, they will not yet have an address value ("
If having an available address value is required at the time a notification is sent, there are three possible solutions:
If the reverse-geocode provider is considered a slow Internet-based service, then when an event arrives in a device communication server (DCS) it spawns a thread which is allowed to take its time to query the reverse-geocode an address, allowing the main thread to continue quickly. The main thread then continues and if any notifications need to be sent, they will not yet have an address value ("
${address}",
"${fullAddress}", etc, will be blank) because the reverse-geocoder has not yet obtained an
address.
If having an available address value is required at the time a notification is sent, there are three possible solutions:
- If using the Event Notification Rules Engine (ENRE) to send notifications, the property
"
rule.waitForEventAddressMS" can be set to a number of milliseconds that it should wait before sending an email notification. Setting this property to "5000" milliseconds (5 seconds) will usually give the reverse-geocoding process enough time to retrieve a valid street address, allowing the notification to be able to include the address in the email. - Within the "active" ReverseGeocodeProvider section set the "
alwaysFast" property to "true" (add the property "<Property key="alwaysFast">true</Property>" if it does not already exist). This will force the main thread to assume that the operation can occur quickly and continue to wait for the reverse-geocode process to complete before continuing with any notifications, thus providing non-blank values for "${address}" and "${fullAddress}". (However, if the DCS is receiving a large number of events every second, this can end up holding on to system resources (threads, memory, etc) for an extended period of time and may limit the number of devices that the server can ultimately handle) - Or install a locally hosted reverse-geocode provider on your own servers so that the reverse-geocoding service does not need to reach out over Internet. Examples include GISGraphy, and a few of the Geonames premium reverse-geocoding services. (This is the recommended method of reverse-geocoding prior to event notification)
E.5) How do I enable geocoding (ie. turning an address into a latitude/longitude)? [_]
Geocoding can be used to enable the "Find Address" or "Center On Address" fields on the various maps.
Enabling a Geocode-Provider is best configured in the "
To enable the Geocode-Provider (ie. street-lookup) on the Device/Vehicle map, Geozone map, and GeoCorridor map (if available), the following properties should also be set in your "
(Note: this feature may not work with all Geocode-Providers, so your results may vary, depending on the reverse-geocode provider that you are currently using)
(Rebuild/Redeploy the "
top
config.conf" file by setting the
following properties:
Domain.GeocodeProvider.active=YourGeocodeProviderName
Domain.GeocodeProvider.key=
Specify the name of the active GeocodeProvider which you will be using, and any authorization key
that the specified GeocodeProvider may require.
Make sure you comply with the terms-of-use for the geocode-provider which you are using. (Available
GeocodeProvider names can be found in the "private/private_common.xml" file).
To enable the Geocode-Provider (ie. street-lookup) on the Device/Vehicle map, Geozone map, and GeoCorridor map (if available), the following properties should also be set in your "
config.conf" file:
Domain.Properties.trackMap.enableGeocode=true
Domain.Properties.zoneInfo.enableGeocode=true
Domain.Properties.corridorInfo.enableGeocode=true
The corresponding "Find Address" or "Center On Address" fields will then become visible on the
specified map admin page.
(Note: this feature may not work with all Geocode-Providers, so your results may vary, depending on the reverse-geocode provider that you are currently using)
(Rebuild/Redeploy the "
track.war" file, and restart any running DCS modules, after making any changes to the runtime configuration files.)
top
E.6) I've enabled geocoding, but clicking on the "Find Address" does not change the map? [_]
This can occur for one of several possible reasons:
top
- The enabled geocoder does not support the addresses entered into the "Find Address" field. (a more general, or different, address may need to be entered, or a different geocode provider may need to be chosen).
- The enabled geocoder is currently off-line, or has refused to geocode a location.
- The Server is unable to locate the geocoding service (fixing any DNS issues, then retarting Tomcat usually fixes this problem).
logs/TrackWar.log" file while
entering an address in the "Find Address" field, then analyze how the log file responds.
The following command can be used to "tail" the "logs/TrackWar.log" on Linux:
cd $GTS_HOME
tail -f logs/TrackWar.log
The log file should display the specific reason why it was unable to obtain a valid latitude/longitude
to use for recentering the map.
top
E.7) How do I enable the OpenCellID cell-tower lookup support? [_]
The GTS Enterprise comes with the ability to support looking up the cell-tower information to
determine an approximate latitude/longitude of the tracking device, in the event that the device
is unable to get a valid fix from the GPS receiver.
The device must be able to support sending cell-tower information to the device communication server (DCS)
module.
At a minimum, the following information must be included for the primary Cell-Tower:
To accept storing cell-tower location information, the EventData table "
OpenCellID is an open-source project for providing location information for various cell-towers around the world. (Currently OpenCellID only requires the CellID, MCC, MCC, and LAC codes, and does not utilize the neighboring cell-tower information)
The "
(Rebuild/Redeploy the "
top
At a minimum, the following information must be included for the primary Cell-Tower:
- CellID - Cell Tower ID
- LAC - Location Area Code
- MCC - Mobile Country Code
- MNC - Mobile Network Code
- TAV - Timing Advance
- RAT - Radio Access Technology
- RXLEV - Reception Level
- ARFCN - Absolute Radio-Frequency Channel Number
To accept storing cell-tower location information, the EventData table "
ServingCellTowerData"
columns must be enabled. If neighboring cell-tower information is also available, the
"NeighborCellTowerData" columns should also be enabled.
Uncommented/setting the following configuration lines in your "config.conf" file will
enable these columns:
startupInit.EventData.ServingCellTowerData=true
startupInit.EventData.NeighborCellTowerData=true
(see Enabling Optional Table Columns for additional information on
completing the configuration of optional data columns)
OpenCellID is an open-source project for providing location information for various cell-towers around the world. (Currently OpenCellID only requires the CellID, MCC, MCC, and LAC codes, and does not utilize the neighboring cell-tower information)
The "
MobileLocationProvider" configuration for the "OpenCellID" support is specified in
the "private/private_common.xml" (or "private.xml" file), and can be enabled
in the "config.conf" file by uncommenting/setting the following properties:
Domain.MobileLocationProvider.active=openCellID
Domain.MobileLocationProvider.key=
OpenCellID requires a registration password in order to use their service, which you can obtain
on their website.
(Rebuild/Redeploy the "
track.war" file, and restart any running DCS modules, after making any changes to the runtime configuration files.)
top
E.8) How do I enable using a Geozone description for the Reverse-Geocode address? [_]
When creating a Geozone on the "Geozone Admin" page, there is a checkbox labeled "Reverse Geocode".
If checked, the description specified for this Geozone will be used ad the reverse-geocoded address whenever
the vehicle in inside the bounds of this Geozone. If unchecked, the Geozone description will not be used
as the reverse-geocoded address, and the address will be obtained from the configured reverse-geocode provider.
top
top
E.9) How do I perform a bulk upload of Geozones from an external source? [_]
Loading a list of Geozones from an external source can be performed using an available GTS command-line tool.
The first step is to format the list of Geozones into a CSV (comma-separated-value) file format as follows
(this currently assumes that all defined Geozones are a simple point-radius type Geozone):
top
"accountID","geozoneID","description","reverseGeocode","arrivalZone","departureZone","zoneType","radius","latitude1","longitude1" 'demo','area1','Custom Zone',true,true,true,0,3000,37.7816,-122.40851 'demo','atsea','Custom Zone',true,true,true,0,3000,37.7840,-142.39900The first row must represent a comma separated list of matching Geozone table columns. The rows following represent the data for each Geozone that is to be added to the Geozone table. The column names and descriptions are defined as follows:
accountID- The Account-ID which owns this Geozone. This Account-ID must already exist.geozoneID- The Geozone-ID of this new Geozone.description- The description of this Geozone.reverseGeocode- True to use this Geozone description as the reverse-geocoded address.arrivalZone- True to enable using this Geozone for arrival notifications.departureZone- True to enable using this Geozone for departure notifications.zoneType- The latitude/longitude configuration type. Should be "0" for simple point-radius Geozones.radius- The radius of the Geozone from the specified latitude/longitude, in meters.latitude1- The Geozone latitude, in degrees.longitude1- The Geozone longitude, in degrees.
cd $GTS_HOME
bin/admin.pl Geozone -account=demo -load=PATH_TO_GEOZONE_FILE.csv
Where "PATH_TO_GEOZONE_FILE.csv" is the full path to the file containing your Geozone CSV records to load.
The contained Geozones will be loaded into the Geozone table. Any specified Accound-IDs which do not already exist will
be flagged as an error.
top
E.10) How do I set up the configuration to use an HTTP proxy? [_]
If your server requires accessing HTTP services (such as reverse-geocoding, etc) through a proxy,
the following properties can be set in the "
top
config.conf" file with your http proxy
information:
http.proxy.host=PROXY_HOST
http.proxy.port=PROXY_PORT
Change the above "PROXY_HOST" and "PROXY_PORT"
to match the HTTP proxy host and port for your specific installation.
top
F.1) How do I configure outbound SMTP (EMail) service? [_]
The GTSE uses the
JavaMail
library support for sending email.
The required "
Once the JavaMail "
Set "
Set "
Set "
Set "
After setting the above configuration, the outbound SMTP/Email configuration can be tested on the command-line with the "
A notification occurring from a rule trigger on an incoming event (either generated by the "RuleFactoryLite" or the Event Notification Rules Engine) will send an email to the combination of the notify email addresses found on the triggered Device and Account records.
(Rebuild/Redeploy the "
top
javax.mail.jar" library file can be downloaded from Oracle
here.
You can find additional information regarding the installation of this and other library prerequisites
in Chapter 2 of the "OpenGTS_Config.pdf" installation/configuration documenation.
The JavaMail library is also used for validating entered email addresses, so if the web-interface
is not accepting entered email addresses (ie. "Contact EMail", "Notify EMail", etc) it may be
that the JavaMail "javax.mail.jar" library file may be properly installed.
The "TrackWar.log" file will also contain additional logging information if this is the case.
Once the JavaMail "
javax.mail.jar" library file has been installed, the SMTP configuration
can be enabled in the "config.conf" file by setting the following properties:
# --- SMTP
# - (outgoing email configuration parameters)
smtp.host=smtp.example.com
smtp.port=465
smtp.user=someuser
smtp.user.emailAddress=someuser@example.com
smtp.password=somepass
smtp.enableSSL=true
Set "smtp.port" to the SMTP server IP address or host name. Set "
smtp.port" to the SMTP service port number. Set "
smtp.user" and "smtp.password" to the outbound SMTP service username and password.Set "
smtp.user.emailAddress" to the "From" email address. If you see the error "No 'From:' address"
in a log file, when attempting to send an email, then this likely means that this property was not set.Set "
smtp.enableSSL" to "true" if the outbound SMTP service requires SSL.After setting the above configuration, the outbound SMTP/Email configuration can be tested on the command-line with the "
bin/checkInstall.sh" command as follows (Linux):
cd $GTS_HOME
bin/checkInstall.sh -sendMail myemail@example.com
On Windows, the commands would be as follows:
cd %GTS_HOME%
bin\checkInstall.bat -sendMail:myemail@example.com
Replace "myemail@example.com" with your email address. During the "CheckInstall"
process, a test email will be sent to the specified email address using the specified SMTP configuration.
Note and fix any displayed configuration errors.
A notification occurring from a rule trigger on an incoming event (either generated by the "RuleFactoryLite" or the Event Notification Rules Engine) will send an email to the combination of the notify email addresses found on the triggered Device and Account records.
(Rebuild/Redeploy the "
track.war" file, and restart any running DCS modules, after making any changes to the runtime configuration files.)
top
F.2) How do I send outbound SMS messages from the GTS Enterprise? [_]
The outbound SMS gateway can be configured in the "
When sending a rule triggered notification (either generated by the "RuleFactoryLite" or the Event Notification Rules Engine), the email address of the Device or Account records can also specify an SMS destination with the following syntax "
(Rebuild/Redeploy the "
top
config.conf" file using
one or more of the following properties below.
-
CDYNE HTTP-based:
To configure "CDYNE" http-based outbound SMS gateway, use the following property configuration:# --- CDYNE HTTP SMS gateway (uncomment to enable) SmsGatewayHandler.httpURL.url=http://sms2.cdyne.com/sms.svc/SimpleSMSSend? LicenseKey=LICENSE_KEY&PhoneNumber=%{mobile}&Message=%{message}(The above property specification should be on a single line in your "config.conf" file. Change theLICENSE_KEYto match the values specified by CDYNE.) -
Twilio Twilio service: (Since 2.5.9-B50+)
To configure "Twilio" service-based outbound SMS gateway, use the following property configuration:# --- Twilio SMS gateway (GTSE support only) SmsGatewayHandler.defaultName=twilio SmsGatewayHandler.twilio.className=org.opengts.custom.gts.twilio.OutboundSMS SmsGatewayHandler.twilio.maxMessageLength=160 SmsGatewayHandler.twilio.accountSID=ACCOUNT_SID SmsGatewayHandler.twilio.authToken=AUTH_TOKEN SmsGatewayHandler.twilio.fromPhoneNumber=FROM_PHONE_NUMBERChangeThe Twilio SMS gateway service is also dependent on their SDK service libraries. The following libraries will need also to be downloaded and installed in the Java extended library directory (ie. "ACCOUNT_SID, AUTH_TOKEN, FROM_PHONE_NUMBERto match the values specified by your Twilio account.)$JAVA_HOME/jre/lib/ext/"):- https://www.twilio.com/docs/java/install
- Download/Install "
twilio-java-sdk-4.0.2-jar-with-dependencies.jar" - http://hc.apache.org
- Download/Unzip/Install Apache HttpCore tools (jar library "
httpcore-4.4.1.jar")
- https://www.twilio.com/docs/java/install
- Download/Install "
-
Clickatell HTTP-based:
To configure "Clickatell" http-based outbound SMS gateway, use the following property configuration:# --- Clickatell HTTP SMS gateway (uncomment to enable) SmsGatewayHandler.httpURL.url=https://api.clickatell.com/http/sendmsg? user=USERNAME&password=PASSWORD&api_id=AUTH_ID&MO=1& from=FROM_NUMBER&to=%{mobile}&text=%{message}(The above property specification should be on a single line in your "config.conf" file. Change theUSERNAME,PASSWORD,AUTH_ID, andFROM_NUMBERto match the values specified by Clickatell.) -
Clickatell EMail-based:
To configure "Clickatell" email-based outbound SMS gateway, use the following property configuration:# --- Clickatell EMail SMS gateway (uncomment to enable) SmsGatewayHandler.clickatell.smsEmailAddress=CLICKATELL_EMAIL_ADDRESS SmsGatewayHandler.clickatell.user=USERNAME SmsGatewayHandler.clickatell.password=PASSWORD SmsGatewayHandler.clickatell.api_id=AUTH_ID(Fill in the specified property values with those provided by Clickatell.) -
Kannel HTTP-based:
To configure "Kannel" HTTP-based outbound SMS gateway, use the following property configuration:# --- Http SMS gateway, eg. Kannel (uncomment to enable) SmsGatewayHandler.httpURL.url=http://localhost:1234/sms/sendSMS? from=%{sender}&to=%{mobile}&message=%{message}(The above property specification should be on a single line in your "config.conf" file.) -
MultiTech SF100-G HTTP-based:
To configure the "MultiTech SF100-G" HTTP-based outbound SMS gateway, use the following property configuration:# --- MultiTech SF100-G HTTP-based SMS gateway (uncomment to enable) SmsGatewayHandler.httpURL.url=http://10.0.0.2:9191/sendmsg? user=USERNAME&passwd=PASSWORD&cat=1&to=${mobile}&text=${message}(The above property specification should be on a single line in your "config.conf" file. ChangeUSERNAMEandPASSWORDto match the values configured into your MultiTech SF100-G.) -
General Email-to-SMS:
To configure an outbound SMS gateway which is based on the mail-to-SMS service available from your wireless service provider, use the following property configuration:# --- email-based SmsGatewayHandler.emailBody.smsEmailAddress=@sms.example.com SmsGatewayHandler.emailSubject.smsEmailAddress=@sms.example.com(Change@sms.example.comto the value provided by your wireless service provider.)
# --- default outbound SMS gateway name
SmsGatewayHandler.defaultName=httpURL
You can test your outbound SMS gateway configuration using the "-sendSMS" on the
"checkInstall.sh" command:
cd $GTS_HOME
bin/checkInstall.sh -sendSMS YOUR_PHONE_NUMBER
When sending an outbound SMS message to a remote device (for configuration purposes, etc)
the outbound SMS gateway support may use the "SMS Email Address", or "SMS Phone Number"
entered into the Device record.
When sending a rule triggered notification (either generated by the "RuleFactoryLite" or the Event Notification Rules Engine), the email address of the Device or Account records can also specify an SMS destination with the following syntax "
sms:SMS_Phone#", where "SMS_Phone#"
is the phone number to which the SMS notification should be sent.
(Rebuild/Redeploy the "
track.war" file, and restart any running DCS modules, after making any changes to the runtime configuration files.)
top
F.3) How do I enable Geozone arrive/depart email notification? [_]
If you are using the "RuleFactoryLite" rules engine that is standard with the GTS Enterprise
package, enabling Geozone arrive/depart notification requires the following steps:
top
- The device communication server (DCS)
you are using must detect Geozone arrivals and departures, then generate the corresponding
Event records with the appropriate status codes (ie.
STATUS_GEOFENCE_ARRIVEorSTATUS_GEOFENCE_DEPART). In most available DCS modules, this may simply mean making sure that the "simulateGeozones" property in the corresponding "dcservers/dcserver_XXXXXXX.xml" file is set to "true". - The SMTP/Email service must also be enable. See the above link for more information on enabling/configuring SMTP.
- For the "RuleFactoryLite" rules-engine, the specific Device/Vehicle Admin page needs to be
updated to include "
arrive" (for arrival notification), "depart" (for departure notification), or "arrive,depart" (for both arrival and departure notification). - The recipient email addresses then must be placed either on the Account Admin page (to receive all notifications for all devices/vehicles), or on the Device/Vehicle Admin page (to receive only notifications for that specific Device/Vehicle).
top
G.1) How do I stop/start Tomcat? [_]
The general documentation for Apache Tomcat can be found at "http://tomcat.apache.org/".
However, the following provides an overview regarding how to check that Tomcat is running, and stop/start Tomcat if
necessary, on a Linux platform.
- Checking to see if Tomcat is running:
The "psjava" command can be used to verify that Tomcat is running:cd $GTS_HOME bin/psjavaThe "psjava" command produces output similar to the following:PID Parent L User Java class/jar ------ ------ - -------- ------------------------------------------------------- 19011( 1) 1 opengts org.apache.catalina.startup.Bootstrap ...The "org.apache.catalina.startup.Bootstrap" is the running Apache Tomcat process. If this line is not present, then Tomcat is likely not running. - Stopping Tomcat:
You will need to "cd" into the Tomcat directory. But assuming that you have set theCATALINA_HOMEenvironment variable to the Tomcat installation directory, the command to stop Tomcat would be as follows:cd $CATALINA_HOME bin/shutdown.shTomcat generally takes a few seconds to stop after this command has been entered. Use the "psjava" command, as specified above, to verify that Tomcat has stopped. - Starting Tomcat:
As above, you will need to "cd" into the Tomcat directory. Assuming that you have set theCATALINA_HOMEenvironment variable to the Tomcat installation directory, the command to start Tomcat would be as follows:cd $CATALINA_HOME bin/startup.shTomcat generally takes a few seconds to initialize and startup after this command has been entered. Use the "psjava" command, as specified above, to verify that Tomcat has started.
G.2) How do I assign a host name to my login URL? [_]
If a host name has not yet been assigned to your server IP address, your login URL may look
similar to the following:
http://192.168.1.1:8080/track/Track
Where "192.168.1.1" is the externally accessible IP address of your server
(Note: 192.168.X.X are local, non-routable, IP addresses).
To assign a host name to your external server IP address, you will need to contact your
DNS provider for the domain name you wish to assign to your server IP address. For example,
assume you own the domain name "example.com" and you wish to assign "track.example.com"
to your server IP address. You will need to contact your DNS provider and let them know to
assign your server IP address to your selected sub-domain name. It may take several hours for the
DNS entries to be available throughout Internet, but when it has been set up, you should then
be able to access your server through a URL similar to the following:
http://track.example.com:8080/track/Track
top
G.3) How do I change the Tomcat listen port? [_]
The default port "
If you wish to access the web-interface on port
8080" can be changed in the Tomcat "server.xml" configuration
file at "$CATALINA_HOME/conf/server.xml". Note that on Linux, binding to a port less
than (or equal-to) 1024 requires that Tomcat be run as "root", which is not
recommended. If you wish to access the web-interface on port
80, an alternative method would be to use
Linux "iptables" to forward requests on port 80 to port 8080,
and requests on port 443 (the SSL port) to port 8443.
This can be accomplished with the following example port-forwarding "iptables" entries:
/sbin/iptables -t nat -I PREROUTING -p \
tcp --dport 443 -j REDIRECT --to-ports 8443
/sbin/iptables -t nat -I PREROUTING -p \
tcp --dport 80 -j REDIRECT --to-ports 8080
The above commands will create entries in the iptables configuration that appear
similar to the following:
-A PREROUTING -p tcp -m tcp --dport 80 -j REDIRECT --to-ports 8080
-A PREROUTING -p tcp -m tcp --dport 443 -j REDIRECT --to-ports 8443
You should also make sure that the port you will be using for Tomcat is also open through any firewalls
between Internet and your server. If your firewall is configured using "iptables", then
entries similar to the following should be included:
-A INPUT -p tcp -m state --state NEW -m tcp --dport 80 -j ACCEPT
-A INPUT -p tcp -m state --state NEW -m tcp --dport 443 -j ACCEPT
-A INPUT -p tcp -m state --state NEW -m tcp --dport 8080 -j ACCEPT
-A INPUT -p tcp -m state --state NEW -m tcp --dport 8443 -j ACCEPT
Once you have configured iptables to fit your server quirements, run one of the following
commands (depending on your version of Linux) to make the iptables changes permanent:
/etc/init.d/iptables save
or
service iptables save
Notes:
- Care must be taken when making any changes to the "
iptables" configuration. Changes in this area are recommended only for users/administrators familiar with how "iptables" works. - The "
iptables" service must be running in order for the above port redirection and firewall rules to be effective. - The above
iptablescommands work on Fedora and CentOS versions of Linux. Other Linux distributions may have theiptablescommand located in a different directory.
G.4) How do I remove the ":8080" port and "/track/Track" requirements from the Login URL? [_]
The typical login URL is "
The latest version of OpenGTS® provides a feature will create this 'frame' html for you. Assuming that "
top
http://track.example.com:8080/track/Track" (where
"track.example.com" is the domain name of your server). This URL is usually placed
in a link from another company webpage so the user never needs to specifically enter this URL.
However, in some cases it may be necessary, or desireable, to instead only require that a user go
directory to a url such as "http://login.example.com" to login, instead of requiring
that the ":8080" and "/track/Track" also be included. The easiest way
to accomplish this is to create an "index.html" file which loads the login url into
a single frame. This way the user can enter a url such as "http://login.example.com",
and have the "index.html" file load the actual login url into a frame. The latest version of OpenGTS® provides a feature will create this 'frame' html for you. Assuming that "
http://track.example.com:8080/track/Track"
is the URL used to view the login page, the following URL will automatically produce the html 'frame'
page required that can be used on another static web server to eliminate the need to enter the
":8080" or
the "/track/Track" specification (change the domain name and port to fit your specific
requirement):
http://track.example.com:8080/track/loginFrame.html
Right-click and save this HTML page (ie. "Save Page As") and copy the resulting file to a directory
on your static web-server. For instance, if you have a static web-server at the location
"http://login.example.com", and you copy the above html to a file called
"index.html" in the root directory of your web-server (typically "htdocs"),
then you should be able to see the login page at "http://login.example.com".
top
G.5) How do I change the default session timeout value for Tomcat? [_]
After a period of inactivity, Tomcat will automatically log out the active user.
This session inactivity timeout can be changed in the Tomcat default "
top
web.xml"
file found at the Tomcat directory "$CATALINA_HOME/conf/web.xml". Here is
the section of the "web.xml" file that sets the timeout to 30 minutes:
<session-config>
<session-timeout>30</session-timeout>
</session-config>
You can change this value to any desired length of time. Tomcat should be restarted after this
value has been changed. (Note: setting this value too large may cause excessive resources to
be consumed by users which have logged in, but are not actually using the system).
top
G.6) How do I configure SSL (ie. "https") in Tomcat? [_]
Configuring SSL (Secure Socket Layer) within Tomcat allows secure access to the GTS login,
ensuring that all data sent between the server and client web-browser is encrypted. The followig
Apache Tomcat SSL configuration URL will describe how to configure SSL withint Tomcat:
http://tomcat.apache.org/tomcat-7.0-doc/ssl-howto.html
http://tomcat.apache.org/tomcat-8.0-doc/ssl-howto.html
top
G.7) I've copied my changed "track.war" file to Tomcat, but I don't see my changes? [_]
Servlet
.war files, such as "track.war" are typically deployed to the
Tomcat webapps/ directory.
If Tomcat is configured with autoDeploy="true" (the default configuration in
"conf/server.xml"), then any .war file copied to the Tomcat
webapps/ directory should be automatically deployed.
However, if for some reason your installation of Tomcat is not automatically deploying the new
track.war file, you can usually force a deployment using the following steps:
- Stop the currently running Tomcat (ie. "
$CATALINA_HOME/bin/shutdown.sh"). - Remove the old deployed Tomcat
webapps/track/directory. - Copy the new
track.warfile to the Tomcatwebapps/directory. - Restart Tomcat (ie. "
$CATALINA_HOME/bin/startup.sh"). - Monitor the Tomcat "
logs/catalina.out" log file for deployment of the newtrack.warfile.
G.8) How do I configure Tomcat to run as a background service on Windows? [_]
The Apache Commons "Procrun" is a set of applications that allows
Java applications (such as Tomcat) to be wrapped as a Windows service.
You can find more information regarding this Apache "Procrun" feature at the following link:
http://commons.apache.org/daemon/procrun.html
top
G.9) How do I increase the amount of memory allocated to the Tomcat process? [_]
Apache Tomcat memory allocation can be controlled using the "
Restart Tomcat after setting this environment variable, using the "
top
CATALINA_OPTS" environment variable.
For example, the following will set the allocated memory to 1024Mb for the Tomcat process (on Linux):
export CATALINA_OPTS=-Xmx1024m
On Windows, "CATALINA_OPTS" would be set as follows:
set CATALINA_OPTS="-Xmx1024m"
If required, multiple options can be added to "CATALINA_OPTS" by separating them with a space.Restart Tomcat after setting this environment variable, using the "
startup.sh" script (Linux),
or "startup.bat" script (Windows).
top
G.10) How do I start Tomcat with "
java.awt.headless=true"?
[_]
Some graphical libraries (such as the Apache POI library for exporting Excel reports) may require that display
rendering is disabled. In Tomcat, the way to disable display rendering is to set the Java property
"
Restart Tomcat after setting this environment variable.
top
java.awt.headless=true". This can be accomplished by setting the "CATALINA_OPTS"
environment variable prior to starting, or restarting, Tomcat.
The following will disable display rendering for the Tomcat process:
export CATALINA_OPTS=-Djava.awt.headless=true
If required, multiple options can be added to "CATALINA_OPTS" by separating them with a space.Restart Tomcat after setting this environment variable.
top
H.1) How do I increase the number of allowed MySQL connections? [_]
If you are seeing MySQL connection issues, and the message "Too many connections" in the MySQL log file,
then you may need to increase the number of connections allowed for MySQL.
The MySQL command "
Then restart MySQL after changing this configuration.
The following MySQL website will provide more information on this issue:
top
SHOW PROCESSLIST" will display all current connections,
and the command "SHOW VARIABLES LIKE 'max_%connections'" will show the current
value of the MySQL connection variables.
To increase the number of allowed MySQL connections, add the following to the MySQL config file
"/etc/my.cnf" (or "/etc/mysql/my.cnf" on some Linux distributions),
in the "[mysqld]" section (or increase their current value if these properties are already defined):
max_connections=1500
max_user_connections=1500
(Note: in some cases, you may also need to set a larger value for "open_files_limit")Then restart MySQL after changing this configuration.
The following MySQL website will provide more information on this issue:
http://dev.mysql.com/doc/refman/5.6/en/too-many-connections.html
Enabling connection-pooling will also better manage the number
of total MySQL connections needed within the GTSE.
top
H.2) How do I reset the MySQL 'root' password? [_]
If you have forgotten the MySQL '
root' password, it can be reset using this procedure
recommended by MySQL:
http://dev.mysql.com/doc/refman/5.6/en/resetting-permissions.html
top
H.3) How do I repair a MySQL reported error indicating an "Incorrect key file"? [_]
During a normal system shurdown or reboot, the MySQL service is stopped gracefully, however
if the MySQL database was not shutdown normally (as can occur during a power-fail, etc)
a MySQL table key index can be come corrupted, resulting in an error similar to one of the
following in a GTS log file:
The following MySQL website describes how to repair key file issues:
To prevent this issue from occuring in the future, it is important that MySQL is always allowed to shutdown normally. If power-fails are an issue, then a UPS (Uninterruptable Power Supply) would be recommended to provide additional time during a power-fail to properly shutdown the system.
top
1) java.sql.SQLException:
Incorrect key file for table './gts/EventData.MYI'; try to repair it
2) java.sql.SQLException:
Table './gts/EventData' is marked as crashed and should be repaired
3) java.sql.SQLException:
Got error 134 from storage engine
Or, possibly an error similar to the following in the "mysqld.log" log file:
[ERROR] Got error 127 when reading table './gts/EventData'
[ERROR] Got error 134 when reading table './gts/EventData'
[ERROR] ... Incorrect key file for table './gts/EventData.MYI'; try to repair it
[ERROR] ... Table './gts/EventData' is marked as crashed and should be repaired
(While MySQL errors on "EventData" are more common, this can occur to other tables
as well, such as "Device", "Account", etc.)The following MySQL website describes how to repair key file issues:
http://dev.mysql.com/doc/refman/5.6/en/myisam-repair.html
On Linux, MySQL typically stores the GTS table data in the directory "/var/lib/mysql/gts"
(unless otherwise configured).
It is recommended that you backup these files after stopping the "mysqld" service, but before
running MySQL diagnostic checks against these files.To prevent this issue from occuring in the future, it is important that MySQL is always allowed to shutdown normally. If power-fails are an issue, then a UPS (Uninterruptable Power Supply) would be recommended to provide additional time during a power-fail to properly shutdown the system.
top
H.4) How do I backup my MySQL daabase? [_]
The default name of the MySQL GTS database is "
gts" (overridable in the
"common.conf" file with the property "db.sql.dbname").
On Linux, MySQL typically stores the GTS table data in the directory "/var/lib/mysql/gts"
(unless otherwise configured).
The "gts" database can be backed-up using the procedures outlined by
MySQL at the following link:
http://dev.mysql.com/doc/refman/5.6/en/backup-methods.html
top
H.5) How do I copy the MySQL "gts" database to another computer? [_]
The default name of the MySQL GTS database is "
gts" (overridable in the
"common.conf" file with the property "db.sql.dbname").
This database can be copied from one computer to another using the procedures outlined by
MySQL at the following link:
http://dev.mysql.com/doc/refman/5.6/en/copying-databases.html
top
H.6) How do I run MySQL on a separate server? [_]
Running MySQL on a server which is separate from the server where Tomcat, and/or the various device
communication server (DCS) modules are running, is possible but also takes some additional security
considerations to insure that the MySQL database is protected against unwanted access.
The following MySQL links describe how to enable MySQL to be accessible over an Intranet or Internet
connection:
(Rebuild/Redeploy the "
top
- Setting the MySQL "bind-address": http://dev.mysql.com/doc/refman/5.6/en/server-options.html
- Security Considerations: http://dev.mysql.com/doc/refman/5.6/en/security-guidelines.html
- Trouble Shooting: http://dev.mysql.com/doc/refman/5.6/en/can-not-connect-to-server.html
config.conf" file to point to the new MySQL location:
db.sql.provider=mysql
db.sql.host=MYSQLSERVER
db.sql.port=3306
Change "MYSQLSERVER" to point to the server where the MySQL
service and database is now located. This value can be an IP address, or a DNS host name.
(Rebuild/Redeploy the "
track.war" file, and restart any running DCS modules, after making any changes to the runtime configuration files.)
top
H.7) How do I enable MySQL "Connection Pooling" in GTSE? [_]
By default, each thread will get it's own connection to the MySQL database. If there are
many threads running, this could unecessarily increase the number of required db connections.
To enable db connection pooling in GTSE, enable the following property in the "
Click here for information on increasing the number of allowed MySQL connections.
(Rebuild/Redeploy the "
top
config.conf"
file:
db.dbConnectionPool=trueThis will create a pool of DB connections which will be shared among all threads within a process.
Click here for information on increasing the number of allowed MySQL connections.
(Rebuild/Redeploy the "
track.war" file, and restart any running DCS modules, after making any changes to the runtime configuration files.)
top
H.8) How do I convert a MySQL table to use the "InnoDB" engine? [_]
By default, the MySQL engine configuration in the GTS uses "
For existing tables, you will need to convert them to "
top
MyISAM".
"MyISAM" advantages include smaller memory requirements, smaller table sizes, etc.
However the big disadvantage of "MyISAM" is that it requires full table locking during
inserts and updates which may slow performance in cases where there are many events received every second.
In cases where there are a large number of events frequently being inserted into the EventData table,
performance may be improved by switching the database to use the "InnoDB" engine, which
supports record locking rather than table locking.
The decision for whether to use the "MyISAM" or "InnoDB" engine depends
how frequent you get incoming event packets, and the how your system will be utilized. The following
links provides a good overview of the advantages and disadvantages of both "MyISAM" and
"InnoDB" MySQL engines:
http://www.mysqlperformanceblog.com/2009/01/12/should-you-move-from-myisam-to-innodb/(Note: one disadvantage for "
InnoDB" is that it does not efficiently support the use of
"count(*)" in a "select" statement to count the number
of records in a table. When using the "InnoDB", counting records in the EventData table
may need to be disabled, as counting records in a very large table can take a significant amount of
time to complete.)
For existing tables, you will need to convert them to "
InnoDB" individually through the
"mysql" command-line interface. The following example describes the MySQL command-line
process for converting the EventData table to use "InnoDB":
mysql -u gts -p gts Enter password: opengts mysql> alter table EventData engine=InnoDB;Only the
EventData table would need to be converted to "InnoDB" to achieve
significant performance improvement.
However, to set the default MySQL db engine to "InnoDB",
uncomment/set the following property configuration in the "config.conf" file, then
convert all other existing tables to "InnoDB":
db.sql.provider=mysql_innodbBefore starting the conversion process, it is important that you review the procedure and warnings describe by MySQL on the following link (make sure you have enough memory and disk space before performing the conversion):
http://dev.mysql.com/doc/refman/5.0/en/converting-tables-to-innodb.html(Before performing the "
MyISAM" to "InnoDB" conversion process, make sure all
all currently running DCS modules are stopped)
top
H.9) How do I fix the MySQL error "The total number of locks exceeds the lock table size"? [_]
When an InnoDB table becomes very large, it requires additional memory to handle workload requirements.
The InnoDB Buffer Pool Size can be increased by setting the following configuration property in the MySQL config file
"
The above sets the InnoDB Buffer Pool Size to approximately 10-times the default size of 8Mb. If the reported error persists, you may need to increase the amount of allocated memory a bit more. The following MySQL website will provide more information on this issue:
/etc/my.cnf" (or "/etc/mysql/my.cnf" on some Linux distributions) in the "[mysqld]" section:
innodb_buffer_pool_size=90000000
Then restart MySQL after changing this configuration.The above sets the InnoDB Buffer Pool Size to approximately 10-times the default size of 8Mb. If the reported error persists, you may need to increase the amount of allocated memory a bit more. The following MySQL website will provide more information on this issue:
https://dev.mysql.com/doc/refman/5.7/en/innodb-buffer-pool-resize.html
top
I.1) Why does my event table contain events dated in the future, and how do I delete them? [_]
Occasionally some GPS tracking devices will send an event to the server with a date/time which
is in the future, sometimes a long time into the future. This can be caused by marginal GPS coverage.
This condition can be prevented by setting the following properties in the
"
The following command can be used to obtain a count of all future events for a specific account and device: (v2.3.9-B30+)
The following command can be used to delete these future events for a specific account and device: (v2.3.9-B30+)
(make sure you back-up the EventData table before deleting any records)
top
config.conf" file:
Device.futureDate.action=ignore
Device.futureDate.maximumSec=86400
The above specification will cause all events to be ignored which are more than 1 day (86400
seconds) into the future.
(Other possible options include "current" - set to current time, and "disable" - do not modify the timestamp)
The following command can be used to obtain a count of all future events for a specific account and device: (v2.3.9-B30+)
cd $GTS_HOME
bin/admin.sh Device -account=myaccount -device=mydevice \
-countFutureEvents=3600
The above command will display a count of events which are more than 1 hour (3600 seconds) into
the future. [replace "myaccount" and "mydevice" with the
desired account/device id.]The following command can be used to delete these future events for a specific account and device: (v2.3.9-B30+)
cd $GTS_HOME
bin/admin.sh Device -account=myaccount -device=mydevice \
-deleteFutureEvents=3600
The above command will delete events which are more than 1 hour (3600 seconds) into the future.
[replace "myaccount" and "mydevice" with the desired
account/device id.](make sure you back-up the EventData table before deleting any records)
top
I.2) My device is sending events with invalid past-dated timestamps, how do I ignore them? [_]
Occasionally some GPS tracking devices will send an event to the server with a date/time which
is in the past, sometimes a long time into the past. This can be caused by marginal GPS coverage.
The GTS can be configured to handle these types of events by setting the following properties in the
"
Please note that care must be taken when choosing a value for "
top
config.conf" file:
Device.pastDate.action=ignore
Device.pastDate.maximumSec=604800
The above specification will cause all events to be ignored which are more than 7 days (604800
seconds) into the past.
(Other possible options include "current" - set to current time, and "disable" - do not modify the timestamp)
Please note that care must be taken when choosing a value for "
Device.pastDate.maximumSec"
because a value too small could cause cached events to be ignored that a device was unable to send
to the server due to poor cell coverage area, and then days later sends the events to the server.
These past-dated events could then be interpreted as invalid timestamps and ignored, etc.
top
I.3) My device is sending events with excessive speeds, how do I clear the excessive speed value? [_]
Occasionally some GPS tracking devices will send an event to the server with a speed value that is
obviously unreasonable for the vehicle in which the device is placed.
This can be caused by marginal GPS coverage.
The GTS can be configured to handle these types of excess speeds by setting the following properties in the
"
top
config.conf" file:
Device.invalidSpeed.action=zero
Device.invalidSpeed.maximumKPH=240
The above specification will cause all events with excessive speeds (240 km/h in this case) to set the speed value to 0.0 (zero).
(Other possible options include "ignore" - to ignore the event entirely,
"max" - to reset the speed to the maximum threshold,
or "disable" - to disable the excessive speed check)
top
I.4) How do I count the number of old events in the EventData table? [_]
The following command example can be used to obtain a count of all old events for a specific device within an account.
This example will display a count of events which are more than 120 days old.
[replace "
top
myaccount" and "mydevice" with the desired
account/device id.]
(v2.3.9-B30+)
cd $GTS_HOME
bin/admin.sh Device -account=myaccount -device=mydevice \
-countOldEvents=-120d
The following command example can be used to obtain a count of all old events for all devices within an account.
This example will display a count of events which are more than 120 days old.
[replace "myaccount" with the desired account id.]
(v2.4.3-B14+)
cd $GTS_HOME
bin/admin.sh Account -account=myaccount \
-countOldEvents=-120d
In some cases, if there are many records in the EventData table (ie. several million), this command can
take some time to complete.
top
I.5) How do I trim/delete old events from the EventData table? [_]
The following command can be used to delete old events for a specific device within an account.
This example will delete events which are more than 120 days old. [replace
"
top
myaccount" and "mydevice" with the desired
account/device id.]
(v2.3.9-B30+)
cd $GTS_HOME
bin/admin.sh Device -account=myaccount -device=mydevice \
-deleteOldEvents=-120d -confirmDelete
The following command can be used to delete old events for all devices within an account.
This example will delete events which are more than 120 days old.
[replace "myaccount" with the desired account id.]
(v2.4.3-B14+)
cd $GTS_HOME
bin/admin.sh Account -account=myaccount \
-deleteOldEvents=-120d -confirmDelete
Since this delete cannot be undone, the option "-confirmDelete" is required to ensure
that you intend to delete the events.
(make sure you back-up the EventData table before deleting any records)
top
I.6) What time format does the EventData "timestamp" field use? [_]
The time format used for the EventData "
The following are some examples commands for obtaining the current time in Epoch time format:
The following are some examples commands for converting an Epoch time into a human readable time format
(replace
A tool for converting Unix Epoch formatted times to a human readable form, can be found at the following link.
Various tables that contain a day-number value (such as
top
timestamp" field, and other timestamp
fields contained in other tables, is the Unix
Epoch
time format (also called "Unix Time"). This value is represented as the number of seconds
since Midnight January 1, 1970 Coordinated Universal Time (UTC).
Nearly every available operating system and programming language has tools for converting
this time into a format relative to any specified TimeZone.
On the map and reports within the GTS, this Epoch time format is converted to a human readable
format, relative to the local specified timezone.
The following are some examples commands for obtaining the current time in Epoch time format:
| Max OS X command shell: | date -u +%s |
| Linux command shell: | date -u +%s |
| PHP: | time() |
| Perl: | time |
| MySQL: | select UNIX_TIMESTAMP(NOW()); |
1293840000 with your actual Unix Epoch time):
| Max OS X command shell: | date -r 1293840000 |
| Linux command shell: | date -d @1293840000 |
| PHP: | date('Y/m/d H:i:s e',1293840000) |
| Perl: | localtime(1293840000) |
| MySQL: | select FROM_UNIXTIME(1293840000); |
http://www.epochconverter.com
NOTE: Various tables that contain a day-number value (such as
Device.licenseExpire)
use a modified Julian day number that can be displayed from a MySQL table column using the function
"FROM_DAYS(DayNumber+578101)", where "DayNumber"
is the field containing the day-number value to display.
top
J.1) What is the best GPS tracking/telematic hardware? [_]
The best hardware greatly depends on the specific requirements for the GPS tracking/telematic application.
Here are some of the questions that need to be answered to best fit the GPS tracking/telematic hardware to the applicaton:
top
Here are some of the questions that need to be answered to best fit the GPS tracking/telematic hardware to the applicaton:
- Is the device for personal tracking, vehicle-installed tracking, or for rarely-moved-asset (RMA) tracking? Personal tracking devices are self-contained, while devices used for vehicle tracking usually require specialized installation. For personal tracking, a cell phone tracking application may be adequate, however battery-life requirements should be considered, as well as the fact that cell-phone tracking applications can usually be stopped by the operator.
- What are the application power requirements for the device? Does it need to be self-powered (ie. for tracking untethered trailers, etc.), or is a power-source available?
- Is notification of digital inputs required? (such as door open/closed events, etc).
- Is notification of analog inputs required? (such as temperature, fuel level sensors, etc).
- Does the application require the ability to query the location of the device, or send commands to the device?
- Does the application require the ability to set digital 'outputs' on the device? (ie. unlock doors, disable starter, etc).
- Does the device need to store unsent events (due to loss of coverage) until connection to the server can again be obtained? (often called "store-and-forward").
- What are the data transport requirements for the device? (ie. TCP, UDP, SMS, Satellite, WiFi, Bluetooth, etc.)
- Is text-based communication with the operator or driver of the vehicle required?
- Is voice-based communication with the operator or driver of the vehicle required?
- Does the application require the ability to send 'next-stop' information to the driver, with navigation to the next stop?
- Is the cell phone coverage area adequate for the application? (ie. will the GSM/GPRS or CDMA wireless data provider cover the areas that you require)
- Is satellite-based communication required? (ie. for areas that do not have adequate GSM/GPRS or CDMA coverage). Satellite-based communication options include Iridium, OrbComm, Globalstar, and Theraya.
- Is engine diagnostic information required, including actual odometer, fuel usage, engine temperatures, etc? (ie. J1708, J1939, OBDII, EOBR, CANBus)
- Is temperature monitoring information required? (ie. refrigerated containers, etc.)
- Does the device need to be PTCRB certified? (This is a question often overlooked. In the US, all tracking devices which transmit data over a wireless modem must be PTCRB certified. More information can be found on the PTCRB website.)
- etc.
top
J.2) How many devices can GTSE track? [_]
The GTS Enterprise has been successfully used to track thousands of devices on a single server.
Here are some of the factors that can effect the number of devices that a single server can track:
top
- TCP vs. UDP - A TCP 'session' consumes more resources that a UDP connection, especially if the device always expects to maintain a constantly connected TCP session. Using UDP for data transport is more scalable and is the recommended method of sending data from the device to the server.
- Event Reporting Interval - A more frequent reporting interval will have a higher load on the system. If 1000 devices transmit location data once every 5 minutes (300 seconds), this averages about 3.33 messages per second arriving at the server (1000 devices / 300 seconds). However, if the same 1000 devices needed to transmit data every 20 seconds, that averages about 50 messages per second (1000 devices / 20 seconds), creating a much higher load on the system.
- Network Speed - The Internet service provider, and/or local Intranet speeds also effect the ability of the server to receive data from the remote devices, and still perform other network queries that it may need for any required event analysis.
- Computer Resources - The more RAM that a computer system has installed, generally the faster it will run. It is recommended that a system running GTSE have at least 4Gb of RAM installed.
top
J.3) What is a Device Communication Server, and why do I need one? [_]
A "Device Communication Server" (aka "DCS") is the module that runs as a separate process on the
computer server and is designed to communicate with the remote tracking device to receive data
and insert received information into the EventData table. It is needed to be able to get data
from the remote tracking device into the GTS system.
Every GPS tracking device manufacturer typically uses their own proprietary protocol for sending
data to the server. This means that for each type of remote tracking device being used, a separate
custom designed device communciation server (DCS) will be needed to understand the protocol being
used by the device. For instance, if you are using Enfora and CalAmp devices, you will need a
separate Enfora DCS, and a separate CalAmp DCS, to be able to handle receiving data from boths types
of devices. Each device communication server (DCS) modules uses a different port for receiving
data from the remote tracking devices, which allows multiple DCS modules to run simultaneously
on the save computer/server.
top
top
J.4) How is GPS tracking/telematic data sent from the device to the server? [_]
Depending on the capabilities of the device, data can be transmitted to the server in one of
several ways. The following describes some of the methods used by devices to transmit data to
the server:
top
- Cellphone Network - The most common method of transmitting data to the server.
The GPS tracking device contains a Cellphone modem which typically uses a
SIM
card provided
by a Wireless Data Provider (ie. AT&T, T-Mobile, Sprint, Rogers, etc). The modem uses
this wireless data-plan to
establish a connection to Internet, and then a
socket
connection with the server. Once connected to the server, it typically
sends its location information, then disconnects. Data can be transmitted using
UDP
or TCP.
Each has their advantages and disadvantages, however UDP is generally preferred due to its
much greater data bandwidth efficiency. In some cases, data may be sent to the server using
SMS through the use of
an SMS-Gateway.
The following graphic displays how GPS data may be transmitted to the server over a GPRS/Mobile
network:
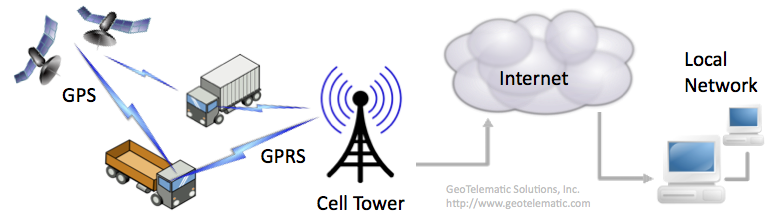
(click to enlarge) - Satellite Communications - The GPS tracking device contains a satellite modem which
connects to one of the major satellite communication data providers (ie. Iridium, OrbComm,
Globalstar, etc.). The data from the tracking device is sent to an orbiting communication
satellite, which then relays the data to a ground station, which then forwards the
data to a server over a stanrd
socket connection,
or may use SMTP to forward
the data to the server. Satellite data communications tend to be much more expensive, and
have much greater data limitations, than using a cellphone network. The following graphic
displays how GPS data may be transmitted to the server over a Satellite Communication network:
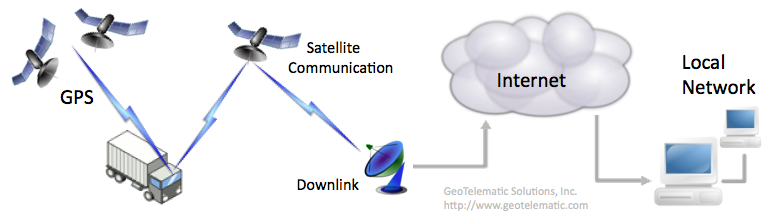
(click to enlarge) - WiFi Network - The GPS tracking device contains an 802.11 compiant WiFi modem when connects to a wireless router to send data to the server. This type of application is typically limited to very localized environments, such as tracking vehicles traveling within a closed yard, or mining plant. The advantage with this solution is that there is no associated cost with the tracking of the vehicle, however, the coverage area is limited to a very specific geographical area.
- Bluetooth - The GPS tracking device contains a Bluetooth modem, which it uses to connect to a local bluetooth enabled server, or router, to send data to the server. This type of application tends to be used only in very customized applications.
- Memory Card - The GPS tracking device contains a removable memory card (such as a "Secure Digital (SD)" card). At the end of the day's travels, the memory card is removed from the device and inserted into a reader which downloads the data to the server. The advantage with this solution is that there is no associated cost with the tracking of the vehicle, however, obtaining near real-time tracking on a map is not possible using this solution.
top
J.5) How do I calculate the amount of data used by my tracking device? [_]
It can be very difficult to accurately calculate the amount of data that would be consumed by a device in a given month.
As a guideline, here is a list of the variables that would need to be considered when trying to determine the amount of
data bandwidth that a device is consuming for GPS tracking purposes:
top
- TCP or UDP? - TCP connections have an initial "session" overhead of 240 bytes (just to connect to the server), plus 44 bytes of overhead for each data packet transmitted. UDP on the otherhand has no "session" overhead and only 28 bytes of overhead for each data packet transmitted. UDP is recommended for lower data overhead.
- Data Packet Size - The size of the data packet also needs to be considered in the amount of data consumed by a device. ASCII data packets may be convenient for debugging and parsing, however they also consume a bit more than a binary encoded data packet. Binary data packets are recommended where possible.
- Acknowledgement (ACK) Packet Size - Having the server acknowledge receipt of a data packet is highly recommended, and the size of the ACK (acknowledgement) packet adds to the amount of data consumed by a device. Also, sending an ACK over TCP adds another 44 bytes of overhead, while UDP adds only 28 bytes.
- Transmissions Interval - How often the device sends data to the server effects the amount of data consumed. A device transmitting every 2 minutes, of course consumes about twice as much data as one that only transmits once every 4 minutes, etc. Less frequent transmission intervals are recommended when possible.
- Transmissions While Not Moving - If the device is configured for a 2-minute transmission interval, and the device still sends data packets while not moving on the same 2-minute frequency, this can greatly increase the amount of data consumed by a device. For instance, if a given device typically only moves for 8-hours during any given day, and is stationary for the rest of the day and on weekends, then the device could be consuming more than 3 times the amount of data bandwidth than it needs to. This tends to be the greatest consumer of unnecessary data bandwidth for devices. It is higly recommended that the device be configured to send data at a higher frequency while moving (ie. every 2-minutes), but at a much lower frequency while stopped (ie. every 60-minutes, etc).
- Wireless Data Provider - Some wireless data providers may have other 'hidden' data consumption requirements, such as PDP connection overhead (when the device establishes connection to the GPRS provider, outside of any TCP/UDP data transmissions to the server), transmission byte minimums, etc.
PacketTransmissionSize = (DataPacketOverhead + DataPacketSize) + (ACKOverhead + ACKPacketSize) PacketsWhileMoving = MinutesMovingPerMonth / IntervalWhileMoving PacketsWhileStopped = MinutesStoppedPerMonth / IntervalWhileStopped TotalPacketsPerMonth = PacketsWhileMoving + PacketsWhileStopped MonthlyDataConsumption = PacketTransmissionSize x TotalPacketsPerMonthFor example, assume we have a device with the following packet configuration and transmission interval, sending data over UDP (device moves 8-hours a day Monday through Friday and not on weekends. Assuming a 28-day/4-week month for simplicity):
DataPacketOverhead = 28 bytes UDP overhead DataPacketSize = 50 bytes ACKOverhead = 28 bytes UDP overhead ACKPacketSize = 10 bytes IntervalWhileMoving = 2 minutes IntervalWhileStopped = 60 minutes MinutesMovingPerMonth = 9600 [480 minutes-per-day x 5 days-per-week x 4 weeks-per-month] MinutesStoppedPerMonth = 30720 [40320 minutes-per-28day-month - 9600]The algorithm would then yield the following:
PacketTransmissionSize = 116 [ie. (28 + 50) + (28 + 10)] PacketsWhileMoving = 4800 [9600 / 2] PacketsWhileStopped = 512 [30720 / 60] TotalPacketsPerMonth = 5312 [4800 + 512] MonthlyDataConsumption = 616192 bytes (0.6Mb) [116 x 5312]If the device transmits packets at the same frequency while stopped, the algorithm would yield the following:
PacketTransmissionSize = 116 [ie. (28 + 50) + (28 + 10)] PacketsWhileMoving = 4800 [9600 / 2] PacketsWhileStopped = 15360 [30720 / 2] TotalPacketsPerMonth = 20160 [4800 + 15360] MonthlyDataConsumption = 2338560 bytes (2.3Mb) [116 x 20160]The above should be used only as a guideline, as there are many other factors that could influence data consumption, such as retransmissions required due to lost or no acknowledgement, impromptu generated events (ie. events generated due to changed in digital inputs, etc), wireless service provider requirements, etc.
top
J.6) How do I set the "Server ID" field on the Device/Vehicle Admin page? [_]
The "Server ID" field specifies the name of specific the device communication server (DCS) module that is
listening for incoming connections from the remote tracking device.
This field will be automatically filled in by the DCS module the first time the remote tracking device sends
its first event to the server, so there is no need to manually fill-in this field (this process guarantees
that the Device record knows exactly the type of remote tracking device that it represents).
It is the responsibility of the DCS module that is handling incoming data packets from the device to set
this value in the Device table record (the "Server ID" field is called the "
Note: if your custom DCS "Server ID" is shown in parentheses - eg. "
top
deviceCode" column
in the Device table).
Until the remote tracking device sends its first event to the server, and the "Server ID" value is filled-in,
the sending of commands to the remote device will not be possible because the system does not know what list
of commands to make available for selection.
Note: if your custom DCS "Server ID" is shown in parentheses - eg. "
(SERVER)" - then this
indicates that your "dcserver_SERVER.xml" file was not included in "track.war"
at build-time and/or was not loaded at startup-time. Check that your custom DCS configuration
file is included in your "track.war" and that it is also referenced for inclusion in
the "dcservers.xml" file.
top
J.7) How do I move a tracking device from one account to another? [_]
Remote tracking devices identify themselves with a unique mobile-id, which they send to the server.
The server looks-up this mobile id to see what current Account/Device record owns this tracking device.
In this way, the incoming data always follows the current assignment of the remote tracking device mobile-id.
So to move a tracking device from one account to another, you need only remove the mobile-id assignment
from one Account/Device (by clearing the "Unique ID" field on the Vehicle/Device Admin page), and re-assign
it to a different Account/Device (by re-entering the mobile-id in the new Vehicle/Device Admin page).
The event data in the "old" Account/Device will remain as it was. This feature was designed in this
manner to allow for the "renting" of tracking devices to clients. One client can "rent" a tracking
device for a short time (with the device mobile-id assigned to their account), then when the device
is returned, the mobile-id can then be re-assigned to another client. The previous client will still
be able to view their own private data in their account.
(Note: Moving the actual Device record and all existing event data from one account to another is
not supported)
top
top
J.8) Why does my GPS-based odometer calculation not match my vehicles actual odometer? [_]
A GPS-based odometer calculation accumulates the distances between successive GPS events.
As new events arrive, the straight-line distance travelled since the previous location is added to the
odometer accumulator in the Device record.
While this method usually does a reasonable job "approximating" the actual distance travelled, it tends to underestimate the actual vehicle odometer while the vehicle is in motion because it tends to "straighten out" the roads as GPS events are typically only sent to the server every few minutes.
Also, in some cases it can overestimate the vehicle odometer while the vehicle is stopped because stray GPS events can cause the accumulated distance to increase even while the vehicle is stopped.
Some tracking devices can support a GPS-based distance calculation within the device itself. If the tracking device supports this feature, this is usually more accurate than a server-side GPS distance calculation.
If an accurate odometer value that matches the vehicle odometer is required, then using a device that is capable of obtaining the actual vehicle odometer (such as with an OBDII or CANBUS device) would be recommended.
top
J.9) How do I create my own device communication server (DCS)? [_]
In order for the GTS Enterprise to receive data from a device, a customized
"Device Communication Server" (DCS) will need to be implemented that understands the protocol
used to communicate with the remote device, and insert received events into the SQL database.
A chapter in the "OpenGTS_Config.pdf" installation/configuration document
("Creating Your Own Device Communication Server") describes the starting point for implementing your own
device communication server.
top
top
J.10) How do I stop/start a single device communication server (DCS) module to begin receving data? [_]
The "
An individual DCS module can be started using the following command:
Alternatively, you can use the standard Linux "
(Note: Restarting all running DCS modules is highly recommend after changing any runtime configuration file, such as any "
top
psjava" command (described below)
will show which Device Communication Server (DCS) modules are currently running.An individual DCS module can be started using the following command:
cd $GTS_HOME
bin/runserver.pl -s SERVERNAME [-mem MEGABYTESm] [-debug] [-i]
Where
SERVERNAMEis the name of the DCS module you wish to start. (such as "sanav").- [
...] represent optional arguments. (ie. These options can be omitted). -mem MEGABYTESmspecifies the amount of memory, in megabytes, to assign to the DCS. The megabyte specification must end with a trailing "m" (as in "-mem 500m" or "-mem 1000m").-debugindicates that additional logging information should be generated for debug/testing purposes.-iindicates that all output should be sent to the console where the DCS was started (ie. "interactive"). Omitting this option will cause the DCS to be run in the background (on Linux), with logging information written to the file "$GTS_HOME/logs/SERVERNAME.log".
- Start the "
tk10x" DCS, with logging to "$GTS_HOME/logs/tk10x.log":cd $GTS_HOME bin/runserver.pl -s tk10x
- Start the "
tk10x" DCS, with 500Mb memory, and logging to "$GTS_HOME/logs/tk10x.log":cd $GTS_HOME bin/runserver.pl -s tk10x -mem 500m
- Start the "
tk10x" DCS, with logging to the console:cd $GTS_HOME bin/runserver.pl -s tk10x -i
cd $GTS_HOME
bin/runserver.pl -s SERVERNAME -kill
The "-kill" option tells the "bin/runserver.pl" command to look
for the file "$GTS_HOME/logs/SERVERNAME.pid", which is expected
to contain the DCS process id (PID). This process id is then terminated using the Linux
"kill -term PID" or "kill -9 PID" command.
(an error will be displayed if the "$GTS_HOME/logs/SERVERNAME.pid"
file cannot be found).
Alternatively, you can use the standard Linux "
kill -term PID",
or "kill -9 PID", command to force the DCS to terminate,
where PID is the process-id of the DCS displayed on the
"psjava" command.
(Note: Restarting all running DCS modules is highly recommend after changing any runtime configuration file, such as any "
.conf" or ".xml" file).
top
J.11) How do I stop/start all installed device communication server (DCS) modules? [_]
The "
All installed/confgiured DCS modules can be started using the following command:
Your "
(Note: Restarting all running DCS modules is highly recommend after changing any runtime configuration file, such as any "
top
psjava" command (described below)
will show which Device Communication Server (DCS) modules are currently running.All installed/confgiured DCS modules can be started using the following command:
cd $GTS_HOME
bin/startServers.sh -start
Likewise all running/configured DCS modules can be stopped using the following command:
cd $GTS_HOME
bin/startServers.sh -stop
The "bin/startServers.sh" command obtains the list of active DCS modules which
should be started, or stopped, from the file "bin/serverList".
This file contains entries similar to the following:
# ---------------------------------------------------------------------------
# This modules is 'sourced' by bin/startServers.sh
# ---------------------------------------------------------------------------
# --- Custom Device Communication Server (DCS) startup commands
execServer "Sanav" "sanav" "${options}" ""
#execServer "TK102/TK103" "tk10x" "${options}" ""
The above shows the "sanav" DCS as an active entry which will be started/stopped by the
appropriate "bin/startServers.sh" command.
Since the "tk10x" entry has a prefixing "#" character, it is currently
commented-out and is not an active DCS entry.
Your "
bin/startServers.sh" file may already contain entries for your active DCS
modules, however you can modify this file to add or remove other DCS modules as necessary.
(Note: Restarting all running DCS modules is highly recommend after changing any runtime configuration file, such as any "
.conf" or ".xml" file).
top
J.12) How do I monitor what device communication server (DCS) modules are currently running? [_]
The command "
top
psjava" has been included to provide listing all currently
running Java processes. The command may be run as follows:
cd $GTS_HOME
bin/psjava
The "psjava" command produces output similar to the following:
PID Parent L User Java class/jar
------ ------ - -------- -------------------------------------------------------
1273( 1) 1 opengts /usr/local/GTS_2.5.3-B15/build/lib/calamp.jar
1356( 1) 1 opengts /usr/local/GTS_2.5.3-B15/build/lib/teltonika.jar
1487( 1) 1 opengts /usr/local/GTS_2.5.3-B15/build/lib/qgv200.jar
1531( 1) 1 opengts /usr/local/GTS_2.5.3-B15/build/lib/atrack.jar
19011( 1) 1 opengts org.apache.catalina.startup.Bootstrap
The output describes what DCS module is running, and from which directory. It also displays
the process-id (PID) and which user was used to start the DCS process.
The "org.apache.catalina.startup.Bootstrap" is the running Apache Tomcat process.
top
J.13) How can I monitor the progress of a device communication server (DCS) process? [_]
The log file for a device communication server (DCS) file is typically placed at "
top
$GTS_HOME/logs/SERVERNAME.log",
where "SERVERNAME" is the name of the DCS module (such as "sanav").
This log file can be monitored by using various Linux commands, such as "tail -f logs/SERVERNAME.log",
which will display new information that is written to the log file, or "cat logs/SERVERNAME.log",
which displays the entire contents of the log file. By default, when the size of the log file reaches a preset limit (as
defined by the "log.file.rotate.maxSize" property), the current log file is renamed to
"SERVERNAME.log.YYYYMMDDhhmmss.log", where "YYYYMMDDhhmmss"
represent the current time (year/month/day/hour/minute/seconds) that the file was renamed. A new
"SERVERNAME.log" is then created for new log information.
top
J.14) How can I change the directory to which device communication server (DCS) log files are written? [_]
DCS log files are typically placed in the directory "
top
$GTS_HOME/logs/"
(and have the name "SERVERNAME.log", where SERVERNAME is the name of the DCS).
When "bin/runserver.pl" or "runserver.sh" start a DCS process, they look for the
environment variable "GTS_LOGDIR" for the location to place the log files. If this
environment variable is not defined, it defaults to the value "$GTS_HOME/logs/".
However, this environment variable can be preset to a different location and the log files will be placed
into the directory specified by the environment variable "GTS_LOGDIR".
For example, on Linux installations the "GTS_LOGDIR" environment variable could be
set to the directory "/var/log/gts" (the "gts/" subirectory will need to be
created and be writable by the gts user which starts the DCS modules), then all DCS log files will be
placed into the "/var/log/gts/" directory. (Note: if you use the environment setup script
"/usr/local/gts_vars.env", then this is where the "export GTS_LOGDIR=/var/log/gts"
command can be placed).
top
J.15) How can I change the directory to which device communication server (DCS) PID files are written? [_]
DCS
top
PID files (the file that contains the Process-ID of the DCS) are typically placed in the directory "$GTS_HOME/logs/".
(and have the name "SERVERNAME.pid", where SERVERNAME is the name of the DCS).
When "bin/runserver.pl" or "runserver.sh" start a DCS process, they look for the
environment variable "GTS_PIDDIR" for the location to place the PID files. If this
environment variable is not defined, it defaults to the value "$GTS_HOME/logs/".
However, this environment variable can be preset to a different location and the log files will be placed
into the directory specified by the environment variable "GTS_PIDDIR".
For example, on Linux installations the "GTS_PIDDIR" environment variable could be
set to the directory "/var/run/gts" (the "gts/" subirectory will need to be
created and be writable by the gts user which starts the DCS modules), then all DCS PID files will be
placed into the "/var/run/gts/" directory. (Note: if you use the environment setup script
"/usr/local/gts_vars.env", then this is where the "export GTS_PIDDIR=/var/run/gts"
command can be placed).
top
J.16) How can I send commands to my remote tracking device using SMS? [_]
After making sure that your device can accept commands via SMS, and that your wireless service plan
supports SMS text message, there are a few steps that will need to be configured to enable sending
commands over SMS:
(Rebuild/Redeploy the "
top
- Enable an outbound SMS gateway as describe here.
- In the runtime configuration file for your specific device communication server (DCS) module,
set up a
Commandstag section similar to the following: (this example describes a "Locate Now" command)<!-- Server-to-Device Commands over SMS --> <Commands dispatchPort="sms"> <Command name="LocateNow" enabled="true"> <Type>map,admin</Type> <Description>Locate Now</Description> <String protocol="sms"><![CDATA[PLACE_PROPER_COMMAND_HERE]]></String> </Command> </Commands>Replace thePLACE_PROPER_COMMAND_HEREwith the command applicable to the function you are trying to perform. The "Type" tag indicates where the command selection will be available. "map" indicates the command will be available in a pulldown from the Device/Vehicle Map page, and "admin" indicates that it will be available from the "SMS" command page available on the initial Device/Vehicle Admin list page. -
In the "
config.conf" file, uncomment and set the following property to "true":Domain.Properties.deviceInfo.showSmsButton=true
track.war" file, the enabled commands should
be visible from a pulldown on the Vehicle/Device Map page, and on the "SMS" commands
from the Vehicle/Device Admin page. When the command is selected, the command specified by
"PLACE_PROPER_COMMAND_HERE" above will be sent to the remote tracking
device using your configured outboud SMS gateway.
(Rebuild/Redeploy the "
track.war" file, and restart any running DCS modules, after making any changes to the runtime configuration files.)
top
J.17) When I click on the "Send" command, why does it say that my device may not support commands? [_]
This may be due to a few different issues:
top
- There are no commands configured for this device in its "
dcservers/dcserver_XXXXXXX.xml" configuration file (where "XXXXXXX" is the server ID of the DCS) - If there are no commands configured for this device, the UI is unable to send commands to the device. Check the "dcservers/dcserver_XXXXXXX.xml" file for proper command definition. - The "
track.war" file may not have been rebuilt/redeployed, or the device DCS module may not have been restarted, since the commands were added to the "dcservers/dcserver_XXXXXXX.xml" configuration file - Rebuild/Redeploy the "track.war" file, and restart any running DCS modules, after making any changes to the runtime configuration files. - The device communication server (DCS) module for this device may not
be running -
Check for running DCS modules with the "
psjava" command and restart the device DCS module as necessary.
logs/TrackWar.log" or
"logs/XXXXXXX.log" files (where "XXXXXXX" is the server ID of the DCS) -
Check these log files for other possible reasons and fix accordingly.
top
J.18) I click the command "Send" and it says it was queued, but why does the device never respond? [_]
This may be due to a few different issues:
top
- The commands defined in the "
track.war" file may be out-of-sync with the commands defined in the running DCS module - This can occur if the "track.war" was not rebuilt/redeployed, or the device DCS module was not restarted, since the commands were added to the "dcservers/dcserver_XXXXXXX.xml" configuration file - Rebuild/Redeploy the "track.war" file, and restart any running DCS modules, after making any changes to the runtime configuration files. - The command delivery method may have accepted the command, but is unable to actually deliver it to the remote device -
- For SMS, this could mean that the outbound SMS gateway was not configured properly, or the device phone number was not entered properly.
- For UDP, this could mean that the return UDP route has already been closed by the wireless service provider, or the wireless service provider does not deliver UDP packets to remote devices.
- For TCP, this could mean that the device may not be currently connected to the server (for in-session TCP command delivery), or the wireless service provider does not support sending TCP commands to remote devices.
- The command may have been sent to the remote device, but the device either rejected the command as invalid, or was not configured to send a response back for the type of command it received.
logs/TrackWar.log" or
"logs/XXXXXXX.log" files (where "XXXXXXX" is the server ID of
the DCS) - Check these log files for other possible reasons and fix accordingly.
top
J.19) My tracking device should be transmitting, why don't I see events in the EventData table? [_]
Make sure the proper device communication server (DCS) is running, and monitor the corresponding DCS
log file for possible incoming connections from the device (scan the correspnding DCS log file for
a mobile-id that matches the device).
The most common reasons that events may not be showing up in the EventData table includes the following:
- Your computer/server firewall blocks incoming UDP/TCP connections on the specified port.
(If the server itself provides its own firewall, such as Linux "
iptables", check the firewall settings to make sure that the port is open into the server. Also check that any external firewall/router is configured to allow incoming event packets to be received by the DCS module). - The device does not have a valid/active SIM card (Check with your wireless service provider to make sure the SIM card is active).
- The device has not been programmed with the proper APN ("Access Point Name") configuration as specified by your wireless service provider. (Obtain the proper APN settings from your wireless service provider).
- The device has not been programmed with the proper host and port of your specific device communication server. (Check that the device is configured to send data to the proper host and port for your device communication server. Check all log files for a matching mobile-id to see if the device is sending data to a different DCS module).
- The mobile-id of the device has not been set properly in the "Unique ID" field of the Device/Vehicle Admin page for the account to which the vehicle belongs. (Check that the unique-id setting in the Device/Vehicle Admin page has the proper prefix for the DCS being used, and the proper mobile-id for the specific device).
- The device is not sending a valid GPS location, and the DCS is configured to omit events without a valid GPS fix. (Check the log file for incoming events matching the device mobile-id).
- The device protocol is not supported by the DCS to which it is sending data. (Check that the device firmware supports the expected protocol for the DCS ip:port to which the event data is being sent. Check the DCS log file for incoming events that are not being parsed properly that may belong to the specific device).
- A database error has occured that is preventing Account/Device table lookups, or preventing
new events to be written to the EventData table.
(Check the DCS log files for possible
SQLExceptionerrors. If these errors are found, see the FAQ link "How do I repair a MySQL reported errors ...?" for information regarding how to correct these errors).
J.20) My tracking device used to be transmitting, why am I no longer seeing events? [_]
First check the corresponding DCS log file (usualy in the GTS installation "
logs/" directory)
for any indication that something may have changed that is causing the DCS module to no longer receive or
save events. If no indicators are present in the log file, check to see if some server firewall or network
router configuration has changed that may cause packets to no longer be routed to the server.
Check the above entry for additional possible reasons that the server DCS may no
longer be receiving events from the device.
top
J.21) My device is sending OBD/CANBUS data, why don't I see the data in the EventData table? [_]
If your device is sending engine diagnotic data (ie. CANBUS, J1939, J1708, OBD-II), but you
do not see the corresponding data fields in the
The following command will display the field that have been defined in the
If the engine diagnostic fields are already listed in the
(Rebuild/Redeploy the "
top
EventData table, then it may be that the
EventData optional "CANBUSFieldInfo" fields (such as "fuelLevel",
"fuelTotal", "engineHours", "idleHours", "faultCode", etc)
have not been enabled and initialized in the EventData table,
or it may be that the device communication server (DCS) configuration has not been set to
recognize the specific engine diagnostic data that the device is sending.The following command will display the field that have been defined in the
EventData table:
cd $GTS_HOME
bin/dbAdmin.pl -schema=EventData
If you do not see the "fuelLevel", "engineHours", etc. fields listed
in the output, then
set/uncomment the following property in your "config.conf" file:
startupInit.EventData.CANBUSFieldInfo=true
Then run the following Linux commands to update the new EventData table fields:
cd $GTS_HOME
bin/dbAdmin.pl -tables=ca
On Windows, the commands would be as follows:
cd %GTS_HOME%
bin\dbConfig.bat -tables:ca
The above command will add the missing engine diagnostic fields to the EventData table.If the engine diagnostic fields are already listed in the
EventData table, then
the specific device communication server (DCS) runtime configuration file may need to be
configured to recognize the specific engine diagnostic data being sent.
Consult the specific DCS runtime configuration file for more information.
(Rebuild/Redeploy the "
track.war" file, and restart any running DCS modules, after making any changes to the runtime configuration files.)
top
J.22) My device is sending Temperature data, why don't I see the data in the EventData table? [_]
The
The
The following command will display the field that have been defined in the
If the general temperature fields are already listed in the
(Rebuild/Redeploy the "
top
EventData table can store several different types of temperature information.
If the temperature information you are looking for is part of the OBD/CANBUS information sent by the
device, then you may want to check with the OBD/CANBUS question above.The
EventData table stores general temperature data in the column names
"thermoAverage0" through "thermoAverage3".
If you believe your device is sending general temperature data to the server, but you do not see
these corresponding data fields in the EventData table, then it may be that the
EventData optional "ThermoFieldInfo" fields have not been enabled and
initialized in the EventData table.The following command will display the field that have been defined in the
EventData table:
cd $GTS_HOME
bin/dbAdmin.pl -schema=EventData
If you do not see the "thermoAverage0", "thermoAverage1", etc. fields listed
in the output, then set/uncomment the following property in your "config.conf" file:
startupInit.EventData.ThermoFieldInfo=true
Then run the following Linux commands to update the new EventData table fields:
cd $GTS_HOME
bin/dbAdmin.pl -tables=ca
On Windows, the commands would be as follows:
cd %GTS_HOME%
bin\dbConfig.bat -tables:ca
The above command will add the missing general temperature fields to the EventData table.If the general temperature fields are already listed in the
EventData table, then
the specific device communication server (DCS) runtime configuration file may need to be
configured to recognize the specific analog temperature data being sent.
Consult the specific DCS runtime configuration file for more information.
(Rebuild/Redeploy the "
track.war" file, and restart any running DCS modules, after making any changes to the runtime configuration files.)
top
J.23) Why is my device reporting inaccurate locations, and movement while stopped? [_]
Here are a few factors that can effect GPS accuracy and cause a device to report a location
that is different from where the vehicle is actually located, and in some cases cause a
device to appear moving when it is actually stationary.
- GPS receiver capabilities - Actual GPS accuracy varies from device manufacturer to manufacturer. Typical accuracies are in the +/- 20 meter range for most GPS devices, however devices that incorporate WAAS (Wide Area Augmentation System) can often achieve accuracies down to about +/- 3 meters. Devices which are not WAAS enabled are more likely to show inaccurate locations, and possible motion while device is actually stationary. (Note: Surveying applications typically utilize a Real Time Kinematic GPS receiver for centimeter-level accuracy, which is generally not available for device gps tracking).
- GPS antenna placement - The placement and type of antenna can also effect the accuracy of a GPS receiver. Generally, the GPS antenna should have a clear unobstructed view of the sky. Placing the GPS antenna under a metallic cover can adversely effect the accuracy of a GPS receiver.
- Location of vehicle - The location and environment can also significantly effect the accuracy of a GPS receiver. One significant environmental issues is the "urban canyon effect" where the vehicle is stopped, or traveling, in a city environment with large buildings surrounding the vehicle. The signals received from the GPS satellites can bounce off of buildings and create inaccuracies in the reporting of the vehicle location. This same effect can occur if the vehicle is parked in a garage or other structure.
J.24) How accurate are the GPS receivers in tracking devices? [_]
Most GPS receivers have a standard accruacy of about +/- 20 meters, or approximately +/- 3 meters if the GPS receiver
incorporates WAAS (Wide Area Augmentation System). For fleet vehicle tracking purposes +/- 20 meters often
provides enough accuracy to determine geofence arrival departure, and general location information. While having
+/- 3 meter accuracy (with WAAS enabled devices) can provide nearly "parking space" accuracy.
The environment can also effect the accuracy of a GPS receiver as well. One of the main environmental issues is the "urban canyon effect". This is where the vehicle is traveling in a city environment with large buildings surrounding the vehicle. The signals received from the GPS satellites can bounce off of buildings and create inaccuracies in the reporting of the vehicle location.
When displaying a latitude/longitude to a user, the question often arises "How many decimal places should be displayed?". Between each degree of latitude is 60 nautical miles (about 111 km, or 69 statute miles), and between each degree of longitude at the equator is about 60 nautical miles (as the longitude increases or decreases at the poles, the distance between longitude lines approaches 0). For simplicity, we'll assume we are calculating distances at the equator. If 1 degree equals 60 nautical miles, then 0.0001 (4 decimal places) of a degree equals 0.006 (0.0001 x 60) nautical miles, which is about 11.1 meters. And 0.00001 (5 decimal places) of a degree is about 1.1 meters (well within the accuracy of most WAAS enabled GPS receivers). So displaying latitude/longitude to 4 decimal places provides approximately 11 to 15 meters of displayed accuracy, while displaying 5 decimal places provides approximately 1 to 2 meters of displayed accuracy. If the device itself is only capable of providing +/- 20 meters of accuracy, then only 4 decimal places are needed to be able to display the full accuracy of the device.
top
J.25) Why do the TCP sessions in my DCS module always time-out? [_]
The default behavior of most of the supported DCS modules is to force a TCP session closed
after a certain timeout to release/reuse system resources used by the TCP session. This allows
greater scalability for supporting a larger number of devices.
However, some devices which use TCP mode to send data to the server may require that they
always maintain a constant connection with the server (sometimes even if they have no data
to transmit). In this case it may be necessary to configure the DCS module to increase the timeout
interval before the TCP session if forced to close.
This can be configured in the "
top
dcservers.xml" file
(or "dcservers/dcserver_XXXXX.xml" file where
XXXXX is the DCS name).
The following example sets the timeout to 1 hour (3600000 milliseconds):
<Property key="tcpIdleTimeoutMS">3600000</Property>
<Property key="tcpPacketTimeoutMS">3600000</Property>
<Property key="tcpSessionTimeoutMS">3600000</Property>
This will cause the DCS (for which the above properties were set) to leave the TCP session
open for up to 1 hour (3600000 milliseconds) before forcing the session to close.
(Note: each connected TCP connection consumes system resources - memory, threads,
filehandles, etc. Having many such connected TCP sessions may significantly limit the number
of devices which can connect with your server).
top
J.26) Will the "tk10x" DCS support my specific TK102/TK103 device? [_]
There are many different manufacturers that make a device that they call TK102/TK103.
Most use the same protocol, however there are a few that use a different protocol format.
The "tk10x" device communication server (DCS) module that comes with OpenGTS should be able to parse
most of these TK102/TK103 protocol formats.
It does this by trying to identify the differences in the protocol formats and parse accordingly.
The "tk10x" DCS attempts to detect and support about 6 or 7 different TK102/TK103 protocol formats that we have encountered.
However there are always new manufacturers making new TK102/TK103 devices that may use a different protocol format.
There is no guarantee that a specific manufacturer/model of TK102/TK103 device will use one of the protocols supported by the "tk10x" DCS.
The only way to be sure is to try it and see if the "tk10x" DCS can parse the data.
top
top
J.27) Why am I getting a "Read timeout" when using the "tk10x" DCS with a TK102 device? [_]
Some TK102 devices do not provide a proper packet terminating character which would indicate to
the server that the packet is complete and can be processed. If this is the case, you can try
adding the following property to the "
(Restart any running "
top
dcservers.xml" file, in the "tk10x"
DCServer section:
<Property key="packetLenEndOfStream">true</Property>
This configuration will cause the data end-of-stream to be considered the packet termination so
that the packet can then be parsed and processed.
(Restart any running "
tk10x" DCS module after making any changes to the runtime configuration file.)
top
J.28) How do I use a Boost Mobile Motorola GPS phone with GTSE? [_]
For information regarding support for various Boost Mobile Motorola phones, please see the document
at "
top
MotoDMTP/MotoDMTP.txt" in the GTS Enterprise installation directory.
top
J.29) How do I use Sanav devices with GTSE? [_]
The GTS Enterprise supports UDP/TCP communication with the various Sanav
devices. The Sanav device communication server (DCS) configuration file can be found at
"
Using HTTP-mode communication with Sanav devices is also supported. Additional documentation for installing and configuring the GC-101 http-mode server within the GTS Enterprise can be found in the "
top
dcservers/dcserver_sanav.xml" where various configuration options can be
set, including the port on which the Sanav DCS will listen for incoming connections
from teh remote devices (the default port is "31220"). The following command
can be used to start the Sanav DCS:
cd $GTS_HOME
bin/runserver.pl -s sanav
This will start the Sanav DCS and place any logging information into the DCS log file
at "logs/sanav.log".Using HTTP-mode communication with Sanav devices is also supported. Additional documentation for installing and configuring the GC-101 http-mode server within the GTS Enterprise can be found in the "
README.txt" file
in the "gc101" source directory at "src/org/opengts/war/gc101/README.txt".
top
J.30) How do I use the "Aspicore GSM Tracker" Nokia phone tracking software with GTSE? [_]
The document "OpenGTS_Config.pdf" contains
information for installing/configuring the device communication server for Aspicore supported
phones.
top
top
J.31) What are the various methods used for sending commands to the remote device? [_]
The 3 most common methods used for sending commands to a remote tracking device are
SMS,
TCP,
and
UDP.
Because of its advantages (and manageable disadvantages), SMS is typically
the recommended method for sending commands to a remote device.
Here is a brief description of the advantages and disadvantages of each of these 3 methods:
Here is a brief description of the advantages and disadvantages of each of these 3 methods:
- SMS - Short Messaging Service (Text messages).
- Advantages:
- Does not need the current IP address of the device (needs only the phone#).
- May operate in areas where GPRS coverage is unavailable or not reliable.
- Disadvantages:
- SMS text messaging must be enabled by the wireless provider.
- May incure extra costs from the wireless provider.
- Occasionally SMS message delivery may be delayed. The server does not know when the SMS message is actually delivered.
- Requires that the server be configured with an available outbound SMS gateway with which to send SMS text messages.
- Advantages:
- TCP - Transmission Control Protocol.
- Advantage:
- The message can be delivered quickly, with immediate delivery confirmation.
- Disadvantage:
- Has much higher data transmission overhead, which may incure additional data costs from the wireless service provider.
- For connections originating from the server, requires that the server know the current IP address of the remote device. If the device uses a dynamically assigned IP address, the last IP address retained by the server may not be the same as the latest IP address assigned to the device by the wireless service provider.
- For connections originating from the server, requires that the wireless service provider allow unsolicited connections into the remote device (many wireless service providers do not allow unsolicited TCP sessions into a remote device).
- For commands sent over a current device TCP communication session, requires that the device be currently connected to the server (this method of device data transmission also has other scalability issues as well).
- Advantage:
- UDP - User Datagram Protocol.
- Advantages:
- Has low data transmission overhead.
- The message can be delivered quickly.
- Disadvantages:
- Requires that the server know the current IP address of the remote device. If the device uses a dynamically assigned IP address, the last IP address retained by the server may not be the same as the latest IP address assigned to the device by the wireless service provider.
- Requires that the UDP packet "routing" remain open from the server to the remote device for an extended period of time. When a device sends a UDP data packet to the server, the return UDP path (from the server to the device) typically only remains open for a short period of time (often 2 minutes or less). This usually also requires that the device send its data packets to the server using UDP, rather than TCP.
- UDP packet delivery is not guaranteed. This means that the server does not know with certainty that the message was delivered.
- Requires that the wireless service provider allow UDP datagrams to be sent to the remote device (some wireless service providers have been known to not allow any UDP messages to be sent to a remote device).
- Advantages:
J.32) How do I configure a device communication server (DCS) to run as a background service on Windows? [_]
The Apache Commons "Procrun" is a set of applications that allows
Java applications (such as a Device Communication Server - DCS) to be wrapped as a Windows service.
You can find more information regarding this Apache "Procrun" feature at the following link:
http://commons.apache.org/daemon/procrun.html
"NSSM" is another alternative Windows service manager wrapper. More information regarding the "NSSM"
windows service manage can be found at the following link:
http://nssm.cc/description
top
J.33) My device provides battery-voltage, why am I not seeing a battery-level value? [_]
The "battery level" value must also come directly from the device. Unfortunately, the battery-level cannot be
accurately determined from the battery-voltage without using a special algorithm provided by the device
manufacture themselves. In order to accurately calculate a battery-level from the battery-voltage, the power
consumption characteristics of the device must be understood, such as the size of the battery (in milliamp-hours),
the full-voltage value, the cutoff-voltage value, and the power-consumption-curve over time. Only the device
manufacturer will have a clear understanding of these power consumption characteristics in order to produce an
algorithm that can accurately determine the battery-level for a given battery-voltage.
top
top
J.34) Why is my device not receiving UDP packet acknowledgements sent by the server? [_]
UDP acknowledgements returned to a remote device must be sent to the IP address and port specified by the device,
and sent over the same network interface to which the device originally sent the data packet.
If the server has more than one network interface, it is possible that the server is returning UDP acknowledgements
back to the device over the wrong network interface. To make sure that the server uses only the proper network
interface for receiving and sending UDP packets, uncomment/set the following property in the "
(Rebuild/Redeploy the "
top
config.conf" file:
DCServerConfig.bindAddress=SERVER_IP_ADDRESSWhere "
SERVER_IP_ADDRESS" is replaced with the IP address to which the remote devices
are sending their data packets.
(Rebuild/Redeploy the "
track.war" file, and restart any running DCS modules, after making any changes to the runtime configuration files.)
top
J.35) How do I allocate more memory to a DCS module? [_]
If you are seeing out-of-memory issues in the log file of a DCS module, you can increase the amount of memory
allocated to the DCS process by restarting the DCS with the "
top
-memory MEMORYSIZE" option,
where "MEMORYSIZE" specifies the amount of memory to allocate.
For example, the following specifies that the DCS should have 1024Mb (1Gb) of memory allocated to the process:
(first make sure that the DCS is no longer running)
cd $GTS_HOME
bin/runserver.pl -memory 1024m -s DCSNAME
Where "DCSNAME" is the name of the DCS which is being started.
top
J.36) I am seeing "UniqueID not found" in the DCS log files, what does this mean? [_]
A "UniqueID" is created by prefixing the device mobile-id (typically a serial#, IMEI#, or ESN) with a prefix
value defined for the specific DCS module. This creates an identifier that makes this device unique among
all other devices in the system. The DCS then looks up this UniqueID in the Device table to see which Account/Device
record to which it belongs.
If the DCS cannot find the matching device record, it will display a "UniqueID not found" message, followed
by the unqiue-id value that it could not find.
This means that a Device record has not yet been created and assigned to this specific device mobile-id (or the "Unique ID"
field in the Device/Vehicle Admin page was entered with an incorrect value).
To correct this condition, create a device record in the appropriate account and set the "Unique ID" field
on the Device/Vehicle Admin page to the UniqueID value provided by the device.
top
top
K.1) Where can I find information on the ENRE rule selector syntax and functions? [_]
The Event Notification Rules Engine (ENRE) is an available add-on module for the GTS Enterprise
that can support complex rule definitions for sending notifications based on arrival/departure,
speeding, digital input triggers, time of day triggers, alarms, etc.
More information on the ENRE rule selectors syntax, functions, and variables, can be found in the
"Event Notification Rules Engine Technical Manual".
top
top
K.2) How do I enable the Rule and GeoCorridor Admin pages? [_]
The Rule Admin and GeoCorridor Admin pages require the Event Notification Rules Engine (ENRE) module.
The Rule/GeoCorridor Admin menu options should already be displayed and available if the ENRE is installed.
If these menu options are not displayed, then it is likely that the ENRE module is not installed on the system.
Please contact GeoTelematic Solutions, Inc. for information on obtaining the Event Notification Rules Engine module.
top
top
K.3) How do I enable the ENRE Periodic Maintenance Notification? [_]
Enabling vehicle Periodic Maintenance notification is described in Chapter 7 of the
"Event Notification Rules Engine Technical Manual".
top
top
K.4) How do I assign a specific ENRE rule to a group of vehicles? [_]
The default configuration is to allow assigning specific rules to a specific Device/Vehicle,
however, the Event Notification Rules Engine (ENRE) also supports the ability to assign
a rule to a group of vehicles. To enable this feature, uncomment/set the following property
in your "
(Rebuild/Redeploy the "
top
config.conf" file:
RuleList.includeGroupRules=true
Then rebuild/redeploy the "track.war" file. A new pull-down menu should then be
available for group selection on the Rule Admin page.
(Rebuild/Redeploy the "
track.war" file, and restart any running DCS modules, after making any changes to the runtime configuration files.)
top
K.5) How do I send rule email notifications to multiple recipients? [_]
When a rule is triggered, a notification email is sent to the combination of the email addresses
found on the Rule, Device, and Account admin pages. Multiple email addresses can be specified in
the Notify Email address fields by separating them with commas.
For example:
top
For example:
Notify Email: email.1@example.com, email.2@example.com, email.3@example.com
If you have a large list of email recipients, it may be much easier to manage using an email
alias list (such as "group@example.com") with your email service provider that will
automatically distribute the email to all addresses assigned to the list.
top
K.6) How do I send a rule notification as an SMS text message? [_]
The Notify Email address fields on the Rule, Device, and Account admin pages
can also specify an SMS destination/recipient phone number with the following syntax
"
For example:
top
sms:SMS_Phone#", where "SMS_Phone#" is the
phone number to which the SMS notification should be sent (the destination phone number must be
prefixed with the characters "sms:"). For example:
Notify Email: sms:1235551234, sms:1235554321
A working outbound SMS gateway configuration is
required to send outbound SMS messages. See How do I send outbound SMS messages ...
for more information.
top
K.7) How can I separately select which list of Account/Device/Rule notification email recipients to combine? [_]
On the Rule Admin page, when the "Trigger Action" field "EMail" box is checked, the default behavior is
to send an email notification to the combined list of recipients from the Account, Device, and Rule
email addresses specified in the respective "Notify Email" list.
The Rule Admin page can also be configured to allow specifically selecting which of the Account/Device/Rule
notification email lists to combine.
This configuration can be enabled by setting the following property in your "
(Rebuild/Redeploy the "
top
config.conf" file:
Domain.Properties.ruleInfo.showTriggerActions=email
This will enable the ability to separately select the Account, Device, or Rule list of email recipients.
(Rebuild/Redeploy the "
track.war" file, and restart any running DCS modules, after making any changes to the runtime configuration files.)
top
K.8) How do I enable the "Alert Monitor" and "Vehicle Alerts" page? [_]
The "Alert Monitor" feature allows setting up a specific rule which can be monitored through a visual
interface when an administrator is logged-in to the system, and the "Vehicle Alerts" page displays the
current list of devices having an alert that has not yet been cleared.
Enabling the "Alert Monitor" and "Vehicle Alerts" page is described in Chapter 6 of the
"Event Notification Rules Engine Technical Manual".
top
top
K.9) How do I enable the "Fuel Register" feature? [_]
The ENRE Fuel Register feature allows detecting increases or decreases in the reported
fuel-level that are over a given specified threshold. This provides the detection of re-fueling
events, as well as possible fuel theft events (Note that this requires a fuel-level sensor on
the device that reports an accurate fuel-level reading to the server).
This feature must be enabled in order to have the fuel-level monitored as events are inserted into
the
To enable the "Fuel Register Detail" report, the following property must also be enabled:
top
EventData table.
The Fuel Register feature is configured with the following properties:
FuelRegister.installFuelManager=true FuelRegister.ignoreNegativeFuelLevels=true FuelRegister.ignoreZeroFuelLevels=true FuelRegister.ignoreWhileMoving=false FuelRegister.levelIncreaseThreshold=0.50 FuelRegister.levelDecreaseThreshold=0.30Set the above property values to those that best fit your application requirements. The above "
FuelRegister.levelIncreaseThreshold" and "FuelRegister.levelDecreaseThreshold"
values are specified as a percent value between "0.0" (0%) and "1.0" (100%).
To enable the "Fuel Register Detail" report, the following property must also be enabled:
Domain.Reports.FuelRegisterDetail=trueWith this property enabled, the "Fuel Register Detail" report will appear on the Device/Vehicle Detail report menu.
top
K.10) Why are no emails being sent for my rule notification? [_]
Active rules are checked for the selected devices and status codes as events arrive from the remote tracking
device and are inserted into the
If you have set up a rule and are expecting an email to occur as a result of a rule trigger, however no email is being sent, then check that the following items have been property configured and set for the Rule, Account, and Device/Vehicle:
EventData table.
If a rule is triggered, the defined action is performed. This is typically sending an email to a list of
recipients defined in any of the specified notification recipients in the Rule Admin, Device/Vehicle Admin,
and/or Account Admin.If you have set up a rule and are expecting an email to occur as a result of a rule trigger, however no email is being sent, then check that the following items have been property configured and set for the Rule, Account, and Device/Vehicle:
- Rule Admin: Make sure that the "Active" selection is set to "Yes".
- Rule Admin: Make sure the "Cron Rule" selection is set to "No" for rules that should be checked for all events as they arrive at the server.
- Rule Admin: Make sure that the rule selector syntax is correct, and properly specifies the condition you wish to check for the incoming device events. See the "Event Notification Rules Engine Technical Manual" for more information.
- Rule Admin: Make sure that the "Trigger Action" section has the appropriate "EMail" selections checked.
- Rule Admin: Make sure that the "Device/Vehicle ID" selection (or "Group/Fleet ID" if displayed) does not exclude the device for which you are trying to receive the notification.
- Rule Admin: Make sure that the "Status Code" selection does not exclude other events that
may otherwise provide the expected rule trigger. For instance, if you wish to receive an email notification
whenever the vehicle exceeds 100 km/h [with rule selector to "
(speed>100)"], and have also selected status code "Speeding", this rule would only be checked if BOTH the event status code is "Speeding" AND the condition "(speed>100)" is true. However, if the device is not configured to ever send a "Speeding" event, then this rule would never be checked, and the email notification would never occur. In this case, selecting "All Codes" will allow this rule check to occur for all incoming events. - System Accounts Admin ("sysadmin" login): Make sure that "Notify Enable" is set to "Yes" for the Account for which you are expecting the notification.
- Device/Vehicle Admin: Make sure that "Notify Enable" is set to "Yes" for the device for which you are expecting the notification.
- Account, Device/Vehicle, or Rule Admin: Make sure that at least one valid email address is specified in the "Notify EMail" field of the Account, Device, and/or Rule Admin.
- EMail Configuration: Make sure that your SMTP/EMail configuration is set and has been tested.
- DCS Log Files: Lastly, examine the log file for the Device Communication Server (DCS) module receiving events for the device to see that the device is sending events and that the rule condition is being checked. The log file will also indicate if there were any issues while sending the email notifications. Common issues include authentication errors or other SMTP service errors where the SMTP service provider is rejecting or refusing to send an email.
K.11) How do I set the "Work Hours" for checking within rule triggers? [_]
The Event Notification Rules Engine supports the function "
The Work Hours can also be set on a per-device basis by setting these values within the Device/Vehicle Admin. To enable setting the Work Hours per device, the Device tables needs to have the optional "
The following property will allow the "Hours of Operation" field to be displayed on the Device/Vehicle Admin page:
The Work Hours can then be specified in the "Hours of Operation" field on the Device/Vehicle Admin page as in the following example:
The "
top
$WORKHOURS" which returns true if the
current event time has occurred with the specified "Work Hours" time frame.
The following specification in one of the ".conf" files (ie. "config.conf", etc)
will set the global/default "Work Hours" specification:
rule.workHours.sun=
rule.workHours.mon=06:00-18:00
rule.workHours.tue=06:00-18:00
rule.workHours.wed=06:00-18:00
rule.workHours.thu=06:00-18:00
rule.workHours.fri=06:00-18:00
rule.workHours.sat=
The above example indicates that the "Work Hours" are between 6am and 6pm Monday through Friday.The Work Hours can also be set on a per-device basis by setting these values within the Device/Vehicle Admin. To enable setting the Work Hours per device, the Device tables needs to have the optional "
startupInit.Device.NotificationFieldInfo" fields enabled.
(see Enabling Optional Table Columns for more information).The following property will allow the "Hours of Operation" field to be displayed on the Device/Vehicle Admin page:
Domain.Properties.deviceInfo.showHoursOfOperation=true
(Then rebuild/redeploy the "track.war" file)The Work Hours can then be specified in the "Hours of Operation" field on the Device/Vehicle Admin page as in the following example:
sun= mon=0600-1800 tue=0600-1800 wed=0600-1800 thu=0600-1800 fri=0600-1800 sat=
The above example indicates that the "Work Hours" are between 6am and 6pm Monday through Friday
(if there are no "work hours" for a specific day, that time-frame is left blank).The "
$WORKHOURS" rule selector function will then first check the Work Hours specification
of the device. If the device does not define specific Work Hours, then the global/default Work Hours
specification will be used.
top
K.12) How do I enable the "Predefined Actions" feature on the Rule Admin page? [_]
The "Predefined Action" feature allow adding other custom actions which will be executed when the rule
is triggered by the conditions specified in the "Rule Selector" field
(such as generating additional events, sending commands to the device, etc).
For more information, see Appendix "E" in the
"Event Notification Rules Engine Technical Manual".
top
top
K.13) How do I enable "Reminder Messages" in the Device Admin and Rule Admin? [_]
"Reminder" messages allow setting a message that will be sent to the selected email address at some time
in the future.
To enable Reminder messages in the Device/Vehicle admin page, make sure the following properties are
uncommented and set to true (preferrably in the "config.conf" file):
Using the Rule Admin, a new rule can then be created to check the reminder periodically. The rule settings should be similar to the following:
In the Device/Vehicle Admin page, set the "Reminder Message" as desired, and set the "Reminder Interval" to a value using one of the following date or time interval formats:
(Rebuild/Redeploy the "
top
startupInit.Device.MaintOdometerFieldInfo=true
Domain.Properties.deviceInfo.showReminderMessage=true
Domain.Properties.ruleInfo.showPredefinedActions=true
Then update the table columns to make sure the reminder columns are added to the Device table, and
rebuild/redeploy the "track.war" file to display the reminder
fields on the Device/Vehicle admin page. Also make sure the "Cron" service is also running.
Using the Rule Admin, a new rule can then be created to check the reminder periodically. The rule settings should be similar to the following:
Selector : ($REMINDER)
Is Cron Rule : Hourly
Trigger Action : EMail
Prefedined Actions: resetReminder
Email subj/body : ${reminderMessage}
The above rule will check the "($REMINDER)" selector every hour.
When the "($REMINDER)" function returns 'true', the email subject/body message will
be sent. The "resetReminder" value set in the predefined actions will then reset the
reminder for the next interval.
(Note: without the "resetReminder" predefined-action, the reminder notification will
continue to be sent every hour).
In the Device/Vehicle Admin page, set the "Reminder Message" as desired, and set the "Reminder Interval" to a value using one of the following date or time interval formats:
- Specific Date -
A specific date using the form "
date:YYYY/MM/DD" (example "date:2014/12/25"). - Specific Month -
A specific month using the month abbreviation.
(example "
jan") - Specific Day-of-Week -
A specific day-of-week using the week-day abbreviation.
(example "
tue") - Periodic Interval -
A repeating time interval (in seconds).
(example "
12345" seconds)
(Rebuild/Redeploy the "
track.war" file, and restart any running DCS modules, after making any changes to the runtime configuration files.)
top
K.14) How do I keep the same rule from triggering for the same condition multiple times? [_]
A specific rule will trigger a notification whenever the specified rule condition is met in an
incoming event, however it may not always be desireable to keep sending a notification for every
event for which the condition was met, but rather only the first time the condition occurs.
On the Rules Admin page, the "Minimum Interval" and "Interval Reset" can be used to accomplish
this specific rule triggering behavior.
Minimum Interval:
Minimum Interval:
The "Minimum Interval" allows specifying (in seconds) the minimum interval between rule triggers
for the same condition (detected by the same rule).
For example, assume we have a rule that detects a speeding condition and we are seeing that as
the vehicle is travelling fast down the road we are getting a speeding email notification every
couple minutes or more (depending on how often the device is sending events to the server).
If we only want one rule trigger to occur when the vehicle goes from non-speeding to speeding,
or if the vehicle is still continuing to speed after one hour, we can set the "Minimum Interval"
value to "3600" (1-hour). Then we will only get one rule notification when the vehicle starts
to speed and another notification each hour that the vehicle is continuing to speed.
Interval Reset:
If during that hour, we also want to know if the vehicle slows down to a non-speeding condition,
and then speeds up again (another speeding condition), we can also set the "Interval Reset" field
to "Yes" which will reset the "Minimum Interval" timer if during that time the speeding rule
condition ever returns false. Then on the next speeding condition the rule notification will again
be sent and the 1-hour "Minimum Interval" timer will restart.
top
L.1) When attempting to build the project, why do I get a "Permission Denied" error? [_]
This error can occur on Linux when building the GTS Enterprise project as one user
(such as "
(see the Linux "
top
opengts"), when another user (such as "root") happens to
own some, or all, of the files in the installation directory. All of the files within the
GTS installation directory should be owned by the same user which is building the project.
To make sure that all of the files are owned by the proper user, the following command may
be executed as "root":
chown -R opengts:opengts /usr/local/GTS_2.5.3-B15
The "-R" indicates that a recursive ownership change should be performed. The
"opengts:opengts" indicates the user and group to which the directory ownership
should be changed (change this to your preferred user:group). And
"/usr/local/GTS_2.5.3-B15" should be the absolute path of where GTS was
installed (change this to the actual directory path where GTS was installed).(see the Linux "
man" page for "chown" for more information on this
command - ie. command "man chown")
top
L.2) How do I fix the compile error "... package javax.mail does not exist"? [_]
This compile error occurs when the JavaMail library has not yet been installed. Please
refer to the "OpenGTS_Config.pdf" document
(section 2.2) for additional information.
top
top
L.3) How do I fix the login error "Error reading Account"? [_]
This error occurs when the login is unable to properly access the GTS database managed by MySQL.
Check one, or both, of the following log files for additional information regarding the
reason for this error:
$GTS_HOME/logs/TrackWar.log$CATALINA_HOME/logs/catalina.out
- The MySQL database service is not running.
Check the "
mysqld" service to make sure that it has been started and is running properly. - The GTS Enterprise database has not been properly initialized for MySQL.
Refer to the "OpenGTS_Config.pdf"
document for how to initialize the GTS Enterprsie database for MySQL, then run the
"
bin/checkInstall.sh" command to check the installation (see the FAQ link "How do I check my GTSE installation ...?" above for information regarding how to check the installation). - The MySQL database service is running, but MySQL has detected an issue with the database (such as "Incorrect key file" or "Table marked as crashed"). See the FAQ link "How do I repair a MySQL reported errors ...?" above for information regarding how to correct this error.
L.4) How do I fix the web-page Status 404 error "'private.xml' contains syntax/parsing errors"? [_]
This occurs when the file "
top
private.xml", or "private/private_common.xml" file,
has been modified, and XML syntax errors have been introduced into the file. Running the command
"bin/checkInstall.sh" should help pinpoint where in the file the XML syntax errors
exist. Fix the XML syntax errors, then re-run the "bin/checkInstall.sh" command to
see if the XML syntax errors were corrected. Then rebuild/redploy the "track.war" file.
top
L.5) How do I fix the web-page Status 404 error "The requested resource (/track/Track) is not available"? [_]
This occurs when Tomcat is running, but the "
top
track.war" file has not been
properly deployed to Tomcat's "webapps" directory (ie. "$CATALINA_HOME/webapps/.").
Make sure that the GTS Enterprise "build/track.war" file has been copied to
the Tomcat "webapps" directory. Tomcat should then automatically deploy the
"track.war" file by unzipping the file and making it available through the
web-interface (if Tomcat does not automatically deploy the track.war file, make sure
that Tomcat's "autoDeploy" property is set to "true", in the Tomcat
"conf/server.xml" file). Also make sure that you are using the proper
URL when attempting to access the login page. Assuming that you have installed Tomcat on the
server "localhost", using port "8080", the correct URL should be
"http://localhost:8080/track/Track".
top
L.6) How do I fix the web-page error "The requested resource (/track/track) is not available"? [_]
URLs are case-sensitive. The correct URL should be specified as
"
top
http://localhost:8080/track/Track", with the first letter of the second
"Track" capitalized. ("localhost" should be replaced with
your appropriate domain name).
top
L.7) After logging-in, selecting any menu option logs me out again. [_]
If everytime you log-in and select a menu option, it always logs you out and displays
the login page again, then the most likely reason is that your client browser is not
accepting cookies from the server. The GTS server uses client-side cookies to maintain
session state. If cookies are disabled, the server is not able to determine that the
user has logged-in. To correct this, configure your client browser to accept cookies
from the server providing the GTS service.
top
top
L.8) How do I fix the command-line error "Can't locate .../common.pl in @INC ..."? [_]
This command-line error can occur when executing a Perl command script, and the
"
top
GTS_HOME" environment variable is not set, or is set to an invalid location.
Set the "GTS_HOME" environment variable to the proper location, and try the
command again.
top
L.9) When running a command, how do I fix the error "ERROR: 'build/lib/tools.jar' not found!"? [_]
This error can occasionally occur when running various "
top
.sh" commands, such as
the "checkInstall.sh" command.
This error message may be accompanied with the following text:
ERROR: 'build/lib/tools.jar' not found!
Possible reasons may include one or more of the following:
- This command is not being run from the OpenGTS® installation directory
- The OpenGTS® project has not been compiled properly
Current directory = /usr/local/GTS_2.5.3-B15/bin
As indicated, the most likely reason for this error is that the current directory is
the GTS installation "bin/" directory, rather than the GTS installation directory
itself. The correct way to run the "checkInstall.sh" command is as follows:
cd $GTS_HOME
bin/checkInstall.sh
This error can also occur if the "build/lib/tools.jar" does not exist,
meaning that the "build" directory was cleaned, and never rebuilt.
In this case, rebuild the GTS libraries using "ant all" (from the GTS installation
directory), then try the command again.
top
L.10) When running a command, how do I fix the error "Exception in 'main' java.lang.NoClassDefFoundError"? [_]
This error is similar to the above
top
tools.jar error, and can
occasionally occur when running various ".sh" commands.
The most likely reason for this error is that the current directory is
the GTS installation "bin/" directory, rather than the GTS installation directory
itself. The correct way to run ".sh" commands is as follows:
cd $GTS_HOME
bin/COMMANDNAME.sh
Where COMMANDNAME is the name of the command you wish to run.
top
L.11) I'm seeing errors indicating "Too many open files", how do I increase the allowed number of open files?"? [_]
This error can occasionally occur when you are using devices which transmit data to the server
using TCP, and which require that they always maintain an open TCP connection with the server
(thus consuming many open files). To check to see the current "open file" limit for the current
user, enter the following command into a Linux shell window:
The following command can be used to view the maximum number of allowed open files for a specific PID (process id):
NOTE: The following command will display the system-wide open file limit:
top
ulimit -n
The returned response (typically "1024") will indicate the maximum number of allowed
open files for the current user
(Note: this does not necessarily indicate the maximum number of concurrent TCP connections that can be
handled, as there are many tasks that can consume multiple file handles in order to be completed, and
a TCP session may require multiple open files).
To increase this limit, modify the file "/etc/security/limits.conf" (as the Linux
"root" user) and add the following lines (or modify the existing lines if they are already present):
* soft nofile 10000
* hard nofile 10000
Once the file is saved, the effects are immediate, however you may need to have the user log out
and log back in to make the change effective for the specific user, and running DCS modules will need to be
restarted.
The "ulimit -n" command should then display the new limit.The following command can be used to view the maximum number of allowed open files for a specific PID (process id):
cat /proc/PID/limits
Where PID is the id of the process for which you want to view the maximum number of allowed open files.
Look for the line titled "Max open files".NOTE: The following command will display the system-wide open file limit:
cat /proc/sys/fs/file-max
The user specified open-file limit must be set to a value less than the system-wide maximum limit.
top
L.12) Why am I seeing errors indicating "java.net.UnknownHostException: HOST.example.com"? [_]
If the local host name has not been properly defined to the Linux system
you may see an error similar to the following in the log files, or when starting a command from
the command-line:
top
[ERROR] Exception: java.net.UnknownHostException: HOST.example.com
at java.net.InetAddress.getLocalHost(InetAddress.java:1426)
...
This indicates that the local machine has been assigned a name, but the locally configured DNS
is not able to resolve this assigned name. In the above error example, the name "HOST.example.com"
has been assigned to the local computer, but the DNS is unable to resolve the name. Check with
your local system administrator for various ways to resolve this issue, however, in most cases
this can be resolved by placing the assigned name in the "/etc/hosts" file next to the
"localhost" definition.
top
L.13) Why am I seeing the message "This report has reached it's record display limit ..." on some reports? [_]
This occurs when the report has reached the limit for the maximum number of report lines
that it is configured to display. This limit is controlled by the following property for
the specific report in the "
(Rebuild/Redeploy the "
top
reports.xml" file:
<Constraints>
...
<SelectionLimit type="first">2000</SelectionLimit>
<ReportLimit>2000</ReportLimit>
</Constraints>
The "SelectionLimit" specifies the maximum number of records that should be
selected from the database table, and "ReportLimit" specifies the maximum
number of records that should be allowed to display on the specific report. These values
can be changed to increased the allowed maximum number of displayed report records.
(Rebuild/Redeploy the "
track.war" file after making any changes to the runtime configuration files.)
top
L.14) How do I fix XML "[Fatal Error] ..." syntax errors? [_]
The GTS contains many different XML configuration files. When the XML configuration files are loaded and parsed,
the XML within these files is expected to be well-formed with proper syntax. When an XML file is modified and
a syntax error is introduced, an XML parsing error message of the following form is displayed:
Here are a few example XML syntax errors that could be displayed:
top
[Fatal Error] CONFIGFILE.xml:XXXX:YY ...
Fortunately, the error message will include the file containing the error (in the place
of "CONFIGFILE.xml" above),
the line number (in the place of "XXXX" above),
and possibly the character number on the line (in the place of "YY" above).
This information helps to exactly locate where the syntax error was introduced. Here are a few example XML syntax errors that could be displayed:
[Fatal Error] private_common.xml:646:42:
The entity name must immediately follow the '&' in the entity reference.
In file "private_common.xml", line646, a tag value was improperly specified.[Fatal Error] private_common.xml:892:48:
The string "--" is not permitted within comments.
In file "private_common.xml", line892, a comment specification is invalid.[Fatal Error] dcserver_sanav.xml:202:19:
The element type "Commands" must be terminated by the matching end-tag.
In file "private_common.xml", line202, a "Commands" tag entry was improperly specified.
top
L.15) How do I fix Tomcat "java.lang.OutOfMemoryError: PermGen space" errors? [_]
This Tomcat error is occasionally displayed in the Tomcat "
This error is usually due to Tomcat not being able to properly clean up after older versions of the redeployed "
Manually stopping and restarting Tomcat will usually correct this issue. It is recommended to manually restart Tomcat after "auto" redeploying 2 to 4 new copies of a "
You can also increase the PermGen memory size with the "
top
$CATALINA_HOME/logs/catalina.out"
log file when several copies of a "track.war" file have been "auto" deployed to Tomcat (by
copying the ".war" file to the Tomcat "webapps/" directory), without occationally
manually stopping/restarting Tomcat. When this error occurs, one of the symptoms is that the login
page no longer displays. This error is usually due to Tomcat not being able to properly clean up after older versions of the redeployed "
.war" file. This prevents some memory resources to be reclaimed,
resulting in the "java.lang.OutOfMemoryError: PermGen space" error to be display in the
Tomcat "$CATALINA_HOME/logs/catalina.out" file after
multiple ".war" files have been "auto" deployed. Manually stopping and restarting Tomcat will usually correct this issue. It is recommended to manually restart Tomcat after "auto" redeploying 2 to 4 new copies of a "
.war" file,
or when a final production version of a "track.war" file has been redeployed.
You can also increase the PermGen memory size with the "
MaxPermGen" parameter by using the
"CATALINA_OPTS" environment variable as described below:
export CATALINA_OPTS="-Xmx1024m -XX:MaxPermSize=256m"
Where "-Xmx1024m" specifies the amount of heap-memory to allocate, and
"-XX:MaxPermSize=256m" specifies the amount of PermGen-memory to allocate.
top
L.16) How do I fix Java runtime "java.lang.OutOfMemoryError: unable to create new native thread" errors? [_]
When this error is displayed, either in the Tomcat "
To fix this issue, the "max user processes" may need to be increased. The current "max user process" limit can be displayed using the "
(To get more information on this error try Googling "how to increase max user processes")
top
catalina.out" log file,
or a device communication server (DCS) log file,
it is typically due to having reached a maximum allowed user process limit on Linux.
(memory limits may also cause this error to occur. First make sure there is sufficient memory available).
This error can occur when there are many different running DCS modules, and/or a high volume of events
arrive at the server from remote devices.
This same user process limit can also cause the error "-bash: fork: Resource temporarily unavailable"
to be displayed when attempting to enter commands on the command line.
To fix this issue, the "max user processes" may need to be increased. The current "max user process" limit can be displayed using the "
ulimit -a" or "ulimit -n" Linux commands.
To increase the "max user processes", the following lines should be updated or added to the "/etc/security/limits.conf"
and "/etc/security/limits.d/90-nproc.conf" (or "/etc/security/limits.d/20-nproc.conf") files:
* soft nproc 4096
* hard nproc 4096
Tomcat and any running DCS module should then be restarted.
(To get more information on this error try Googling "how to increase max user processes")
top
L.17) How do I fix log file "Field does not exist" and "Colum 'X' not found" warnings? [_]
The "Field does not exist" and "Colum 'X' not found" warnings typically occur when a new version of the GTSE has been
installed, or a configuration change has been made to include additional table fields/columns, but the
database tables have not yet been updated to add these new fields/columns.
The following command will display any tables that have missing fields/columns.
On Linux:
On Linux:
On Linux:
If you do wish to update the tables at this time, and would like to eliminate the "Field does not exist" warning from the log files (and the missing fields are not currently needed), you can add a property, in your "
Also Rebuild/Redeploy the "
top
The following command will display any tables that have missing fields/columns.
On Linux:
$ cd $GTS_HOME $ bin/dbAdmin.pl -tablesOn Windows:
> cd %GTS_HOME% > bin\dbConfig.bat -tablesTo update the tables with the missing fields/columns, run the following command:
On Linux:
   $  cd $GTS_HOME
   $  bin/dbAdmin.pl -tables=cak
On Windows:
> cd %GTS_HOME% > bin\dbConfig.bat -tables:cakTo update only a specific table with the missing fields/columns, run the following command (replace
TABLE with the name of the actual table):On Linux:
$ cd $GTS_HOME $ bin/dbAdmin.pl -tables=cakn -tableName=TABLEOn Windows:
> cd %GTS_HOME% > bin\dbConfig.bat -tables:cakn -tableName:TABLEIn the above commands the letters provided on the "
-tables" option mean the following:
c- add missing columnsa- alter columns with changed typesk- rebuild key indicesn- update specified table only (specified with '-tableName=TABLE')
If you do wish to update the tables at this time, and would like to eliminate the "Field does not exist" warning from the log files (and the missing fields are not currently needed), you can add a property, in your "
config.conf" file
similar to the following to ignore log file errors for missing fields:
db.ignoreColumnError.TABLE_NAME.COLUMN_NAME=trueFor example, to ignore a missing
EventData column called entityType
you can add the following property setting to your "config.conf" file:
db.ignoreColumnError.EventData.entityType=trueBefore running the "
bin/dbAdmin.pl -tables=cak" described above, it is important
that you first comment/remove the "db.ignoreColumnError...." properties,
otherwise these columns may also be ignored during the DB table column update process.
Also Rebuild/Redeploy the "
track.war" file, and
restart any running DCS modules, so that these modules will also
pick up the new table column changes.
top
L.18) How do I enter command-line options on Windows? [_]
When running a command from the command-prompt on Windows, command options/value pairs must be separated
by a colon ":" character as in the following example:
top
> bin\dbConfig.bat -tables:cakNote that if the "
=" character is used to separate the option key from the value
(as in "-tables=ca'), Windows may not parse the option/value properly to send to the executing
program. (On Linux, using either the "=" or ":" separator character is acceptable).
top